Items
The Second Language Proficiency Test is adaptive. Each correct or incorrect answer affects the progression of the test, so that the respondent’s proficiency level can be determined effectively and quickly. The SLPT’s performance depends on the interaction of the platform with appropriate content that is carefully chosen, finely calibrated, associated with predefined levels of difficulty, and classified in relevant categories.
Each item added to the bank using the Editing module consists of the following:
- General instructions, presented in words and images
- One or more media (text, image, sound, video)
- A question
- Answer choices that vary according to the type of item
- Properties that allow for the classification of items (Item category, Linguistic Scale level, Task), their configuration (Allotted time to answer) and their status (Approved Item or to Recalibrate)
The Editing module includes six types of items:
- Associations
- Multiple choice
- Sequencing
- Multiple answers
- Cloze text with drag-and-drop
- Cloze text with menus
List of Items
When you access the Editing module, the default view is the Items page, which contains all of the test items in a list. This is where you can add new items, modify, duplicate, delete or print existing items, as well as preview items on the Web.
If there is a large number of elements in the list, you can navigate the pages using the commands on the right of the page, above and below the list: |
The available headings are:
- ID: System-generated identification number
- Title: Title of the item when it was created in the Editing module
- Type: Identifies the type of item from the six available types
- Category: Identifies the category of the item: oral or written comprehension
- Remark: Comment added to describe the item's content, to communicate between users in order to review, edit, or approve items, or for any other purpose required by the editor.
- Time: The duration, in seconds, allotted to the respondent to answer the question
NOTE: If the item includes sound or video, the timer starts when the media finishes playing. The Allotted time to answer should not be used to increase the level of difficulty of an item. It only serves to encourage respondents to answer as quickly as possible, without searching for the answer on the Internet or asking the opinion of others. The Allotted time to answer should be long enough for a respondent to read and answer the question, even if the respondent’s reading skills aren’t advanced. - Approved: Identifies if the item has been approved; if No, the item will not be used in the test.
- Scale: Identifies the proficiency level assigned to the item according to the linguistic scale
- Difficulty: Identifies the item's difficulty level, transmitted by an adaptive test specialist and entered by the editor or established during calibration
- Modification: Indicates the date and time that the item was last modified
Search for an Item
You can search the Items page list on the basis of keywords and/or specific criteria using the search bar located below the page header.
- Enter the text to search for in the Keywords field.
- Narrow your search parameters by selecting a value for the Field, Type, Category, and Linguistic scale lists.
- Click Find; the matching search results appear on the Items page.
- To clear the search parameters and results, click the Reset button.
The available search parameters are:
Keywords: A string of characters that may include words, numbers or a series of words and/or numbers
Field: Use the Field list to narrow the search to a specific field in the list of items. These fields were completed when the item was created or modified in the Editing module. The available fields are:
- Title
- Remark
- Instructions
- Statement
- Answer
- Multimedia
Type: Use the Type list to narrow the search to a specific item type. The type was selected when the item was created in the Editing module. The available types are:
- Associations
- Multiple choice
- Sequencing
- Multiple answers
- Cloze text with drag-and-drop
- Cloze text with menus
Category: Use the Category list to narrow the search to a specific item category. The category was selected when the item was created in the Editing module. Categories are defined in the Administration module.
Linguistic scale: Use the Linguistic scale list to narrow the search to a specific linguistic scale level. The level was selected when the item was created in the Editing module. Levels are defined in the Administration module.
Add or Modify an Item
On the Items page, you can add or modify an item. To add an item, you must select the type of item to add from the Add an item drop-down list. There are 6 available item types.
After you select an item type, you must complete the four sections of the new item's page: the first three sections apply to all item types, while some of the Content section varies according to the type of item selected.
- General Settings
- Multimedia
- Properties
- Content
|
You can always return to the Items page by clicking the Back to the items list link at the top or bottom of each page. If you don't click Save before returning to the Items page, all your changes will be lost. |
To create a new item:
- From the Items page, point to Add an item, then click from the drop-down list. The item type's page appears.
- Configure the General Settings section.
- Configure the Multimedia section.
- Configure the Properties section.
- Configure the item-specific Content section.
- When the item is complete, click the Save button.
- To see how the question will appear to a respondent, click the Web preview button; the item appears in a new tab/window.
To modify an item:
- From the Items page, click on the item you want to modify in the list; the item's page appears.
- Modify the General Settings section if required
- Modify the Multimedia section if required.
- Modify the Properties section if required.
- Modify the item-specific Content section as required.
- When the item is complete, click the Save button.
- To see how the question will appear to a respondent, click the Web preview button; the item appears in a new tab/window.
Text Editor
The text editor enables importing and editing of text and images. In the Editing module, the text editor is used as part of the Multimedia and Content sections on the item's page. In each of these sections, you can copy and paste text into the text editor.
IMPORTANT: Using the Paste plain text function (icon resembling a clipboard and notepad) allows you to copy text from another word processing application and strip it of underlying code before pasting it into the text field, thereby preventing potential problems with the way the text displays or interacts with the SLPT platform.
You can also add images using the text editor (icon resembling a canvas). If you use the text editor to insert an image, the window that appears allows you to enter text in the Texte de remplacement (alternative text) field as you would when adding an image to the Multimedia section.
Using the text editor
You can enlarge the text field as needed by clicking and dragging the bottom right corner of the field or by clicking on the last icon on the toolbar. Most of the options on the text editor's toolbar are similar to those found in other editing software:
- Bold font
- Italic font
- Superscript
- Alignment (left, centre, right)
- Text indent
- Numbered lists
- Bulleted lists
To review their functions in the Editing module, point your cursor at each option's icon.
The following editing options may be less familiar:
 |
Insert a non-breaking space at the location of the cursor in the text field |
 |
Insert a special character at the location of the cursor in the text field |
 |
Paste plain text in order to remove underlying code from another application |
 |
Display the HTML source code |
 |
Insert an image |
 |
View the text field in full screen mode |
Using the text editor to add an image
On the text editor's toolbar, click the Image button. The Propriétés de l'image window appears.
To use an image file already stored on the server:
- In the Informations sur l'image tab, click the Explorer le serveur button: a window appears.
- Scroll through the list of images stored on the server and select the desired image: the image appears in the Aperçu (preview) field of the Informations sur l'image tab.
- If necessary, adjust the image settings on the left side of the preview window.
- Click OK: the image is inserted into the text field.
To use an image file that is not stored on the server:
Using the Informations sur l'image tab
- In the Informations sur l'image tab, click the Explorer le serveur button: a window appears listing all the images stored in the images directory on the server.
- Click Envoyer at the top of the window: this opens your computer's file directory.
- Locate and double-click the image file (or use Open or Select, depending on your computer's available commands): The image is uploaded to the directory of image files on the server.
- Locate the image stored on the server and select it: the image appears in the Aperçu (preview) field of the Informations sur l'image tab.
- Click OK: the image is inserted into the text field.
Using the Envoyer tab
- In the Envoyer tab, click the Browse... button or Choisir le fichier, depending on your browser: this opens your computer's file directory.
- Locate and double-click the image file (or use Open or Select, depending on your computer's available commands).
- Click Envoyer sur le serveur: the image appears in the Aperçu (preview) field of the Informations sur l'image tab.
- Click OK: the image is inserted into the text field.
General Settings
The General Settings section applies to all item types. You can enlarge the text field as needed by clicking and dragging the bottom right corner of the field or by clicking on the last icon on the toolbar.
There are two fields that require you to enter text:
- Item title: Enter the Item title as it will appear in the Items page list. This is the title that was used by authors and specialists during the previous phase of development. It serves to connect the item in the platform with the original content. This text appears in the Title column of the Items page list.
- Remark: As needed, enter a comment in the Remark field. This field serves as a means of communication between users in order to review, edit, or approve items. This text appears in the Remark column of the Items page list.
|
You can always return to the Items page by clicking the Back to the items list link at the top or bottom of each page. If you don't click Save before returning to the Items page, all your changes will be lost. |
Multimedia
All test items, regardless of type, can include content added in the Multimedia section. ![]()
NOTE: To see all of the available multimedia fields, ensure that the white and green triangle icon in the upper right corner of the section is pointing upwards.
The available fields are:
|
You can always return to the Items page by clicking the Back to the items list link at the top or bottom of each page. If you don't click Save before returning to the Items page, all your changes will be lost. |
The Text field generally contains a passage the respondent must read in order to answer the test questions. You can copy text from any type of word processing document and paste it into the text field.
IMPORTANT: To avoid copying underlying code from another application, use the Paste plain text function available in the text editor. You may then safely apply formatting to the text using the text editor.
If you wish, you can add an image to the text field by using the text editor, but the more common method of adding images is to use the Image field situated below the text field in the Multimedia section:
To add an image
The Image field generally contains an image the respondent must view in order to answer the test questions. The image added here could be a contextual image that provides additional information to support the text or audio associated with the item. It could also be text presented in the form of an image (a poster, an advertisement, a letter, etc.).
- Click the button; the Open window appears.
- Browse to the location where the image file is saved and click Open. The file name appears beside the button.
- Enter a brief descriptive alternative text in the field below the button to describe the image. In the case of a text presented in the form of an image, enter the entire original text in the alternative text field.
NOTE: Text entered into the alternative text field isn't visible to the respondent. - To remove a selected file, click the X button.
To add a sound file
The Sound field generally contains an audio track the respondent must listen to in order to answer the test questions.
- Click the button; the Open window appears.
- Browse to the location where the sound file is saved and click Open. The file name appears beside the button.
- Enter the entire original script in the field below the button to describe the sound.
- To remove a selected file, click the X button.
To add video
The Video field generally contains a video the respondent must watch in order to answer the test questions.
- Click the button; the Open window appears.
- Browse to the location where the video file is saved and click Open. The file name appears beside the button.
- Enter a brief descriptive alternative text or the entire original script in the field below the button to describe the video.
- To remove a selected file, click the X button.
Properties
The Properties section applies to all item types. ![]()
NOTE: To see all of the available properties, ensure that the white and green triangle icon in the upper right corner of the section is pointing upwards.
Properties allow for the classification of items (Item category, Linguistic Scale level, Task), their configuration (Allotted time to answer) and their status (Approved Item or to Recalibrate).
A user can only modify properties within the limits set by their assigned role. Some properties (Item category, Linguistic Scale level, Task, Indicator, Allotted time to answer) are entered by the editor when adding items, as specified in the original documentation provided by content specialists. Difficulty levels, Discrimination and Chance are added either manually by an approver from the data provided by an adaptive test specialist following the statistical analysis of a representative sample of respondents or automatically when the TPLS administrator proceeds to calibration. The Approved item and to Recalibrate properties can only be used by an approver.
|
You can always return to the Items page by clicking the Back to the items list link at the top or bottom of each page. If you don't click Save before returning to the Items page, all your changes will be lost. |
There are ten possible properties:
- Item category: Select the item's category from the list. The categories are determined in the administration module and cannot be modified or deleted.
- Linguistic scale: Select the item's proficiency level on the linguistic scale.
- Indicator: Enter the specific indicator of the proficiency level.
- Allotted time to answer: If the question requires a time limit with a counter to be displayed during the test, select the Yes option and enter a value (in seconds) in the field. This field remains inactive until the Yes option is selected.
NOTE: If the item includes sound or video, the timer starts when the media finishes playing. The Allotted time to answer should not be used to increase the level of difficulty of an item. It only serves to encourage respondents to answer as quickly as possible, without searching for the answer on the Internet or asking the opinion of others. The Allotted time to answer should be long enough for a respondent to read and answer the question, even if the respondent’s reading skills aren’t advanced. - Difficulty, Discrimination and Chance: Only authorized persons (approval role) can add or change the value of these fields according to the specifications of an adaptive test specialist. These values can also be added automatically by the TPLS calibration process. They are primarily used for the adaptive algorithm of the test. Only approved and calibrated items (with at least one value in the Difficulty field) are used by the test in Adaptive mode.
- Recalibrate: Only authorized persons (approval role) can recalibrate items. Select the Yes option to recalibrate the item. Only approved items can be recalibrated. The item will then be recalibrated during the next calibration initiated in the administration module.
- Approved item: Only authorized persons (approval role) can approve items. Select the Yes option to approve the item. Only approved items are used in the test, whether in Adaptive or Non-adaptive mode.
- Task: n/a
Content by Type
The Content section of an item includes several fields, ![]() some of which vary according to the type of item selected. To see all of the available content fields, ensure that the white and green triangle icon in the upper right corner of the section is pointing upwards.
some of which vary according to the type of item selected. To see all of the available content fields, ensure that the white and green triangle icon in the upper right corner of the section is pointing upwards.
The first two fields are common to all types:
- Instructions: If you wish, you can enter an image or a series of images to serve as support to the written instructions in the Instructions field. In the same field, below the images, you can then enter the written instructions. The content of this field displays the general visual and written instructions at the top of each page of the test. This is the information the respondent will need in order to understand all of the information on the page.
- Statement: In the Statement field, you can enter the specific question the respondent must answer after having taken note of all of the information on the page, as prompted by the general Instructions. This field can contain both text and images.
|
You can always return to the Items page by clicking the Back to the items list link at the top or bottom of each page. If you don't click Save before returning to the Items page, all your changes will be lost. |
The other fields in the Content section vary by item type. Detailed descriptions of how to build each of the item types can be found in the following pages:
Associations
An Associations item requires that the respondent associate elements in two columns by dragging items in the column on the right to align with those in the column on the left.
To create a new Associations item:
- From the Items page, point to Add an item, then click Associations from the drop-down list. The Associations page appears.
- Configure the General Settings section.
- Configure the Multimedia section.
- Configure the Properties section.
- In the Content – Associations section, set up the Instructions:
- Add the image(s) to support the Instructions using the text editor. Align the image(s).
- Enter the general description of what the respondent must do beneath the images in the Instructions field. Align the text.
- Enter the question or task in the Statement field.
- In the Answers area, for A, enter a text in the Element field and the correct association in the Associated element field.
- Repeat step 7 for B in the Answers area.
- To add more associations, click the + button beside the Element field and repeat step 7 for each new association.
- To remove an association, click the x button beside the Element field of the association you want to remove.
- When the associations question is complete, click the Save button.
- To see how the question will appear to a respondent, click the Web preview button; the item appears in a new tab/window.
Multiple Choice
A Multiple choice item requires that the respondent answer the question or statement by selecting the correct answer from a list of possible responses.
To create a new Multiple choice item:
- From the Items page, point to Add an item, then click Multiple choice from the drop-down list. The Multiple choice page appears.
- Configure the General Settings section.
- Configure the Multimedia section.
- Configure the Properties section.
- In the Content – Multiple choice section, set up the Instructions:
Enter the question or task in the Statement field.- Add the image(s) to support the Instructions using the text editor. Align the image(s).
- Enter the general description of what the respondent must do beneath the images in the Instructions field. Align the text.
- In the Answers - Response options area, for A, enter a text or image.
- Repeat step 7 for B in the Answers - Response options area.
- To add more answer choices, click the + button beside the text/image field and repeat step 7 for each new choice.
- To remove an answer choice, click the x button beside the text/image field of the answer choice you want to remove.
- To identify the correct choice, click the option beside the correct answer.
- When the multiple choice question is complete, click the Save button.
- To see how the question will appear to a respondent, click the Web preview button; the item appears in a new tab/window.
Sequencing
A Sequencing item requires that the respondent drag the answer choices to organize them in the correct order, based on the instructions for the question.
To create a new sequencing item:
- From the Items page, point to Add an item, then click Sequencing from the drop-down list. The Sequencing page appears.
- Configure the General Settings section.
- Configure the Multimedia section.
- Configure the Properties section.
- In the Content – Sequencing section, set up the Instructions:
- Add the image(s) to support the Instructions using the text editor. Align the image(s).
- Enter the general description of what the respondent must do beneath the images in the Instructions field. Align the text.
- Enter the question or task in the Statement field.
- In the Answers - Element area, for A, enter an answer text or image.
- Repeat step 7 for B in the Answers - Element area.
- To add more answers to include in the sequence, click the + button beside the text/image field and repeat step 7 for each new sequencing answer.
- To remove a sequencing answer, click the x button beside the text/image field of the sequencing answer you want to remove.
NOTE: The order in which you add the sequence of answers is considered the correct sequence to reproduce. - When the sequencing question is complete, click the Save button.
- To see how the question will appear to a respondent, click the Web preview button; the item appears in a new tab/window.
Multiple Answers
A Multiple answers item requires that the respondent select the correct answer(s) from a list of available responses. A Multiple answers item is different from a Multiple choice item because Multiple answers can include more than one correct response, and the respondent must identify all the correct answers from the responses provided.
NOTE: In this version of the test, the Multiple answers type is not used, in order to limit the complexity of tasks to the level of the Multiple choice item type. This type of item is more appropriate for advanced students.
To create a new multiple answers item:
- From the Items page, point to Add an item, then click Multiple answers from the drop-down list. The Multiple answers page appears.
- Configure the General Settings section.
- Configure the Multimedia section.
- Configure the Properties section
- In the Content – Multiple Answers section, set up the Instructions:
- Add the image(s) to support the Instructions using the text editor. Align the image(s).
- Enter the general description of what the respondent must do beneath the images in the Instructions field. Align the text.
- Enter the question or task in the Statement field.
- In the Answers - Response options area, for A, enter an answer text or image in the text field.
- Repeat step 7 for B in the Answers - Response options area.
- To add more answer choices, click the + button beside the text/image field and repeat step 7 for each new choice.
- To remove an answer choice, click the x button beside the text/image field of the answer choice you want to remove.
- To identify the correct choices, click the check box beside each correct answer.
- When the multiple answers question is complete, click the Save button.
- To see how the question will appear to a respondent, click the Web preview button; the item appears in a new tab/window.
Cloze Text with Drag and Drop
A Cloze text with drag-and-drop item provides a sentence or paragraph containing blank spaces with all the possible answers (correct and incorrect) listed above the text. The respondent must drag words to the appropriate blank spaces to complete the sentence or paragraph.
To create a new cloze text with drag-and-drop item:
- From the Items page, point to Add an item, then click Close text with drag-and-drop from the drop-down list. The Cloze text with drag-and-drop page appears.
- Configure the General Settings section.
- Configure the Multimedia section.
- Configure the Properties section
- In the Content – Cloze text with drag-and-drop section, set up the Instructions:
- Add the image(s) to support the Instructions using the text editor. Align the image(s).
- Enter the general description of what the respondent must do beneath the images in the Instructions field. Align the text.
- Enter the question or task in the Statement field.
- In the Text field, enter the cloze text sentence or paragraph in the text field. The text field is in Rich Text Format, so you can format the text or add images if you wish using the text editor.
- To enter a blank space, click Add a gap; the Answers to the gap pop-up window appears.
- Enter the correct answer (multiple correct answers are separated by a / with no spaces), then type a + and enter the incorrect answer (multiple incorrect answers are separated by a / with no spaces).
- Click the Save button; the Answers to the gap pop-up window closes and the correct and incorrect answers appear in the text.
- Repeat steps 7 to 10 to add additional text and blank spaces with answers in the Text field.
- To edit a correct or incorrect answer for a gap, click the button containing the text; the Answers to the gap pop-up window appears, edit the answers and click the Save button.
- To remove an answer to a gap, place the cursor after the button containing the text and press the Backspace key or select and delete.
- When the cloze text question is complete, click the Save button.
- To see how the question will appear to a respondent, click the Web preview button; the item appears in a new tab/window.
Example
This procedure describes how to enter the following sentence as a cloze text question in the Text field of the Cloze text with drag-and-drop page:
The capital of Canada is Ottawa, and the Canadian national anthem is O Canada.
- In the Text field, type or paste The capital of Canada is Ottawa, and the Canadian national anthem is O Canada.
- Select Canada then click Add a gap; the Answer(s) to the gap pop-up window appears. Type Canada+America and click Save.
- Select Ottawa then click Add a gap. Type Ottawa+Toronto/Montreal/Vancouver and click Save.
- Select O Canada then click Add a gap. Type O Canada+The Star Spangled Banner/La Marseillaise/Let it Be and click Save.
The Text field looks similar to the following:

When you click Web preview, the question appears similar to the following:
IMPORTANT: Planning a cloze text with drag-and-drop is essential. Make a list of all the possible correct and incorrect answers you will use. Since all possible answers (correct and incorrect) appear above the cloze text, you do not need to provide an incorrect answer for every instance of a gap. Be especially careful not to add the same incorrect answer to multiple gaps, or you will see duplication in the answer choices, as illustrated in the following example:
The Text field in the editing module:

In the Web preview:

Cloze Text with Menus
A Cloze text with menus item provides a sentence or paragraph containing blank spaces with all the possible answers (correct and incorrect) listed in a menu. The respondent must select the correct words for the blank spaces to complete the sentence or paragraph.
To create a new cloze text with menus item:
- From the Items page, point to Add an item, then click Cloze text with menus from the drop-down list. The Cloze text with menus page appears.
- Configure the General Settings section.
- Configure the Multimedia section.
- Configure the Properties section
- In the Content – Cloze text with menus section, set up the Instructions:
- Add the image(s) to support the Instructions using the text editor. Align the image(s).
- Enter the general description of what the respondent must do beneath the images in the Instructions field. Align the text.
- Enter the question or task in the Statement field.
- In the Text field, enter the cloze text sentence or paragraph in the text field. The text field is in Rich Text Format, so you can format the text or add images if you wish using the text editor.
- To enter a blank space, click Add a gap; the Answers to the gap pop-up window appears.
- Enter the correct answer (multiple correct answers are separated by / with no spaces), then type a + and enter the incorrect answer (multiple incorrect answers are separated by a / with no spaces).
- Click the Save button; the Answers to the gap pop-up window closes and the correct and incorrect answers appear in the text.
- Repeat steps 7 to 10 to add additional text and blank spaces with answers in the Text field.
- To edit a correct or incorrect answer for a gap, click the button containing the text; the Answers to the gap pop-up window appears, edit the answers and click the Save button.
- To remove an answer to a gap, place the cursor after the button containing the text and press the Backspace key or select and delete.
- When the cloze text question is complete, click the Save button.
- To see how the question will appear to a respondent, click the Web preview button; the item appears in a new tab/window.
Example
The following procedure is an example of how to enter the following sentence as a cloze text question in the Text field of the Cloze text with menus page:
The capital of Canada is Ottawa, and the Canadian national anthem is O Canada.
- In the Text field, type or paste The capital of Canada is Ottawa, and the Canadian national anthem is O Canada.
- Select Canada then click Add a gap; the Answer(s) to the gap pop-up window appears. Type Canada+America and click Save.
- Select Ottawa then click Add a gap. Type Ottawa+Toronto/Montreal/Vancouver and click Save.
- Select O Canada then click Add a gap. Type O Canada+The Star Spangled Banner/La Marseillaise/Let it Be and click Save.
The Text field looks similar to the following:
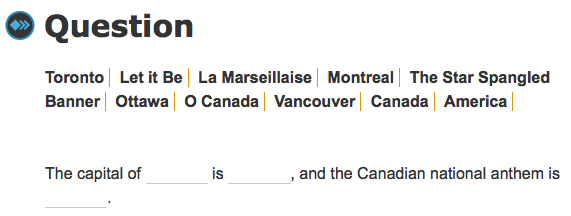
When you click Web preview, the question appears similar to the following:

Duplicate an Item
To add a new item similar to an existing item, the Duplicate function allows you to create a copy of an existing item and add it to the list of items.
To duplicate an existing item:
- From the Editing module's Items page, scroll to the item you want to duplicate and select its check box.
- Click the Duplicate link; a window appears asking you to confirm the action.
- Click OK. The new item appears at the bottom of the list with the title Question ### Duplicate (where ### is the ID number of the item you duplicated).
- Modify the duplicate item as required.
- Click Save.
NOTE: A user can only duplicate an item if their assigned role allows it.
Approve an Item
An item can only appear in the SLPT once it is approved.
To approve an item:
- From the list of items on the Editing module's Items page, click the Title of an item where No appears in the Approved column. The item's page appears.
- In the Properties section of the item's page, select the Yes option for the Approved item property.
- Click Save. The item is now approved.
NOTE: A user can only approve an item if their assigned role allows it.
Print an Item
You can print one or more items from the Items page list.
To print one or more items:
- From the list of items, select the check box for the item(s) you want to print.
- Click Print. A new window/tab appears displaying item details for the selected item(s).
- Use your browser’s Print command to send the page(s) to your printer.
Delete an Item
Delete can be used, for example, when an item appears to be dysfunctional or corrupted, or when an experimental or incorrect item has inadvertently been left in the database. Note that deleting an item removes all of its data including its ID, which can leave gaps in the numerical order of the Items list. It is therefore recommended to use deletion sparingly.
To delete one or more items:
- From the main Items page, select the check box for the item(s) you want to delete.
- Click Delete. A popup window appears asking you to confirm that you want to delete the selected item(s).
- Click OK. The item(s) is/are deleted.
NOTE: A user can only delete an item if their assigned role allows it.
Export Items to CSV
You can export all of the items in the Editing module's items list into a Comma Separated Values (CSV) file for analysis or offline reference.
To export the items to a CSV file, go to the Editing module's Items page and click Export all in CSV format. The CSV file is downloaded to your computer, containing the data for all the items in the list.
Web Preview of Items
You can preview how all the items on the Editing module's Items page will appear to a respondent, including answering the questions within the allotted times.
To preview all the items in the list:
- Click Web preview; the first question in the list appears in a new window/tab.
- Follow the instructions and answer the question.
- Click Continue to advance to the following item in the list.