Content by Type
The Content section of an item includes several fields, ![]() some of which vary according to the type of item selected. To see all of the available content fields, ensure that the white and green triangle icon in the upper right corner of the section is pointing upwards.
some of which vary according to the type of item selected. To see all of the available content fields, ensure that the white and green triangle icon in the upper right corner of the section is pointing upwards.
The first two fields are common to all types:
- Instructions: If you wish, you can enter an image or a series of images to serve as support to the written instructions in the Instructions field. In the same field, below the images, you can then enter the written instructions. The content of this field displays the general visual and written instructions at the top of each page of the test. This is the information the respondent will need in order to understand all of the information on the page.
- Statement: In the Statement field, you can enter the specific question the respondent must answer after having taken note of all of the information on the page, as prompted by the general Instructions. This field can contain both text and images.
|
You can always return to the Items page by clicking the Back to the items list link at the top or bottom of each page. If you don't click Save before returning to the Items page, all your changes will be lost. |
The other fields in the Content section vary by item type. Detailed descriptions of how to build each of the item types can be found in the following pages:
Associations
An Associations item requires that the respondent associate elements in two columns by dragging items in the column on the right to align with those in the column on the left.
To create a new Associations item:
- From the Items page, point to Add an item, then click Associations from the drop-down list. The Associations page appears.
- Configure the General Settings section.
- Configure the Multimedia section.
- Configure the Properties section.
- In the Content – Associations section, set up the Instructions:
- Add the image(s) to support the Instructions using the text editor. Align the image(s).
- Enter the general description of what the respondent must do beneath the images in the Instructions field. Align the text.
- Enter the question or task in the Statement field.
- In the Answers area, for A, enter a text in the Element field and the correct association in the Associated element field.
- Repeat step 7 for B in the Answers area.
- To add more associations, click the + button beside the Element field and repeat step 7 for each new association.
- To remove an association, click the x button beside the Element field of the association you want to remove.
- When the associations question is complete, click the Save button.
- To see how the question will appear to a respondent, click the Web preview button; the item appears in a new tab/window.
Multiple Choice
A Multiple choice item requires that the respondent answer the question or statement by selecting the correct answer from a list of possible responses.
To create a new Multiple choice item:
- From the Items page, point to Add an item, then click Multiple choice from the drop-down list. The Multiple choice page appears.
- Configure the General Settings section.
- Configure the Multimedia section.
- Configure the Properties section.
- In the Content – Multiple choice section, set up the Instructions:
Enter the question or task in the Statement field.- Add the image(s) to support the Instructions using the text editor. Align the image(s).
- Enter the general description of what the respondent must do beneath the images in the Instructions field. Align the text.
- In the Answers - Response options area, for A, enter a text or image.
- Repeat step 7 for B in the Answers - Response options area.
- To add more answer choices, click the + button beside the text/image field and repeat step 7 for each new choice.
- To remove an answer choice, click the x button beside the text/image field of the answer choice you want to remove.
- To identify the correct choice, click the option beside the correct answer.
- When the multiple choice question is complete, click the Save button.
- To see how the question will appear to a respondent, click the Web preview button; the item appears in a new tab/window.
Sequencing
A Sequencing item requires that the respondent drag the answer choices to organize them in the correct order, based on the instructions for the question.
To create a new sequencing item:
- From the Items page, point to Add an item, then click Sequencing from the drop-down list. The Sequencing page appears.
- Configure the General Settings section.
- Configure the Multimedia section.
- Configure the Properties section.
- In the Content – Sequencing section, set up the Instructions:
- Add the image(s) to support the Instructions using the text editor. Align the image(s).
- Enter the general description of what the respondent must do beneath the images in the Instructions field. Align the text.
- Enter the question or task in the Statement field.
- In the Answers - Element area, for A, enter an answer text or image.
- Repeat step 7 for B in the Answers - Element area.
- To add more answers to include in the sequence, click the + button beside the text/image field and repeat step 7 for each new sequencing answer.
- To remove a sequencing answer, click the x button beside the text/image field of the sequencing answer you want to remove.
NOTE: The order in which you add the sequence of answers is considered the correct sequence to reproduce. - When the sequencing question is complete, click the Save button.
- To see how the question will appear to a respondent, click the Web preview button; the item appears in a new tab/window.
Multiple Answers
A Multiple answers item requires that the respondent select the correct answer(s) from a list of available responses. A Multiple answers item is different from a Multiple choice item because Multiple answers can include more than one correct response, and the respondent must identify all the correct answers from the responses provided.
NOTE: In this version of the test, the Multiple answers type is not used, in order to limit the complexity of tasks to the level of the Multiple choice item type. This type of item is more appropriate for advanced students.
To create a new multiple answers item:
- From the Items page, point to Add an item, then click Multiple answers from the drop-down list. The Multiple answers page appears.
- Configure the General Settings section.
- Configure the Multimedia section.
- Configure the Properties section
- In the Content – Multiple Answers section, set up the Instructions:
- Add the image(s) to support the Instructions using the text editor. Align the image(s).
- Enter the general description of what the respondent must do beneath the images in the Instructions field. Align the text.
- Enter the question or task in the Statement field.
- In the Answers - Response options area, for A, enter an answer text or image in the text field.
- Repeat step 7 for B in the Answers - Response options area.
- To add more answer choices, click the + button beside the text/image field and repeat step 7 for each new choice.
- To remove an answer choice, click the x button beside the text/image field of the answer choice you want to remove.
- To identify the correct choices, click the check box beside each correct answer.
- When the multiple answers question is complete, click the Save button.
- To see how the question will appear to a respondent, click the Web preview button; the item appears in a new tab/window.
Cloze Text with Drag and Drop
A Cloze text with drag-and-drop item provides a sentence or paragraph containing blank spaces with all the possible answers (correct and incorrect) listed above the text. The respondent must drag words to the appropriate blank spaces to complete the sentence or paragraph.
To create a new cloze text with drag-and-drop item:
- From the Items page, point to Add an item, then click Close text with drag-and-drop from the drop-down list. The Cloze text with drag-and-drop page appears.
- Configure the General Settings section.
- Configure the Multimedia section.
- Configure the Properties section
- In the Content – Cloze text with drag-and-drop section, set up the Instructions:
- Add the image(s) to support the Instructions using the text editor. Align the image(s).
- Enter the general description of what the respondent must do beneath the images in the Instructions field. Align the text.
- Enter the question or task in the Statement field.
- In the Text field, enter the cloze text sentence or paragraph in the text field. The text field is in Rich Text Format, so you can format the text or add images if you wish using the text editor.
- To enter a blank space, click Add a gap; the Answers to the gap pop-up window appears.
- Enter the correct answer (multiple correct answers are separated by a / with no spaces), then type a + and enter the incorrect answer (multiple incorrect answers are separated by a / with no spaces).
- Click the Save button; the Answers to the gap pop-up window closes and the correct and incorrect answers appear in the text.
- Repeat steps 7 to 10 to add additional text and blank spaces with answers in the Text field.
- To edit a correct or incorrect answer for a gap, click the button containing the text; the Answers to the gap pop-up window appears, edit the answers and click the Save button.
- To remove an answer to a gap, place the cursor after the button containing the text and press the Backspace key or select and delete.
- When the cloze text question is complete, click the Save button.
- To see how the question will appear to a respondent, click the Web preview button; the item appears in a new tab/window.
Example
This procedure describes how to enter the following sentence as a cloze text question in the Text field of the Cloze text with drag-and-drop page:
The capital of Canada is Ottawa, and the Canadian national anthem is O Canada.
- In the Text field, type or paste The capital of Canada is Ottawa, and the Canadian national anthem is O Canada.
- Select Canada then click Add a gap; the Answer(s) to the gap pop-up window appears. Type Canada+America and click Save.
- Select Ottawa then click Add a gap. Type Ottawa+Toronto/Montreal/Vancouver and click Save.
- Select O Canada then click Add a gap. Type O Canada+The Star Spangled Banner/La Marseillaise/Let it Be and click Save.
The Text field looks similar to the following:

When you click Web preview, the question appears similar to the following:
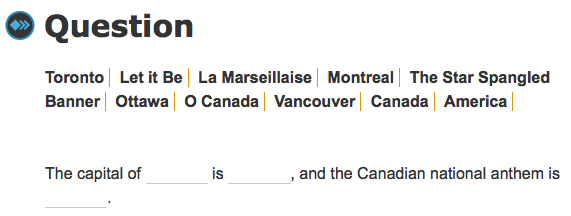
IMPORTANT: Planning a cloze text with drag-and-drop is essential. Make a list of all the possible correct and incorrect answers you will use. Since all possible answers (correct and incorrect) appear above the cloze text, you do not need to provide an incorrect answer for every instance of a gap. Be especially careful not to add the same incorrect answer to multiple gaps, or you will see duplication in the answer choices, as illustrated in the following example:
The Text field in the editing module:

In the Web preview:

Cloze Text with Menus
A Cloze text with menus item provides a sentence or paragraph containing blank spaces with all the possible answers (correct and incorrect) listed in a menu. The respondent must select the correct words for the blank spaces to complete the sentence or paragraph.
To create a new cloze text with menus item:
- From the Items page, point to Add an item, then click Cloze text with menus from the drop-down list. The Cloze text with menus page appears.
- Configure the General Settings section.
- Configure the Multimedia section.
- Configure the Properties section
- In the Content – Cloze text with menus section, set up the Instructions:
- Add the image(s) to support the Instructions using the text editor. Align the image(s).
- Enter the general description of what the respondent must do beneath the images in the Instructions field. Align the text.
- Enter the question or task in the Statement field.
- In the Text field, enter the cloze text sentence or paragraph in the text field. The text field is in Rich Text Format, so you can format the text or add images if you wish using the text editor.
- To enter a blank space, click Add a gap; the Answers to the gap pop-up window appears.
- Enter the correct answer (multiple correct answers are separated by / with no spaces), then type a + and enter the incorrect answer (multiple incorrect answers are separated by a / with no spaces).
- Click the Save button; the Answers to the gap pop-up window closes and the correct and incorrect answers appear in the text.
- Repeat steps 7 to 10 to add additional text and blank spaces with answers in the Text field.
- To edit a correct or incorrect answer for a gap, click the button containing the text; the Answers to the gap pop-up window appears, edit the answers and click the Save button.
- To remove an answer to a gap, place the cursor after the button containing the text and press the Backspace key or select and delete.
- When the cloze text question is complete, click the Save button.
- To see how the question will appear to a respondent, click the Web preview button; the item appears in a new tab/window.
Example
The following procedure is an example of how to enter the following sentence as a cloze text question in the Text field of the Cloze text with menus page:
The capital of Canada is Ottawa, and the Canadian national anthem is O Canada.
- In the Text field, type or paste The capital of Canada is Ottawa, and the Canadian national anthem is O Canada.
- Select Canada then click Add a gap; the Answer(s) to the gap pop-up window appears. Type Canada+America and click Save.
- Select Ottawa then click Add a gap. Type Ottawa+Toronto/Montreal/Vancouver and click Save.
- Select O Canada then click Add a gap. Type O Canada+The Star Spangled Banner/La Marseillaise/Let it Be and click Save.
The Text field looks similar to the following:
When you click Web preview, the question appears similar to the following:
