The SLPT Administration Module
The SLPT is a test that evaluates an individual's proficiency in oral and written comprehension of a second language. The platform includes four modules:
- Administration: For CCDMD personnel to configure and administer the test. The administrator can also access a subscriber's Management module and provide assistance if required.
- Management: Where subscribers manage their individual accounts
- Editing: Used to create and modify the content of the proficiency test
- Test: The actual test module where respondents answer the questions
Logging In
The person responsible for the SLPT at the CCDMD communicated your username and password to you.
To login to the SLPT Administration module:
- For the English test, open a browser connected to the Internet and go to the following address: http://www.tpls.ca/admin_slpt For the French test, open a browser connected to the Internet and go to the following address: http://www.tpls.ca/admin_tpls. You can also use your email address instead of your username.
- The Administration module Login page appears.
- Type the username or registered email address in the Username or email field.
- Type the password in the Password field.
NOTE: If you enter the username or password incorrectly, a message appears that the information is invalid. Re-enter the username and password to try again. If you have forgotten your username or password, click on Lost username or password? and follow the instructions. - Click Login. The Administration module opens to the Subscriptions page by default. The main menu on the left displays the other options. If you need help, click on Help in the page header.
Change my Password
You can change the password for your account through your user profile.
To change your password:
- When logged into the SLPT platform, place your cursor over your name in the page header.
- Select My account from the drop-down list. The User page appears.
- Scroll to the Account Profile section.
- Type the new password in the Password field.
NOTE: Passwords are case-sensitive, must be at least 8 characters long, and contain at least one letter and one number. - Re-type the new password in the Confirm the password field.
- Click Save.
The new password takes effect on your next login.
Change the Display Language
You can change the display language for the SLPT interface. The default language is defined in your user profile. You can change the interface language for a single session, or change the language preference in your user profile. The available language options are French or English.
To change the interface language for a single session:
- When logged into the SLPT platform, scroll to the bottom of a page.
- In the Language column, select the language you wish to use.
To change the language preference in your user profile:
- When logged into the SLPT platform, place your cursor over your name in the page header.
- Select My account from the drop-down list. The User page appears.
- Scroll to the Account Profile section.
- Select the new default language from the Language drop-down list.
- Click Save.
Edit my Account
You can edit your account settings through your user profile.
To change your account settings:
- When logged into the SLPT platform, place your cursor over your name in the page header.
- Select My account from the drop-down list. The User page appears.
- Edit the desired account settings.
- Click Save.
Using Online Help
- You can access the SLPT online help by clicking the Help link in the header of every SLPT page.
- The topics for the Administration module help appear on the left side of the window. Click on a subject link to view the related help information.
- At the bottom of each help page are links to the previous and next pages; the link in the middle takes you back to the top of the page.
- You can print the current help topic by clicking on the Printer-friendly version link at the bottom of the page. A new window or tab appears displaying the help topic; use your browser's Print command to send the page(s) to your printer.
- You can change the display language for the help by choosing a different language in the page header.
Logging Out
When you are done working in the SLPT platform, you need to log out to end your session.
To log out:
- When logged into the SLPT platform, scroll to the top of a page.
- Place the cursor over your name in the header and select Logout from the drop-down list.
Subscriptions
The Subscriptions menu allows the administrator to view, add to, edit, or delete from the list of subscribers, as well as prepare the invoicing and access a subscriber's Management module if required.
An institution must have a valid subscription in order for their users to manage their account on the SLPT platform, as well as for the respondents to be able to take their second language proficiency test. For each registered institution, a designated manager is the point of contact for the administrator, whether dealing with invoicing or account settings.
Subscription settings are entered and modified by the administrator, but some settings can also be modified by the manager in the Management module.
Subscriptions List
When you access the Administration module’s Subscriptions page, all of the registered subscribers appear in a list.
If there is a large number of elements in the list, you can navigate the pages using the commands on the right of the page, above and below the list: |
To consult the list of subscriptions:
- ID: System-generated identification number
- Subscriber: The institution name assigned to the subscriber by the administrator when the subscription was created
- Manager: The name of the subscription manager
- Phone: The subscription manager's telephone number
- Cost: The cost per respondent who completes the test as entered by the administrator according to CCDMD rates
- Start: The date at which the subscription began
- End: The date at which the subscription ends
- Status: The status of the subscription, Active or Blocked
Add or Modify a Subscription
Institutions that wish to use the SLPT platform must have a Subscription in order to be able to access the platform and administer tests. Each subscription has a manager, who is the contact person that the CCDMD communicates with about billing and platform maintenance. The manager can modify some of their subscription information in the Management module.
To add a subscription:
- Click Subscriptions in the left-side menu; the Subscriptions window appears.
- Click Add a subscription; the Subscription window appears.
In the following sections, add all obligatory information marked with a red asterisk.
To modify a subscription:
- Click Subscriptions in the left-side menu; the Subscriptions window appears.
- Click a subscriber name; the Subscription page appears.
- Modify the information in the General Settings, Manager Profile, or Institution sections as required.
- Click Save. The subscriber information is updated.
General Settings
Only the administrator can add or modify the General Settings. The information is nevertheless available for consultation on the Subscription page in the Management module of each subscriber.
- In the General Settings area, select the subscription Status: Active or Blocked. The default value when creating a new subscription is Active. A blocked subscriber will not be able to access the platform.
- Select the Notification status, Yes or No. The default value when creating a new subscription is Yes. When you enable the Notification option, the subscription manager receives emails about the account, including the username and password, and any relevant platform-related updates. Select No if you do not want to send an email, which is the default value for a subscription during modification.
- Select the Subscription Start date from the date lists. This is the date at which the subscriber can begin administering tests.
- Select the Subscription End date from the date lists. This is the date at which the subscriber will no longer be able to administer tests. The default setting for the subscription period is one year.
NOTE : If the manager attempts to access the Management module at a time that is not included in the subscription, a message to contact the CCDMD will appear. If a respondent attempts to access the test at a time that is not included in the subscription, a message prepared by the manager in the Settings of the Management module will appear. - In the Cost per respondent field, enter the fee for each test. The fee is set by the CCDMD administration and reviewed periodically.
Manager Profile
The administrator creates the Manager Profile to facilitate invoicing. The profile can nevertheless be modified by the manager on the Subscription page of the Management module.
- In the Manager Profile area, enter a subscriber username in the username field. The username can be a name or an alphanumeric code that is case-sensitive.
- Enter the First Name, Last Name and Email address in the appropriate fields.
- Type a temporary password in the Password field; the manager will have to change it when logging in for the first time.
NOTE: Passwords are case-sensitive , must be at least 8 characters long, and contain at least one letter and one number. - Re-type the password in the Confirm the password field.
- You can also enter the optional title, telephone, and language information (if known) in the appropriate fields. The Language field determines the default language of the platform interface when the manager logs in. The manager can change the platform’s default language and the First Name, Last Name, Email address and Telephone in the Management module.
Institution
The administrator adds the Institution information. Some of this information can be modified by the manager on the Subscription page of the Management module, with the exception of the institution name and service.
- Enter the Institution Name for the subscription that serves primarily for invoicing.
- Enter the Department for the subscription. Since it is possible for there to be more than one subscription per institution, this field allows them to be organized accordingly.
- Enter the institution’s Address information into the appropriate fields (No., Street, City, Postal Code, Country, Province/State/Department). The manager can modify this information on the Subscription page of the Management module.
- Click Save; the subscription is added.
Access a Subscriber's Management Module
The administrator can access the Management module of a subscriber and use all of its functions if necessary.
To access the Management module of a subscriber:
- Click Subscriptions from the left-side menu; the Subscriptions window appears.
- In the list of subscribers, select the check box for the subscriber whose Management module you wish to access.
- Click Access the management module; the main page (Groups) of the subscriber's Management module opens.
- Make the necessary modifications to the subscription, then click Save.
You can also consult the Help for the Management module.
Block or Grant Access
Only the administrator can grant or block access to the SLPT platform. If a subscriber's access is Blocked, a message will appear telling them to contact CCDMD when they try to log in.
To block or grant access to a subscriber:
- Click Subscriptions in the left-side menu; the Subscriptions window appears.
- Click the desired subscriber name; the Subscription page appears.
- Scroll to the General Settings section.
- Select the desired subscription Status:
Active: The subscriber will be able to access the platform.
Blocked: The subscriber will no longer be able to access the platform. - Click Save. The subscriber's status is updated. A message is sent to the manager if you have selected Yes in the Send Notification setting.
Extend a Subscription
Only the administrator can modify the Subscription start and end dates. To extend a subscription, the end date must be modified.
To extend a subscription:
- Click Subscriptions in the left-side menu; the Subscriptions window appears.
- Click a subscriber name; the Subscription page appears.
- In the General Settings section, select a new subscription end date using the Subscription End lists.
- Click Save. The subscriber information is updated.
Send Email to a Subscriber
The administrator can contact a subscription manager to inform them of system-related subjects, such as system downtime, that an invoice has been created, that a password has been reset, or more. The administrator can contact a single subscriber or many at the same time.
To email one or more subscribers:
- From the main Subscriptions page, select the check box for the desired subscriber(s).
- Click Send an email. The default email program opens.
NOTE: The name(s) and email address(es) of the subscriber(s) are automatically entered into the Bcc field (Blind carbon copy) and the sender's name and address are entered into the To field. As a result, subscribers do not see each other's coordinates and the administrator receives a copy of all communications. - Write the message and send it to the subscriber(s).
Invoice a Subscriber
After a subscriber’s respondents complete the test, the administrator prepares invoices for some or all of the respondents who have completed the test.
To create an invoice:
- From the main Subscriptions page, select the check box for the desired subscriber.
- Click Access the invoicing history. The subscriber’s Invoicing page appears.
- Select the respondent(s) whose invoice you want to create in the List of non-invoiced respondents.
- Click Create an Invoice.
- Check the accuracy of the information, then click Send the invoice by email and add to the history. The invoice is sent to the Invoicing email (as entered on the Settings page) so that it can then be forwarded to the subscription manager.
To consult the invoicing history for a subscription:
- In the Invoicing page, consult the Invoicing History (at the bottom of the page) on-screen or by printing one or more invoices.
To print an invoice:
- In the Invoicing page, consult the Invoicing History (at the bottom of the page).
- Select the check box(es) for the respondent(s) whose invoice(s) you want to print. To print all of the invoices, select the check box in the column header. The invoices are prepared for printing.
- Use your browser’s Print command to send the page(s) to your printer.
Delete a Subscriber
When the administrator deletes a subscription, the status for the subscription changes to Blocked in the General Settings. The groups and results associated with the subscription are deleted from the interface. However, for statistical purposes, respondent results are preserved anonymously in the Archives, and previously created invoices are kept in the Invoicing History.
To delete one or more subscriptions:
- From the main Subscriptions page, select the check box for the subscription(s) you want to delete.
- Click Delete. A popup window appears asking you to confirm that you want to delete the selected subscription(s).
IMPORTANT: Before deleting a subscription, ensure that you have created invoices for all respondents who have taken the test. - Click OK. The subscription(s) is/are deleted.
Users
The User menu allows the administrator to consult the list of users, add, modify, and delete user accounts, or send a message to one or more users.
Users are defined as CCDMD resources who can access the Editing module to compose and assemble the items that make up the test. Depending on the resource's tasks, the Administrator assigns one of the three following roles to a user:
- Editing
- Approval
- Observation
A fourth role, Administration, is reserved for the user who administers the SLPT platform.
Users List
When you access the Administration module’s Users page, all of the registered users appear in a list.
If there is a large number of elements in the list, you can navigate the pages using the commands on the right of the page, above and below the list: |
To consult the list of users:
- ID: System-generated identification number
- Last Name: The user's last name
- First Name: The user's first name
- Email: The user's email address
- Phone: The user's telephone number
- Role: The assigned role for the user when using the Editing module
- Status: The status of the user, Active or Blocked
Add or Modify a User
The User page contains the user's contact information and account configuration. Some of this information can be modified by the user in the Account Profile section of the Editing module.
To add a new user:
- Click Users from the left-side menu; the Users window appears.
- Click Add a user; the User window appears.
In the following sections, add all obligatory information marked with a red asterisk.
To modify a user:
- Click Users from the left-side menu; the Users window appears.
- Click a user name; the User page appears.
- Modify the information in the General Settings or Account Profile sections as required.
- Click Save. The user account information is updated.
General Settings
Only the administrator can add or modify the General Settings.
- In the General Settings area, select the user Status, Active or Blocked. The default value when creating a new user is Active. A blocked user will not be able to access the platform. and receives a message to contact the CCDMD.
- Select the Notification status, Yes or No. The default value when creating a new user is Yes. When you enable the Notification option by selecting Yes, the user receives emails about their account, including username, password and any relevant platform-related updates. The default value when modifying a user's account is No.
- Select the desired user role from the Role list.
Assign a Role to a User
Users have roles that define their access rights and permissions. When creating a user, the administrator must assign that user a role. There are four types of user roles:
- Administration: Can access the SLTP Administration and Editing modules with the same username and password. Can also access individual subscriber Management modules through a link in the Administration module.
- Approval: Can access the Editing module and perform all operations within the module.
- Observation: Can access the Editing module and perform all operations within the module except duplicating or saving an item.
- Editing: Can access the Editing module and perform all operations within the module except modifying the following properties: Difficulty, Discrimination, Chance, Recalibrate, Approved item.
To set or modify a user's role:
- Click Users from the left-side menu; the Users window appears.
- For a new user, click Add a user and define the user's role.
- For an existing user, click the user name whose role you want to change; the User page appears.
- In the General Settings section, select a new role from the Role list.
- Click Save. The user account information is updated.
Account Profile
The administrator creates the Account Profile to give a user access to the Editing module. The profile can nevertheless be modified by the user on the User page of the Editing module.
- In the Account Profile area, enter a username in the username field. The username can be a name or an alphanumeric code that is case-sensitive.
- Enter the First Name, Last Name, and Email address in the appropriate fields.
- Type a temporary password in the Password field; the representative will have to change it when they log in for the first time.
NOTE: Passwords are case-sensitive, must be at least 8 characters long, and contain at least one letter and one number. - Re-type the password in the Confirm the Password field.
- You can also enter the optional title, telephone, and language information (if known) in the appropriate fields.
NOTE: The Language field determines the default language of the platform interface when the user logs in. The user can change the platform’s default language by selecting My account below their name at the top right of the window when they are logged into the system. - Click Save.
Block or Grant Access
Only the administrator can grant or block access to the SLPT platform. If a user's access is Blocked, a message will appear telling them to contact CCDMD when they try to log in.
To block or grant access to a user:
- Click Users in the left-side menu; the Users window appears.
- Click the desired user name; the User page appears.
- Scroll to the General Settings section.
- Select the desired user Status:
Active: The user will be able to access the platform.
Blocked: The user will no longer be able to access the platform. - Click Save. The user's status is updated. A message is sent to the user if you have selected Yes in the Send Notification setting.
Send Email to a User
- From the main Users page, select the check box for the desired user(s).
- Click Send an email. The default email program opens with the selected user(s) email address in the TO field.
NOTE: The name(s) and email address(es) of the user(s) are automatically entered into the Bcc field (Blind carbon copy) and the sender's name and address are entered into the To field. As a result, users do not see each other's coordinates and the administrator receives a copy of all communications. - Write the message and send it to the user(s).
Delete a User
When the administrator deletes a user, only the user account information is deleted from the database. Edited items are preserved as there is no connection between them and the user who created them.
To delete one or more users:
- From the main Users page, select the check box for the user(s) you want to delete.
- Click Delete. A popup window appears asking you to confirm that you want to delete the selected user(s).
- Click OK. The user(s) is/are deleted.
Item Categories
The Categories menu allows the administrator to add, modify or delete categories. Up to four categories can be created, but only two categories are used in the current version: ORAL COMPREHENSION and WRITTEN COMPREHENSION. Editing module users associate each item with one of the categories. During the test, the SLPT presents an equal number of items in each category so that the respondent's global proficiency and proficiency by category can be determined.
To add or edit a category:
- Scroll to a category field.
- Add or modify the text in the Title field.
IMPORTANT: Once a category has been created, you can edit the text in the Title field, but you should absolutely avoid exchanging one category for another or deleting the title of a category to reuse it with another category. In the Editing module, the items are associated with the category number, not the title. - Add or modify the category description in the Presentation Text of the Category field. There is no risk in modifying this text as it is for the administrator's informational purposes only.
- Click Save; the category title is updated and applies to all new items and previously created items that used the old title.
To delete a category:
- Scroll to a category and delete the text in the Title field. When you click Save, the category is removed.
Settings
The Settings menu allows the administrator to configure the test. Certain settings are general, while others allow the administrator to configure the parameters of the Adaptive and Non-adaptive test modes.
On the Settings page, you can:
- Activate the test
- Configure the test in Adaptive mode
- Configure the test in Non-adaptive mode
- Disable the test
Activate the Test
In the General Settings, the Status setting activates or disables the test. For a respondent to take the SLPT:
- The test status must be Active
- The status of the group that the respondent is assigned to must be Active (valid password and test period)
- The group's institution must have a valid and Active subscription
- If the test is non-adaptive, it must contain at least one approved item
- If the test is adaptive, it must contain at least one calibrated item (Approved item set to Yes with a value in the Difficulty field)
If the status of the test, the group, or the subscription is set to Blocked, respondents will not be able to log into the Testing module.
To configure the general settings of a test:
- In the General Settings section, make sure that the Status option is Active.
- Confirm that the address in the Invoicing email field is the person responsible for sending invoices to the subscribers.
- In the Test presentation text field, enter the test presentation text that appears when a respondent connects to the Testing module. This text presents the general guidelines of the test.
- Select whether the test is adaptive or non-adaptive by clicking the appropriate Adaptive test option: Yes or No. The default value is No. The type of test selected determines the testing mode for all respondents.
- To continue configuring the test, go to the help section that represents the option selected in step 4:
You can enlarge the text field as needed by clicking and dragging the bottom right corner of the field. All text fields are accompanied by an editing toolbar. Most of the options are similar to those found in other editing software. To view their functions, point your cursor at each option's icon.
The following editing options may be less familiar:
 |
Insert a non-breaking space at the location of the cursor in the text field |
 |
Insert a special character at the location of the cursor in the text field |
 |
Paste plain text in order to remove underlying code from another application |
 |
Display the HTML source code |
 |
Insert an image |
 |
View the text field in full screen mode |
Configure the Test in Adaptive Mode
The administrator can set the test to Adaptive mode when informed that a sufficient number of items in the database are calibrated. Generally, this follows an experimental phase in Non-adaptive test mode and statistical analysis of data by an evaluation specialist, which allows the difficulty levels of previously approved items to be entered manually in the Editing module.
The administrator sets the test to Adaptive test mode by selecting Yes in the Adaptive test field of the Settings page.
To configure an adaptive test:
![]() Ensure that the white triangle in the green circle icon is pointing toward the top
Ensure that the white triangle in the green circle icon is pointing toward the top
NOTE: Once the Settings have been saved, the modality section of the selected test (Adaptive or Non-adaptive) deploys automatically (white triangle pointing toward the top).
- In the Welcome text field, type the text that is to appear on the welcome page for an adaptive mode test.
- Click the button to browse and select the Welcome sound that plays when a respondent clicks the You must click here to listen to the instructions link on the test's welcome page. You can preview the sound by clicking on the file name's link.
NOTE: A different Welcome sound may be required depending on the current test mode. You must therefore add the correct audio file separately on the Settings page of each specific mode, adaptive or non-adaptive. - In the End text field, type the text that is to appear by default when a respondent completes the test. The manager can customize the End text using the Management module's Settings menu; this change applies only to the subscriber's groups.
- In the Cut scores section, enter the level values in the Linguistic scale column and the corresponding results ranges in the Proficiency level (theta) column. The values entered for the Linguistic scale column should be defined by a qualified second language specialist, while the Proficiency level (theta) column should be provided by a second language evaluation specialist who has analyzed a sampling of respondent test results in non-adaptive mode.
- Enter a value in the Maximum number of items in a category field (the recommended setting is between 70 and 100); this value sets the stop conditions (maximum number of questions) for an adaptive test in the event that the algorithm is unable to determine the respondent's proficiency level.
- In the Error margin tolerance field, enter the value transmitted by an adaptive test evaluation specialist. This value is used in the adaptive algorithm.
- Enter 2 or 3 in the Number of items to calibrate per category field; this value determines the number of approved items presented to respondents with the goal of calibrating the items.
- Enter a value greater than 100 in the Number of records required for calibration field; this value determines the number of respondent answers to a specific item for it to be approved and ready to be calibrated.
- Click Save.
You can enlarge the text field as needed by clicking and dragging the bottom right corner of the field. All text fields are accompanied by an editing toolbar. Most of the options are similar to those found in other editing software. To view their functions, point your cursor at each option's icon.
The following editing options may be less familiar:
|
Insert a non-breaking space at the location of the cursor in the text field |
|
Insert a special character at the location of the cursor in the text field |
|
Paste plain text in order to remove underlying code from another application |
|
Display the HTML source code |
|
Insert an image |
|
View the text field in full screen mode |
Configure the Test in Non-adaptive Mode
Generally, it is after an experimental phase in Non-adaptive test mode and statistical analysis of data by an evaluation specialist that the difficulty levels of previously approved items can be manually entered in the Editing module.
The test therefore remains in Non-adaptive mode (No in the Adaptive test field of the Settings page) until such time as the administrator is informed that a sufficient number of items in the database have been calibrated.
To configure a non-adaptive test:
![]() Ensure that the white triangle in the green circle icon is pointing toward the top
Ensure that the white triangle in the green circle icon is pointing toward the top
NOTE: Once the Settings have been saved, the modality section of the selected test (Adaptive or Non-adaptive) deploys automatically (white triangle pointing toward the top).
- In the Welcome text field, type the text that is to appear on the welcome page for a non-adaptive mode test.
- Click the button to browse and select the Welcome sound that plays when a respondent clicks the You must click here to listen to the instructions link on the test's welcome page. You can preview the sound by clicking on the file name's link.
NOTE: A different Welcome sound may be required depending on the current test mode. You must therefore add the correct audio file separately on the Settings page of each specific mode, adaptive or non-adaptive. - In the End text field, type the text that is to appear by default when a respondent completes the test. The manager can customize the End text using the Management module's Settings menu; this change applies only to the subscriber's groups.
- Click Save.
You can enlarge the text field as needed by clicking and dragging the bottom right corner of the field. All text fields are accompanied by an editing toolbar. Most of the options are similar to those found in other editing software. To view their functions, point your cursor at each option's icon.
The following editing options may be less familiar:
|
Insert a non-breaking space at the location of the cursor in the text field |
|
Insert a special character at the location of the cursor in the text field |
|
Paste plain text in order to remove underlying code from another application |
|
Display the HTML source code |
|
Insert an image |
|
View the text field in full screen mode |
Disable the Test
In the General Settings, the Status setting activates or disables the test. For a respondent to take the SLPT:
- The test status must be Active
- The status of group that the respondent is assigned to must be Active (valid password and test period)
- The group's institution must have a valid and Active subscription
- If the test is non-adaptive, it must contain at least one approved item
- If the test is adaptive, it must contain at least one calibrated item (Approved item set to Yes with a value in the Difficulty field)
If the status of the test, the group, or the subscription is set to Blocked, respondents will not be able to log into the Testing module.
To disable a test:
- In the General Settings section, select the Status option Blocked.
- Click Save.
NOTE: For respondents to gain access to the test again, the Status must be Active.
Calibration
The Calibration menu allows the administrator to periodically calibrate new, approved items from the database of items created in the Editing module. Calibrating an item means that it is assigned a difficulty level (between -3 and +3). Contained within the SLPT platform is a function that determines an item's statistical difficulty level after a sufficient number of respondents have answered the question.
The Calibration of the items list includes the unique identifier (ID code) of all approved (but uncalibrated) items, as well as the Number of respondents to have answered the question.
To calibrate approved items:
- Click the Calibrate link.
- After calibration, the list of items disappears and their assigned Difficulty level appears in each item's Properties section in the Editing module.
Archives
The Archives menu displays the anonymized results of all respondents. After a respondent completes their test, a copy of the results and the demographic information (excluding the respondent's name) is saved to the archives. Subscriptions, groups, respondents and results can be deleted from other sections of the platform without affecting the archives, where all results are stored.
In the Archives page, you can:
- Review the list of test respondents
- View individual respondent results
- Print results
- Delete results
- Export the results to a CSV file
Respondents List
When you access the Administration module’s Archives page, all of the registered respondents who have completed the test appear in a list. This list includes test results, as well as data entered by respondents on the Testing module's home page.
By default, the list displays all of the respondents' results.
If there is a large number of elements in the list, you can navigate the pages using the commands on the right of the page, above and below the list: |
To consult the Respondents List:
From the Subscriber drop-down list, choose the subscriber or department for which you want to consult the results.
NOTE: You can display all respondents for a subscriber or the respondents for a specific department by selecting either the subscriber name or the subscriber name/department name from the list.
The list contains the following fields:
- Username: Respondent username as assigned by the manager when the respondent's group was created
Information entered by the respondent on the TPLS home page
- Sex
- Language spoken at home
- Self-assessment
System-generated information
- Subscriber: The name of the institution to which the respondent is assigned
- Test end: The date and time when the test was completed
- Global result: The global result ranging from 1 to 10+ as calculated by the adaptive test for all categories combined
- Proficiency level: The respondent's proficiency level as determined by the adaptive test for all categories combined
Individual Respondent Results
Using the Respondents List, you can consult the detailed results for each respondent, including the global result, results by category and results for each of the items presented to the respondent during the test.
To view an individual respondent’s results:
Click the respondent's username in the Respondents List; the Respondent’s results page appears, including the respondent's demographic information, followed by results and a list of items presented during the test.
The demographic information includes:
- Username: Respondent identification number as assigned by the manager when the respondent's group was created
- Subscriber: The respondent's institution
Information entered by the respondent on the TPLS home page
- Sex
- Language spoken at home
- Self-assessment of English level
System-generated information
Test end: The date when the test was completed
|
The default list sorting method is by the order of items presented to the respondent in the test (column #). It can be changed by clicking the name of the column you wish to sort in the header. The list may be sorted in ascending or descending order by clicking the column name in the header to change the order. |
Respondent results
- Global result: The global theta ranging from -3 to +3 as calculated by the adaptive test for all categories combined ; global x/y for a non-adaptive test
MPORTANT: If the subscriber's institution is participating in the validation of a non-adaptive test, the results are represented not as theta or linguistic scale level, but as the number of correct versus incorrect responses x/y, for example 7/10. - Result for each category: Theta for this category as calculated by the adaptive test ranging from -3 to +3 ; category x/y for a non-adaptive test
- Global linguistic scale: The respondent's linguistic scale as determined by the system in evaluating the cut scores and the theta results ; -- for a non-adaptive test
- Linguistic scale for each category: Linguistic scale level estimated by the system through a comparison of the respondent's theta for this category with the cut scores ; -- for a non-adaptive test
List of items presented to the respondent :
- #: The number representing the order in which the items were presented to the respondent
- ID: System-generated item identification number
- Category: The item's assigned category
- Answer: The respondent's result to the question; 0 red=incorrect answer, 1 green=correct answer
- Time to answer (s): The time, measured in seconds, that the respondent took to answer the question
- Provisional result (theta): The theta result as calculated by the system as the adaptive test progressed. The theta result is provisional until it is calculated conclusively at the end of the test ; -- for a non-adaptive test
Print results
The administrator can print results for a single respondent or for multiple respondents.
To print one or more archived respondent results:
- If necessary, select the subscriber from the Subscriber drop-down list for which you want to print respondent results.
- In the Respondents List, select the check box for the respondent(s) whose results you want to print.
- Click Print.
- A new window/tab appears displaying the detailed results of the selected respondent(s). Use your browser’s Print command to send the page(s) to your printer.
Delete results
The administrator can delete results for one or more respondents.
To delete the archived results for one or more respondents:
- If necessary, select the subscriber from the Subscriber drop-down list for which you want to print respondent results.
- In the Respondents List, select the check box for the respondent(s) whose results you want to delete.
- Click Delete. A popup window appears asking you to confirm that you want to delete the selected respondent(s).
- Click OK. The archived respondent(s) is/are deleted.
NOTE : The archived results for the respondents are deleted from the database, but their recorded results remain visible in the subscriber's Management module.
Export the Data
The administrator can export results for all respondents, for some respondents, for a subscription or for a select number of respondents in a specific subscription. The results are exported to a Comma Separated Value (CSV) file for analysis.
The CSV file may include:
- Respondent results as answer vectors
- Respondent results plus all associated respondent information
Respondent results as answer vectors
To export the results as answer vectors for all respondents:
-
- On the Archives page, ensure that All is selected in the Subscriber drop-down list.
- Click Export answer vectors.
- The CSV file is downloaded to your computer, containing the answers provided by all respondents.
To export the results as answer vectors for all respondents in a subscription :
-
- On the Archives page, choose the subscriber from the Subscriber drop-down list for which you want to export the results.
- Click Export answer vectors.
- The CSV file is downloaded to your computer, containing the answers provided by the respondents in the subscription.
Respondent results plus all associated respondent information
To export all of the information for all respondents:
-
- On the Archives page, ensure that All is selected in the Subscriber drop-down list.
- Click Export the results in CSV format.
- The CSV file is downloaded to your computer, containing the results for all respondents.
To export all of the information for all respondents in a subscription:
-
- On the Archives page, choose the subscriber from the Subscriber drop-down list for which you want to export the results.
- Click Export all in CSV format.
- The CSV file is downloaded to your computer, containing the results for the respondents in the subscription.
To export all of the information for one or more respondents:
-
- On the Archives page, select the check box in the Respondents List for the respondent(s) whose results you want to export.
NOTE: You can limit the number of respondents by selecting a subscriber from the Subscriber list. - Click Export the results in CSV format.
- The CSV file is downloaded to your computer, containing the results for the selected respondent(s).
- On the Archives page, select the check box in the Respondents List for the respondent(s) whose results you want to export.
For More Information
The Second Language Proficiency Test (SLPT) is an educational resource created by the Collegial Centre for Educational Materials Development (CCDMD) for the Québec college network.
The CCDMD’s mandate is to ensure that students throughout the network have access to quality educational materials in both French and English, and to contribute to the development of such materials at the different stages of production. The CCDMD produces materials for students in a wide range of courses and programs as well as documents intended specially to help them improve their French and English language skills.
These services are funded by the Québec Ministère de l’Éducation, de l’Enseignement supérieur et de la Recherche and, in some cases, benefit from support under the Canada-Québec Agreement on Minority-language Education and Second Language Instruction.
Colleges wishing to use this test must subscribe for it. Anyone wishing to use it for commercial purposes must enter into a specific agreement with the CCDMD. To become a subscriber or to obtain more information, please contact the CCDMD by email at info@ccdmd.qc.ca or by telephone at (514 873-2200).
Background
Initially, the project was implemented by the Ministère de l’Éducation, du Loisir et du Sport (MELS) through its 2004-2008 second language action plan, when it agreed to develop, along with the Official Languages Program, a scale of second language proficiency levels and the related evaluation mechanisms. The general objective of the project was to improve the second language proficiency of college graduates, as recommended by the Commission d’évaluation de l’enseignement collégial (CEEC).
The project led to a long collaboration between the members of the coordinating committees responsible for the production of French and English tests: a large number of teachers and professionals in the French and English CEGEP networks participated in the first phase of development of the linguistic scales and items associated with the resulting tests.
In the fall of 2012, the Collegial Centre for Educational Materials Development (CCDMD) was entrusted with a new mandate to develop the second language proficiency test. In 2012-2013, the CCDMD consulted some twenty professionals and experts in the college and university networks. It set up a production team, with project managers, content specialists, programmers and technicians.
When the technical analysis was concluded, the CCDMD proposed an adaptive test model and a linguistic scale based on new criteria.
Educational Objectives
The primary objective of the Second Language Proficiency Test (SLPT) is to determine the proficiency level of the respondent in order to propose appropriate courses as well as tailored learning activities within those courses. When the respondent finishes the test, the result is given as a number from 1 to 10 and corresponds to a level on the Scale of Second Language Proficiency Levels for the College Student. The teacher and student can then consult the proficiency level descriptions for information on what the student is able to do at that level. The teacher can also use this information to plan learning activities to help the student progress to the next level. As a result, the SLPT goes further than a traditional placement test designed strictly to assign a student to a course level according to his or her results. Nonetheless, the head of a subscribing college has the option, in the management module, of associating a course number with each of the 10 levels.
The 10 levels in the Scale of Second Language Proficiency Levels for the College Student are closely related to the levels in other recognized international scales. The proficiency of students taking an upgrading (mise à niveau) course is at about level 1. A level 10 result means that the student may be more proficient than the maximum level measured by the test. Ideally, college graduates should reach level 8: subsequent university training should enable students to fine-tune their proficiency and achieve level 9 or higher during their university studies. Students registered in some ACS (attestation of collegial studies) programs would be well advised to achieve this level of proficiency so they can pass the OLF (Office de la langue française) examination for their profession.
Features
The Scale of Second Language Proficiency Levels for the College Student includes 10 levels. The SLPT is made up of two categories of items: written comprehension and oral comprehension. However, the platform can accommodate two additional categories, if required.
There are six types of items: associations, multiple choice, sequencing, multiple answers, cloze text with drag and drop, and cloze text with menus. Each item is accompanied by a timer, a volume control slider bar (oral comprehension), and an interactive button enabling the respondent to go to the next item. The items are presented in a random manner. Each item includes:
- general instructions, provided in words and images;
- a text (written comprehension) or audio recording (oral comprehension);
- a question;
- a choice of answers.
The SLPT is adaptive. Each answer, correct or incorrect, affects the progression of the test, so that the respondent’s proficiency level can be determined quickly and efficiently. The platform can also operate in non-adaptive mode, so that the items can be tested and calibrated. However, the performance of the SLPT and the reliability of the results, in particular, depend on the interaction of the platform with appropriate content that is carefully targeted, finely calibrated, associated with predefined levels of difficulty, and classified in relevant categories.
Sample Item Types
There are six item types:
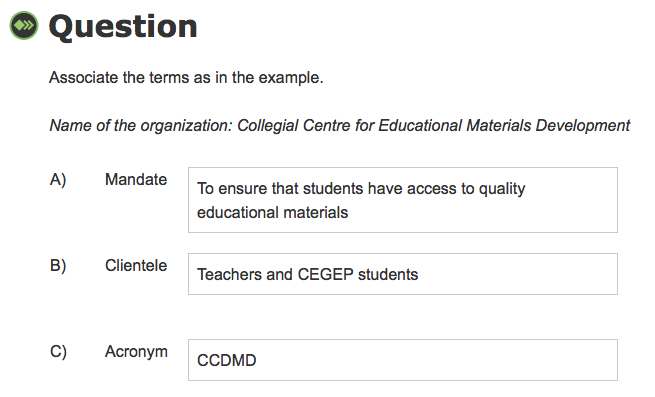
- Associations
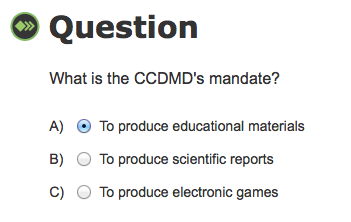
Drag and drop the answer choices to form pairs. - Multiple choice
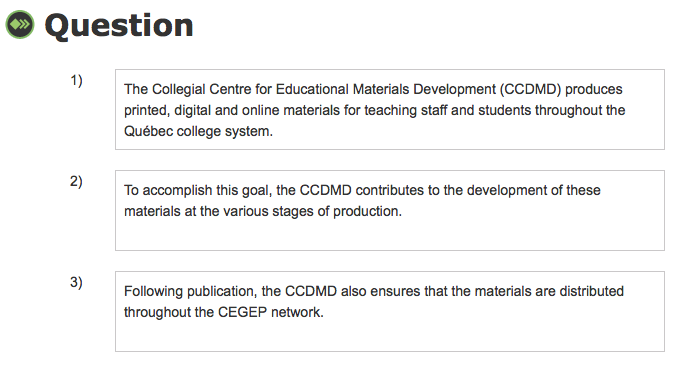
Select the correct answer from a list of possible answers. - Sequencing
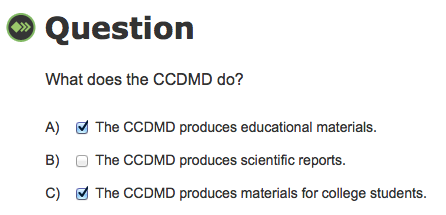
Drag and drop the answer choices in the correct order to form a logical text. - Multiple answers
Select all of the correct answers from a list of possible answers. - Cloze text with drag-and-drop
Drag and drop the correct answers into the blank spaces. - Cloze text with menus
Select the correct answer from a list of possible answers.
The answers to the following questions can be found in this text:

ASSOCIATIONS: Drag and drop the answer choices to form pairs.
Respond to an association question by pairing each of a set of elements in the 2nd column with one of the choices provided in the 1st column. Association questions are used to assess recognition and recall of related information. The response is deemed correct when the respondent has successfully matched all of the elements.
MULTIPLE CHOICE: Select the correct answer from a list of possible answers.
Respond to a multiple choice question by selecting the correct answer from a list that includes the correct answer and several incorrect answers. Multiple choice questions are used to test comprehension of a broad range of content. The context of the item and the type of response required determines whether the item is recall or interpretation. The response is deemed correct when the respondent has selected the single correct answer.
SEQUENCING: Drag and drop the answer choices in the correct order to form a logical text.
Respond to a sequencing question by dragging the elements into the correct order. Sequencing questions are used to test the ability to recall a series of events or a process in the order in which it was presented. They measure the ability to construct meaning and comprehend logical consequences expressed in verbal or written form. The response is deemed correct when the respondent has arranged all of the elements in the correct order.
CLOZE TEXT: Drag and drop the correct answers into the blank spaces.
Respond to a cloze text with drag-and-drop question by filling in the blanks in a text. Drag the correct answer from a predefined set of possible answers above the text to the appropriate blank in the text. Cloze text with drag-and-drop questions are used to assess language skills by imitating the editing process. They measure the ability to infer the most appropriate conclusion to an incomplete statement. The response is deemed correct when the respondent has filled in all of the blanks correctly.
CLOZE TEXT: Select the correct answer from a list of possible answers.
Respond to a cloze text with menus question by filling in the blanks in a text. Select the correct answer from a predefined list of possible answers. Cloze text with menus questions are used to assess the ability to compare options and make accurate choices. Cloze text with menus questions are simpler to decode than cloze text with drag-and-drop, as they narrow the range of correct answers. The response is deemed correct when the respondent has selected the single correct answer.

Accessibility
The educational design of the SLPT is based on principles of universal accessibility. The written instructions for each item, intended to guide the respondent in his or her approach, are accompanied by visual instructions. Thus, a respondent who is not sufficiently proficient to read the written instructions should be able to understand the task and answer the question. Visual instructions are provided for all items, including those in the advanced levels. This strategy creates a predictable virtual environment suitable for various types of learning.
Images have been included with the text or audio recording in the majority of items in proficiency levels 1 to 3. In some cases, the answer choices consist of numbers, images or even colours. An alternative text for each audio recording and image has been provided for in the editor.
Accommodation for Students with Special Needs
Since the objective of the SLPT is to determine reading and listening proficiency, no writing support measure (screen reader) or oral support measure (audio transcription) has been provided for in the test. The allotted answer time for each item is regulated by the administrator.
The test is an objective measure of second language proficiency throughout the college network. We thus ask educational institutions not to adapt it, as we wish to avoid distortion of the data collected.
The CCDMD development team would be pleased to discuss the development of an untimed replacement test, hosted on a separate virtual environment, to meet the needs of colleges having to accommodate groups of students with special needs.
The CCDMD can be reached at 514 873-2200 or info@ccdmd.qc.ca.
Administering the Test
The SLPT is intended to be administered twice during a student’s college studies: once at the beginning and once before the diploma is awarded. The head of a subscribing college may decide to use it differently: the test can be used as a placement test under certain conditions or as a test within a language course. However, since students do not progress rapidly to a higher level of proficiency, it is recommended that students not take the test numerous times during their studies.
The subscription manager can create groups and define the testing schedule from the management module. The manager has access to both the overall results and detailed data and can decide whether or not to display the respondent’s results on screen at the end of the test.
The test can be taken online from home, in class or in a lab. Students can access the test using an ID and a password sent by the test manager. The monitoring of tests administered in class or in a lab is facilitated by the fact that the test progression (the type and order of items) varies with the respondent. Similarly, the correct answer is not always in the same order in the list of answer choices.
Scale of Proficiency Levels
The scale used for the SLPT was developed on the basis of a comparison with three recognized scales in Québec: the Échelle québécoise des niveaux de compétence en français des personnes immigrantes adultes, the Quebec College ESL Benchmarks (provisional version), and the Échelle des niveaux de compétence en français langue seconde pour le collégial (provisional version). These benchmark scales include 12 levels.
For this project, only the first 10 levels were taken into account, since the proficiency level of the target audience generally ranges from 1 to 10. The SLPT scale development team selected indicators whose content was common to that of at least two scales. The team subsequently chose other indicators that were consistent with and complementary to the ones initially selected. It later added descriptions to the scale from the Canadian Language Benchmarks. Then 147 passages and 302 items were prepared to delimit the scale indicators and make up the proficiency test.
Importance of a Scale of Proficiency Levels
The interpretation of a proficiency level result based on a scale offers a number of advantages:
- The information obtained is standardized and can thus be compared with that derived from other tests and scales developed according to the same principles;
- The proficiency levels in the scale provide clear, practical information that can be used to analyze programs and develop their content with a view to standardizing second language services at the college level;
- These proficiency levels offer clear, practical information that can be used to formulate the learning objectives to be achieved, thus enabling students to prepare for tests and progress from one level to the next.
Proficiency Level Descriptions
The Scale of Second Language Proficiency Levels for the College Student describes the development of second language proficiency in 10 levels. For each level, it defines what the learner is able to understand orally and in writing.
The proficiency test is made up of a number of items divided into two categories:
- Items that focus on texts and measure the respondent’s degree of proficiency in written comprehension;
- Items that focus on audio recordings and measure the respondent’s degree of proficiency in oral comprehension.
NOTE: For a description of each of the proficiency levels, please refer to the complete list contained in the Management and Editing Help Guides. A summary version of the levels is also provided for college respondents in the Student Guide.
Test Types
The SLPT is adaptive. Each answer, whether correct or incorrect, affects the progression of the test, so that the respondent’s proficiency level is determined quickly and efficiently.
The platform can also operate in non-adaptive mode, so that items can be tested and calibrated.
Adaptive Test
The administration of an adaptive test is non-linear. The way in which the learner answers the first questions, whether correctly or incorrectly, determines the progression of the test. As the test is administered, it dynamically selects, from a bank of approved and calibrated items, the item most likely to assess the respondent’s skill level in light of his or her preceding answers. The answers are analyzed as the respondent gives them, and tasks are selected progressively according to the answers; the assessment of the respondent’s proficiency level is thus refined quickly and efficiently. The test ends when the proficiency level is determined. An adaptive test, in comparison with a non-adaptive test, makes it possible to reduce the number of items presented, decrease the test administration time and increase the reliability of skill assessment.
The results for the adaptive test vary between -3 and +3. For purposes of interpretation, these results (called “thetas”) are matched with the language proficiency scale levels. In the Cut scores section, the proficiency levels are identified and the thetas corresponding to each level are defined.
The test is generally used in non-adaptive mode so that a representative sample of respondents can go through a representative number of approved items (say, about a hundred). The items can then be calibrated, i.e., a difficulty value on a scale of -3 to +3 can be obtained. Once the test includes about a hundred calibrated items, it can be used in adaptive mode. An automatic calibration mechanism for new items is included in adaptive mode: each respondent is given a certain number of non-calibrated items in each category (for example, two per category), in addition to the items chosen to measure his or her language skill. The results for these items will not be used in the assessment of skill. Once a certain number of respondents (say, 150) have answered a given non-calibrated item, the administrator will calibrate the item, by clicking on the Calibrate button in the Calibration section.
Non-adaptive Test
The administration of the non-adaptive test is linear, with a predetermined number of questions to which the learner must respond. The test ends when the bank of questions is used up.
The test in non-adaptive mode randomly presents all items created and approved in the editing module. The non-adaptive mode is used essentially to calibrate items, i.e., to determine their level of difficulty by having a representative sample of respondents take the test. In this mode, the respondent’s results are not calculated in thetas, but according to the number of correct answers out of the number of items presented.
Production Team
Application Design
Educational Design and Drafting
Project Management
Test Evaluation
Translation
Drafting of Implementation Guide
Language Editing
|
System Design and Programming
Web Integration
Graphic Design
Audio Production
Voice
|
AcknowledgmentsWe at CCDMD wish to thank the following individuals and groups: Deborah Armstrong, Rebecca Baker, Chantal Bélanger, Kathye Bélanger, Philippe Bonneau, Marie-Pierre Bouchard, Yvonne Christiansen, Marie-Claude Doucet, Cathie Dugas, Paul Fournier, Philippe Gagné, Sylvain Gagnon, Francine Gervais, Sue Harrison, Réjean Jobin, André Laferrière, Charles Lapointe, James Laviolette, Julia Lovatt, Michel D. Laurier, Susan MacNeil, Anne McMullon, Jean-Denis Moffet, Andrew Moore, Joanne Munn, Ian Murchison, Colette Noël, Patrick Peachey, Christian Ragusich, Michael Randall, Pierre Richard, Joan Thompson, Rachel Tunnicliffe and Inèse Wilde, as well as
This work is dedicated to the many teachers who contributed in one way or another to the production of a fair and reliable second language proficiency test that is fitting for young students in Québec. This project is funded by the Québec Ministère de l’Éducation, de l’Enseignement supérieur et de la Recherche and the Canada-Québec Agreement on Minority-language Education and Second Language Instruction. |