Netquiz Web application software
Netquiz Web is a multilingual and multi-user application produced by the CCDMD that, with Internet access, allows you to easily create exercises, formative game quizzes and multimedia tests, and to publish them on the Internet with a single click. (For more information concerning system requirements and compatible browsers, see the section Minimum system requirements.)
DEMO text and video for this item
PROJECTS
A Netquiz Web project is a collection of quizzes prepared using items and media files from the project's library. The collaboration function allows several users to work on the same project.
QUIZZES
Netquiz Web quizzes are published in French or in English, and can also be translated into other languages. It is also possible to add a glossary of terms for the respondent's use.
LIBRARY
The library of a Netquiz Web project contains the elements needed to create quizzes, such as names of categories to file quizzes, items and names of categories to file them, media files, a list of terms for the glossary and the list of languages in which quizzes are published, along with the translated content, for quizzes in other languages.
ITEMS
Netquiz Web items are the building blocks of quizzes. There are 13 item types all requiring a different sort of interaction from the respondent, in the form of question pages; the last item type, Page, is used to make additional pages for your quiz such as a welcome page, an end page, and transition pages, depending on your needs.
MEDIA FILES
Media files, including images, audio files and videos, are easy to integrate into the items of a quiz.
TERMS
Terms are words or expressions that are saved in the library and can be used to create glossaries that can be associated with quizzes.
LANGUAGES
Languages make it possible to create quizzes in languages other than French and English.
My Projects
A Netquiz Web project brings together all the quizzes that share the elements saved to the project’s own library, including the items, media files, collections, categories, terms and languages. You can create several projects, allowing you to have completely separate work environments. You can also use the Import and Export functions to copy items and quizzes from one project to another.
You can use the collaboration function to invite others to work with you on a specific project. Be aware that your collaborators have access to all the same functions as you. They can, for example, modify an item or even delete a quiz. However, they cannot invite others to collaborate or name themselves as the manager of a project.
When you connect to Netquiz Web for the first time, it will ask you to create your first project. Its title appears at the top of the page next to the mention Current project. When you add a new project and its status is Active, its title will appear in the pop-up menu of the Current project, where you can select the project in which you want to work.
To display the list of projects:
At the top of the Netquiz Web page, click on Account. Then, in the menu on the left under the Account, click on My projects.
From this page, you can add, modify or move a project to the recycle bin. You can also invite other users to collaborate with you on the project.
The columns in the list are as follows:
Code: A unique code number assigned by Netquiz Web when the project is saved.
Project title: The title given by the user under the Content tab when the project was created or modified.
Manager: The name of the person responsible for the project.
Identifier: A unique identifier given to the project by the user when the project was created.
NOTE: The identifier cannot be modified; it is a file name that appears in the URL (address) of everything you publish. For example, if you gave your project the identifier myproject and you publish a quiz entitled myquiz, the URL (address) for the publication will be http ://application name Netquiz_Web/web/myproject/myquiz.
Status: The status of a project is determined when a project is created or modified. A project can be either Active or Inactive.
Modification date: Date and time when the project was last saved.
Star icon: An orange star is used to flag one or more projects that require special attention. You can flag or unflag a project by clicking on the appropriate star in the list or by clicking on Flag for one or more projects in the list.
See Using lists
Add a new project
Each new project has its own distinct library containing its items, media files, collections, categories, terms and languages.
- At the top of the Netquiz Web page, click on Account.
- In the menu to the left of the title, under Account, click on My projects; this will display the list of projects.
- Click on Add a project; this will display the form for the project.
- Fill out the Profile and Collaboration sections in the form and then click on Save in order to save the information, or on Cancel if you don’t wish to save the new project.
PROFILE SECTION
Project title: This title will appear in the list of projects.
Description
Unique identifier for the project: Enter a unique identifier for the project.
NOTE: The identifier cannot be modified; it is a file name that appears in the URL (address) of everything you publish. For example, if you gave your project the identifier myproject and you publish a quiz entitled myquiz, the URL address for the publication will be http: //application name Netquiz_Web / web / myproject / myquiz.
Project status: A project can be either Active or Inactive.
Project manager: The user who created the project is the manager. The project manager has access to all the same functions as those who collaborate. However, only the manager can invite others to collaborate.
COLLABORATION SECTION
Everyone who collaborates on a project has access to all the same functions. Those who collaborate can, therefore, modify an item or a quiz, and even delete them.
The project manager can invite new collaborators by sending an email. An email will also be sent to a collaborator if the manager chooses to leave a project or designate the collaborator as the new manager.
Actual collaborators: If you are the project manager, this list will show you who is currently collaborating with you. Move the cursor over the gear icon to display the list of commands available.
Send an email
Name as project manager
Deny access to project
Invited collaborators - waiting for an answer: If you are the project manager, this list will show you the list of collaborators to whom you have sent an invitation, but have not yet replied to your invitation. Move the cursor over the gear icon to display the list of commands available.
Send an email
Delete the invitation
Invite a new collaborator: If you are the project manager, enter the email address of the person you wish to invite to collaborate, and click on the Send invitation button.
The person you invite will automatically receive an email informing them of your invitation. If the individuals already have a Netquiz Web account on the same server as you, they will see the name of your project in the pull-down menu at the top of the page. If those you invite don’t have an account, they will be invited to open one, and their names will appear in the list of Invited collaborators - waiting for an answer. When your invited collaborators accept your invitation by email, their names will be moved to the Actual collaborators list.
If you are not the project manager, you will be able to see the two lists, for your information, but you cannot invite others to collaborate.
If you want to be removed from the list of collaborators for a project:
- At the top of the Netquiz Web page, click on Account.
- In the menu to the left of the title Account, click on My projects; this will display the list of projects.
- In the list of projects, click on the project that you want to leave.
- Move the cursor over the gear icon and select Remove me from the collaborators' list.
Import and export
Netquiz Web does not allow you to duplicate a project or copy elements directly from one project to another. However, import and export functions allow you to copy components from one project to another. See the information provided for each of these functions in the appropriate sections:
for quizzes,
for collections,
for items,
for categories,
for languages,
for terms.
Modify or delete a project
Modify a project:
- At the top of the Netquiz Web page, click on Account. Then, in the menu on the left of the page under the title Account, click on My projects. This will display the list of projects.
- Click on the corresponding box, then move the cursor over the gear icon and click on Modify. This will display the form for the project.
- Modify the content of the input fields.
- Click on the Save button to save the information or click on Cancel if you do not wish to save the changes.
Move one or more projects to the recycle bin:
- At the top of the Netquiz Web page, click on Account. Then, in the menu on the left of the page under the title Account, click on My projects. This will display the list of projects.
- Select the project or projects you wish to delete by clicking on the corresponding boxes.
- Move the cursor over the gear icon and click on Move to recycle bin.
NOTE: Projects in the recycle bin are not permanently deleted, but simply placed in the project's recycle bin. By using the Recycle bin menu, you can either retrieve items or delete them permanently.
My Quizzes
A Netquiz Web project can contain one or several quizzes that are made using the items and media files previously saved in the project's library.
By default, a quiz contains a cover page, an end page and a page for each question. You can use Page items to separate the question pages, which use any of the 13 other types of items requiring different types of interaction from the respondent. For example, a Dictation item asks the respondent to transcribe the contents of an audio file, while a Matching item requires the respondent to pair different elements.
NOTE: One should not confuse items with questions. The item can be seen as one of the Netquiz Web building blocks that you use in preparing the pages of your quiz, whether the pages are in fact questions or pages used to frame your quiz. A question is shown to the respondent and requires an answer. When we create a question, we start with an item to which we can add images, video or audio files in order to create a multimedia quiz.
We can organize the pages of a quiz in order to structure its contents.
The project manager can invite other users to collaborate in preparing quizzes by inviting them to join the project to which the quiz is associated.
To display the list of quizzes:
At the top of the Netquiz Web page, click on Quizzes, then, in the menu on the left beneath the title Quizzes, click on My quizzes.
From this page, you can use all of the functions related to quizzes: add a new quiz, modify, duplicate, flag, see a web preview of the quiz, import or export quizzes, print or delete quizzes, and create collections to organize quizzes.
The columns in the list are as follows:
Code: A unique code number assigned by Netquiz Web when the quiz is saved.
Title: Name given to the quiz by the user, under the Parameters tab when the quiz was created or modified.
Items: Number of items in the quiz.
Collection: Collection as saved at the time when the quiz was added or modified. Although is not essential for a quiz to belong to a collection, collections can help you organize your quizzes.
Status: Status of the quiz. The values are:
Draft
Published
Unpublish
Note: This is a comment added under the Parameters tab concerning a quiz when it was created or modified. The content of this field is not visible in the published quiz. It is used to write notes to help you manage the content or for collaboration with a colleague. It can help identify an item that you wish to note, such as something to check, complete, check copyrights for, etc.).
Modification date: Date and time that an item was last saved.
Star icon: An orange star is used to flag a quiz or quizzes to which you want to draw a special attention. It could be a quiz to complete or check. You can flag or unflag the quiz by clicking on the star next to the quiz title in the list or by using the command Flag for one or more quizzes in the list.
See Using lists
Add a new quiz
A quiz is always associated with a project, and is made from items and media files that are saved in the project's library. The quizzes that are part of a project can be organized into collections. It is not essential to use collections to categorize your quizzes, but it is an effective way to file your work.
- Display the list of quizzes by clicking on Library at the top of the Netquiz Web page
OR
in the menu on the left, under the title Library, and click on My quizzes. - Move the cursor over Add a new quiz, to the right of the title My quizzes; this will display the form for the quiz.
- Fill in the text input fields.
NOTE: As soon as the quiz's form is displayed, the list of items in the quiz will be visible at the left of the page.
- Click on the Save button to save the information or click on Cancel if you do not wish to save the changes to the form.
Three tabs are used to define a quiz: Parameters, Theme and Glossary.
At the top and bottom of the page, you can see the Save button, to save the information you have entered, Cancel if you choose not to save the new information, and Preview to see how the item will appear when published. This will allow you to see the quiz exactly as it will appear to the respondent.
Netquiz Web simulates how the quiz will appear to the respondents.
Parameters for the quiz
The Parameters tab allows you to determine the quiz's essential elements.
Collection: A quiz can, but does not have to belong to a collection. To learn more about collections, see the page [lien vers la page des collections].
To associate a quiz with an existing collection, click on Collection in the drop-down menu.
To associate a quiz with a new collection, enter a name for the new collection in the input field Create a new collection if needed. The new collection will be created at the same time as the quiz. It will appear in the library under My collections.
Title of the quiz: This title will appear in the list of quizzes.
Presentation of items: Order in which the items are presented within the quiz (here we refer to the questions). Your options are:
Based on the parameter of each section: If the quiz is divided into sections (see how to divide a quiz in sections), you can choose, for each section, to present the items (questions) in either random order or in a predetermined order, as displayed in the left-hand column. If your quiz is not divided in sections, and you do not set this parameter, the items will appear in random order by default in the published quiz.
Random order: The items (questions) will appear in random order in the published quiz.
Predetermined order: The items (questions) will appear in the same order as they are in the left-hand column. (see how).
Response time: The time that the respondent spent on each item (question) before clicking on the Submit button (see). Your options are:
Do not calculate: Response time will not appear in the results table;
Calculate: Response time column will appear in the results table; Response time is calculated from the instant the item is displayed until the respondent clicks on Submit. Response time is always based on the respondent's last attempt at the item, if the respondent submits the item more than once. A dash before an item (question) indicates that it has not yet been submitted for correction.
Display correct answer: Choose whether or not to show the correct answer to the respondent. It might be pedagogically desirable to show the respondent the correct answer before submitting an actual answer.
Based on the parameter of each item: each item contains the parameter Display correct answer. Display correct answer is the default option. So if you choose the option Based on the parameter of each item in the parameters of the quiz, the Solution button will appear or not, depending on the parameter setting in the published quiz.
Display: the Solution button will appear in the question page of the published quiz, regardless of the parameter setting for the item.
Do not display: the Solution button will not appear in any of the question pages in the published quiz, regardless of the item's parameter setting.
Automatically start media: Choose the appropriate option if you want the selected media to start automatically or not.
Based on the parameter of each item: every item offers the parameter option Automatically start media. Do not start the media is the default option. However, if the option Based on the parameter of each item is selected in the parameters of the quiz, the media will or will not start automatically when the item page is displayed depending on the parameters of the item presented.
Never start media: The respondent must start the media him or herself.
Always start audio: If the item contains an audio file, the audio file will always start to play as soon as the item in the published quiz is displayed.
Always start video: If the item contains a video file, the video file will always start to play as soon as the item in the published quiz is displayed.
Language for preview or publication of this quiz: Determines the interface language of the published quiz. The drop-down menu contains the title of each of the languages defined in My languages.
Note: The content of this field is not visible in the published quiz. It is used to write notes to help you manage the content or for collaboration with a colleague. It can help identify an item that you wish to note (such as something to check, complete, check copyrights for, etc.).
The Theme of the quiz
The Theme tab offers a selection of graphic templates for the pages. Every page in a quiz will use the theme that you select here.
To choose a theme, just click on the Theme tab and choose from among the choices offered. Apart from some visual characteristics, all of the themes have a similar appearance.
At the top and bottom of the page, you can see the Save button, to save the information you have entered, Cancel if you choose not to save the new information, and Preview to see how the item will appear when published. This last command allows you to see the item exactly as it will appear to the respondent.
Add a glossary to a quiz
Using this tab, you can create a glossary for a quiz.
First, you must create a list of terms and save them to the library (see). The terms that you save will be available for any glossary that you add to a quiz that is part of the same project.
To add terms to the glossary of a quiz you are preparing, display the complete list of terms under the Glossary tab and click on the appropriate boxes, one at a time, to select the terms for the quiz.
When the quiz is published, a tab will be added to bar at the top of the page giving access to the Glossary page at the end of the quiz. The terms and expressions included in the glossary will be underlined in all of the text fields. For this reason it is important to avoid using underlining as a way to highlight parts of the text. The respondent can simply click on the underlined terms and expressions to display the definition saved in the glossary.
Add items to or delete items from a quiz
To add one or more items to a quiz:
- Display the list of items by clicking on Library at the top of the Netquiz Web page.
- Select the quiz that you wish to modify by clicking on the corresponding button.
- Move the cursor over the gear icon to display the list of commands and click on Add to a quiz. This will display a list that allows you to select the quiz.
In the list of items in the library, the selected items now have a hyperlink icon in the last column. This icon identifies an item that appears in one or more quizzes. Move the cursor over this icon to display the list of quizzes that contain this item.
NOTE: When the form for an item is displayed, click on the command Add to a quiz by moving the cursor over the gear icon at the top right of the form.
To delete one or more items from a quiz:
- Display the list of quizzes by clicking on Quizzes at the top of the Netquiz Web page.
- Click on the quiz that you want to modify; this will display the selected quiz on the left side of the page, with all the items it contains.
- Select the item or items in the list that you want to delete.
- Move the cursor over the gear icon in the top right of the page and click on Remove this item from the quiz.
The item is now removed from the quiz, but it can still be found in the library.
Divide a quiz into sections
1. In the quiz's form, move the cursor over the gear icon to display the list of commands available.
2. Click on Add a section. This will display the form for the section.
3. Enter the required information in the input fields: Presentation of items gives you the option of showing the items in either Random order or Predetermined order. The later meaning that items will appear in the order they are in the section's list.
4. Use the cursor to slide items to the appropriate section in the column at the left.
To delete a section, use the cursor to select the section from the items list displayed on the left. Move the cursor over the gear icon and click on Move to recycle bin.
When you delete a section and its contents, you cannot recover them from the recycling bin; they have been removed from the quiz. To return the items to the quiz, click on Add a quiz.
Modify the order of items in a quiz
- Display the list of quizzes by clicking on Quizzes at the top of the Netquiz Web page.
- Click on the title of the quiz. This will display the quiz's form. At the left of the page, the title of the quiz is displayed followed by the list of items it contains, including the first and the end pages.
- Use the cursor to select an item and to slide it to its new position in the list.
Publish a quiz
When you are ready to publish a quiz:
- Move the cursor over Status: Draft at right. This will display a drop-down menu.
- Select Publish the quiz, then write a word in the input field in the window that appears. This word will be, along with the prefix already indicated, the URL (address) for your quiz.
- Click on the Publish button.
To see your published quiz, click on the URL that appears in blue when your quiz is successfully published. If you modify a published questionnaire, you must publish it again to see the changes online. The URL will not change.
Modify the quiz's form
- Display the list of quizzes by clicking on Quizzes at the top of the Netquiz Web page.
- Click on the title of the quiz. This will display the quiz's form. At the left of the page, the title of the quiz is displayed followed by the list of items it contains, including the first and the end pages.
- Modify the content of the input fields.
- Click on the Save button to save changes or click on Cancel if you do not wish to save the changes.
Duplicate quizzes
- Display the list of quizzes by clicking on Quizzes at the top of the Netquiz Web page.
- Select the quiz or quizzes that you want to duplicate by clicking on the corresponding buttons.
Move the cursor over the gear icon to display the list of commands. Click on Duplicate.
The quiz or quizzes that you have duplicated are added at the bottom of the list, and an asterisk (*) is appended to their name.
NOTE: When a quiz's form is displayed, you can move the cursor over the gear icon in the top right of the form and click on Duplicate.
Flag a quiz
- Display the list of quizzes by clicking on Quizzes at the top of the Netquiz Web page.
- Select the quiz or quizzes that you want to flag by clicking on the corresponding buttons.
- Move the cursor over the gear icon to display the list of commands. Click on Flag.
In the list of quizzes in the library, the flagged quizzes now have an orange star in the second-last column. An orange star is used to flag a quiz or quizzes to which you want to draw a special attention. It could be a quiz to complete or check.
It is possible to flag or to unflag a quiz by clicking on the star next to the appropriate quiz title in the list of quizzes.
NOTE: When a quiz's form is displayed, you can move the cursor over the gear icon in the top right of the form and click on Flag.
See a Web preview of a quiz
- Display the list of quizzes by clicking on Quizzes at the top of the Netquiz Web page.
- Select the quiz that you wish to see in a Web preview by clicking on the corresponding button.
Move the cursor over the gear icon to display the list of commands. Click on See a Web preview.
The Web preview will be displayed in a new browser window and Netquiz Web produces a simulation of the quiz as it will appear to the respondent in the published quiz.
NOTE: When a quiz's form is displayed, you can move the cursor over the gear icon in the top right of the form and click on Web preview.
Export a quiz
- Display the list of quizzes by clicking on Quizzes at the top of the Netquiz Web page.
- Select the quiz or quizzes that you want to export by clicking on the corresponding buttons.
- Move the cursor over the gear icon to display the list of commands. Click on Export XML.
The content of the selected quiz will be converted to XML format. In this way, it can be made available to other Netquiz Web users or added to another project. You can now retrieve it from your downloads folder.
NOTE: When a quiz's form is displayed, you can move the cursor over the gear icon in the top right of the form and click on Export XML.
Download a Web quiz
Display the list of quizzes by clicking on Quizzes at the top of the Netquiz Web page.
Select the quiz that you want to download by clicking on the corresponding button.
Move the cursor over the gear icon to display the list of commands. Click on Download Web quiz.
A .ZIP file with the compressed content will be downloaded to your computer. The downloaded file contains all of the source code for the quiz, and all of the media files associated with the quiz. It can be published on a website.
NOTE: When a quiz's form is displayed, you can move the cursor over the gear icon in the top right of the form and click on Download Web quiz.
Print a quiz
- Display the list of quizzes by clicking on Quizzes at the top of the Netquiz Web page.
- Select the quiz that you want to print by clicking on the corresponding button.
- Move the cursor over the gear icon to display the list of commands. Click on Print.
- You now have a window showing the full questionnaire, which you may print using the printing function of your Web browser.
NOTE: When a quiz's form is displayed, you can move the cursor over the gear icon in the top right of the form and click on Print.
Delete a quiz
- Display the list of quizzes by clicking on Quizzes at the top of the Netquiz Web page.
- Select the quiz or quizzes that you want to delete by clicking on the corresponding buttons.
- Move the cursor over the gear icon to display the list of commands. Click on Move to recycle bin.
Quizzes in the recycle bin are not permanently deleted, but simply placed in the project's recycle bin. By using the Recycle bin menu, you can either retrieve quizzes or delete them permanently.
NOTE: When a quiz's form is displayed, you can move the cursor over the gear icon in the top right of the form and click on Move to recycle bin.
Organize my quizzes in collections
Although it is not essential for quizzes to belong to a collection, collections can help you organize your quizzes.
Information about the collections is recorded in project's Library.
Commands that apply to collections, such as Duplicate or Print, function in the same way as they do for other aspects of Netquiz Web.
LIST OF COLLECTIONS
At the top of the Netquiz Web page, click on Library, then, in the menu on the left beneath the title Library, click on My collections.
The columns in the list are as follows:
Code: A unique number given by Netquiz Web when the collection was saved.
Title: Name of the collection
Note: The content of this field is not visible in the published quiz. This is used to write notes to help you manage the content or for collaboration with a colleague. It can help identify an item that you wish to note, such as something to check, complete, check copyrights for, etc.).
Modification date: Date and time that the collection was last saved.
See Using lists
Associate a quiz with a collection
There are two ways to associate a quiz with a collection:
By first creating collections for your quizzes (see)
OR
By assigning a quiz to a collection when it is created or modified, under the Parameters tab. If the collection has not yet been saved in the library, write a name for the new collection in the field Create a new collection if needed.
Managing collections
At the top of the Netquiz Web page, click on Library, then, in the menu on the left beneath the title Library, click on My collections. This displays the list of collections.
From this page, you can add a new category, modify, duplicate, export, print or delete forms for collections.
See the gear icon above and to the left of the collections list. When you move the cursor over this icon, a menu appears showing the functions available for managing collections.
Add a new collection:
- Click on Add a new collection, to the right of the title My collections.
- Enter the required information in the input fields:
Title of the collection
Note: The content of this field is not visible in the published quiz. This is used to write notes to help you manage the content or for collaboration with a colleague. It can help identify categories that you wish to note, such as something to check, complete, check copyrights for, etc.).
Click on the Save button to save the information or click on Cancel if you do not wish to save the form.
Modify a collection:
- Select the collection you wish to modify from the list of collections by clicking on the corresponding button.
- Move the cursor over the gear icon, above and to the left of the list of collections, and select Modify in the drop-down menu.
- Enter the changes in the appropriate input fields.
- Click on Save to save the changes or on Cancel if you do not want to save the changes.
Duplicate one or more collections:
- Select the collection you wish to duplicate from the list of collections by clicking on the corresponding button.
- Move the cursor over the gear icon, above and to the left of the list of collections, and select Duplicate in the drop-down menu.
The duplicated collections will be added to the list, preceded asterisk.
Export one or more collections:
- Select the collection you wish to export from the list of collections by clicking on the corresponding button.
- Move the cursor over the gear icon, above and to the left of the list of collections, and select Exporter XML in the drop-down menu. Information concerning the selected collection or collections will be saved in XML format.
- You can retrieve the XML file from your downloads folder.
Print one or more collections:
- Select the collection you wish to print from the list of collections by clicking on the corresponding button.
- Move the cursor over the gear icon, above and to the left of the list of collections, and select Print in the drop-down menu.
- Print the document as you normally do with your computer.
Delete one or more collections:
- Select the collection you wish to delete from the list of collections by clicking on the corresponding button.
- Move the cursor over the gear icon, above and to the left of the list of collections, and select Move to recycle bin in the drop-down menu.
The information concerning the selected collection or collections has not been permanently deleted, but simply moved to the recycle bin. By using the Recycle bin menu, you can either retrieve or delete them permanently.
My Items
A Netquiz Web quiz is made up of different elements that are assembled like building blocks to form the questions. Items are the essential components of any question.
NOTE: One should not confuse items with questions. The item can be seen as one of the Netquiz Web building blocks that you use in preparing the pages of your quiz, whether the pages are in fact questions or pages used to frame your quiz. A question is shown to the respondent and requires an answer. When we create a question, we start with an item to which we can add images, video or sound files in order to create a multimedia quiz.
Items are recorded in the Library of a Netquiz Web project. This makes it possible to file and reuse an item in many different quizzes belonging to the same project. You can make 14 different types of items; 13 of which are designed to interact with the respondent as question pages. The last type, Page, is used to make additional pages for your quiz such as a cover, an end page, or transition pages, depending on your needs.
| Icon | Item Type | Description |
| |
Matching | Match elements in the first column with elements in the second column. |
| |
Multiple choice | Choose one answer from among several offered to the respondent. |
| |
Classification | Categorize the elements, which can be either words or images, into what look like file folders. |
| |
Matching board | Find matching pairs of elements, which can be either words or images, within a grid. |
| |
Essay | Answer freely or give an opinion on a given subject. |
| |
Dictation | Transcribe the content of an audio or video file. |
| |
Highlight | Find elements in a text and highlight them using different colours. |
| |
Sequencing | Put elements in order. They can be either words or images. |
| |
Short answer | Write a short answer to a given question. |
| |
Multiple answers | Choose more than one answer from among those offered. |
| |
Fill in the blanks | Complete a text by adding the missing words or expressions. |
| |
True or False | Choose either of the two possible answers. |
| |
Identify parts of an image | Identify the parts of an image. |
| |
Page | Create pages for your quiz that are not question pages. |
Display the list of items:
At the top of the Netquiz Web page, click on Library, then, in the menu on the left beneath the title Library, click on My items.
From this page, you can use all of the functions related to items: add a new item, modify, duplicate, flag, see a Web preview, add an item to a quiz, export, print, delete forms for your items and create categories to classify items.
The columns in the list are as follows:
![]()
Code: A unique number given by Netquiz Web when the item was recorded.
![]()
Title: Name given to the item, under the Content tab, by the user when the item was created or modified.
![]()
Item type: Type of item chosen from the menu Add new item when the item was created or modified. The interaction with the respondent varies depending on the type of item.
![]()
Category: The chosen category when the item was created or modified. Although it is not essential for items to belong to a category, categories can help you organize your items.
- Note: Comment added under the Parameters tab concerning an item when it was created or modified. The content of this field is not visible in the published quiz. This is used to write notes to help you manage the content or for collaboration with a colleague. It can help identify an item that you wish to note, such as something to check, complete, check copyrights, etc.).
![]()
Modification date: Date and time that an item was last saved.
![]()
Star icon: An orange star is used to flag an item or items to which you wish to draw a special attention, whether it is a favourite item or an item to complete or check. You can flag or unflag the item by clicking on the star next to the item in the list or by using the command Flag for one or more items in the list.
![]()
Hyperlink icon: This icon indicates that an item is linked to one or more other quizzes. When you move the cursor over the icon, a list appears showing the code of these quizzes.
Add a new item
All of the items used in the quizzes of a project are saved in the library of that project.
Add a new item:
- Display the list of items by clicking on Library at the top of the Netquiz Web page
OR
in the menu on the left, under the title Library, and click on My items. - Move the cursor over the command Add a new item, to the right of the title My items, and choose the type of item you wish to add.
Each item type has its own characteristics that distinguish it from the other item types.
Click on the item type to learn more about its characteristics.
Matching
Multiple choice
Classification
Matching board
Essay
Dictation
Highlight
Sequencing
Short answer
Multiple answers
Fill in the blanks
True or False
Identify parts of an image
Page
Multiple answer type item
A Multiple answers item asks the respondent to choose one or more than one answers from among several that are offered.
This type of item can offer from 2 to 30 possible answers, in either text or image format.
At the top and bottom of the page, you can see the Save button, to save the information you have entered, Cancel if you choose not to save the new information, and Preview to see how the item will appear when published. This last command allows you to see the item exactly as it will appear to the respondent.
Note that when you add an item to the library of a given project for which you have invited people to collaborate with you, this item will also be available for them to consult or modify as needed. What's more, if one of the people collaborating modifies an item, the modified version of the item will appear in all of the quizzes that use this item.
DEMO text and video for this item type
Three tabs are used to define the item: Content, Add-ons and Parameters.
CONTENT OF A MULTIPLE ANSWERS ITEM
The Content tab is used to define what makes up the item. By default, a Multiple answers item offers two possible answers.
Item title: Enter a meaningful name that will help you to find the item in your library. The item's title will appear in the Title column in the list of items. However, it will not appear when the item is shown to the respondent, nor when we look at a preview of an item that we are preparing.
Item type: The item type is Multiple answers.
Text: Write the text for your question as it will be shown to the respondent. Use the editing tools as needed.
Correct answer: Click on the radio button to indicate which is or are the correct answers.
Answer (Text or Image): A Multiple answers item must offer at least two possible answers. To add a new choice, click on the + (plus) button to the right of the last choice. Click on the – (minus) to remove a choice that had been added.
Select the file format for the answers. Viewing the correct answer does not require the respondant to put in an answer.
For Text, write your text in the input field for each element. Use the editing tools as needed.
For Image elements, you can use an image file from your library (see how) or import a new file from another source (see how).
Feedback: Enter the text for the corresponding feedback.
NOTE: The feedback should be used to give a meaningful explanation or feedback other than Correct answer or Incorrect answer, because this general feedback is given automatically when the respondent submits the answer, whether or not you have written feedback for each possible response. You are not obliged to write feedback for every possible answer, but it is worth the effort because it adds to the teaching potential of the questions.
ADD-ONS FOR A MULTIPLE ANSWERS ITEM
The Add-ons tab allows you to add complementary information to the item.
Add-ons 1 and 2: Enter the complementary information related to the question. Use the editing tools as needed. For example, you could give clues to help the respondent understand.
Media in the header: The header of an item can contain a descriptive text, a second line with descriptive text or one or more media files.
Add a descriptive text and a second line of descriptive text. Use the editing tools as needed.
Use the commands Add image file, Add audio file or Add video file to choose the media file or files for the header. You can use a file that is already saved in your library (see how) or you can import a new file from another source (see how).
PARAMETERS FOR A MULTIPLE ANSWERS ITEM
The Parameters tab allows you to define the specific attributes for this item type.
- Category: An item can belong, or not, to a category. To learn more about categories, see the page.
To associate an item with an existing category, choose a category from the drop-down menu.
To associate an item with a new category, write a name for the category in the input field Add a new category as needed. The new category will be created at the same time as the new item and will be added to the library under My categories.
-
Setting parameters for the item
- Weighting: Indicate the number of points given to the question.
- Automatically start media: Choose the appropriate option whether or not you want the selected media to start automatically in the Media in the header section, under the Add-ons tab. Your options are:
- Do not start the media: In this case, the respondent must start the media.
- Start the audio file and Start the video: The media file will start automatically as soon as the item appears to the respondent.
- Display correct answer: Choose whether or not to show the correct answer to the respondent. It might be pedagogically desirable to show the respondent the correct answer.
- Order in which the elements are shown to the respondent: You can choose to show the elements in an order that is
- Predetermined, whether in the order in which they were entered under the Content tab, or in
- Random order, an order determined by chance, by Netquiz Web.
- Labels for the elements: Choose the label type that that the respondent will see on the left of each element in the published quiz. Your options are:
- Numbers: For example, 1), 2), 3), etc.
- Letters: For example, a), b), c), etc.
- None
You can choose whether the user must give:
all of the correct answers
or at least one correct answer among the choices.
-
General messages in the preview language: The General messages appear when the respondent chooses to Submit the answer for correction (See). These messages are defined for all of the items of this type by the person responsible for the quiz (See My languages).
By default, a Correct answer is marked in green, Incorrect answer is marked in red and Incomplete answer is marked in yellow. However, you can provide different messages when creating the item by clicking on Modify these values for this item only.
In order to add an image, a video or an audio file to a message, you can use a file that is already saved in your library (see how) or you can import a new file from another source (see how).
Note: The content of this field is not visible in the published quiz. This is used to write notes to help you manage the content or for collaboration with a colleague. It can help identify an item that you wish to note (such as something to check, complete, check copyrights for, etc.).
Multiple choice type item
Multiple choice items ask the respondent to choose one answer from among several that are offered.
There can be anywhere from 2 to 30 possible answers, in either text or image format.
At the top and bottom of the page, you can see the Save button, to save the information you have entered, Cancel if you choose not to save the new information, and Preview to see how the item will appear. This last command allows you to see the item exactly as it will appear to the respondent.
DEMO text and video for this item type
Three tabs are used to define the item: Content, Add-ons and Parameters.
CONTENT OF A MULTIPLE CHOICE ITEM
The Content tab is used to define what makes up the item. By default, a Multiple choice item offers the respondent two choices.
Item title: Enter a meaningful name that will help you to find the item in your library. The item's title will appear in the Title column in the list of items. However, it will not appear when the item is shown to the respondent, nor when we look at a preview of an item that we are preparing.
Item type: The item type is Multiple choice.
Text: Write the text for your question as it will be shown to the respondent. Use the editing tools as needed.
Correct answer: Click on the radio button to indicate which is the correct answer. Viewing the correct answer does not require the respondant to put in an answer.
Answer (Text or Image): A Multiple choice item must offer at least two possible answers. To add a new choice, click on the + (plus) button to the right of the last choice. Click on the – (minus) to remove a choice that had been added.
Select the file format for the answers.
For Text, write your text in the text box for each element. Use the editing tools as needed.
For Image elements, you can use an image file from your library (see how) or import a new file from another source (see how).
Feedback: Enter the text for the corresponding feedback.
NOTE: The feedback should be used to give a meaningful explanation or feedback other than Correct answer or Incorrect answer, because this general feedback is given automatically when the respondent submits the answer, whether or not you have written feedback for each match. You are not obliged to write feedback for each of the matches, but it is worth the effort because it adds to the teaching potential of the questions.
ADD-ONS FOR A MULTIPLE CHOICE ITEM
The Add-ons tab allows you to add complementary information to the item.
Add-ons 1 and 2: Enter the complementary information related to the question. Use the editing tools as needed. For example, you could give clues to help the respondent understand.
Media in the header: The header of an item can contain a descriptive text, a second line with descriptive text or one or more media files.
Add a descriptive text and a second line of descriptive text. Use the editing tools as needed.
Use the commands Add an image, Add audio file or Add video file, to choose the media file or files for the header. You can use a file that is already saved in your library (see how) or you can import a new file from another source (see how).
PARAMETERS FOR A MULTIPLE CHOICE ITEM
The Parameters tab allows you to define the specific attributes for this item type.
-
Category: An item can belong, or not, to a category. To learn more about categories, see the page.
To associate an item with an existing category, choose a category from the drop-down menu.
To associate an item with a new category, write a name for the category in the input field Add a new category as needed. The new category will be created at the same time as the new item. and will be added to the library under My categories.
-
Setting parameters for the item
- Weighting: Indicate the number of points given to the question.
- Automatically start media: Choose the appropriate option whether or not you want the selected media to start automatically in the Media in the header section, under the Add-ons tab. Your options are:
- Do not start the media: In this case the respondent must start the media.
- Start the audio file and Start the video: The media file will start automatically as soon as the item appears to the respondent.
- Display correct answer: Choose whether or not to show the correct answer to the respondent. It might be pedagogically desirable to show the respondent the correct answer.
- Order in which the elements are shown to the respondent: You can choose to show the elements in an order that is
- Predetermined, whether in the order in which they were entered under the Content tab, or in
- Random order, an order determined by chance, by Netquiz Web.
- Labels for the elements: Choose the label type that that the respondent will see on the left of each matching pair in the published quiz. Your options are:
- Numbers: For example, 1), 2), 3), etc.
- Letters: For example, a), b), c), etc.
- None
-
General messages in the preview language: The General messages appear when the respondent chooses to Submit the answer for correction (See). These messages are defined for all of the items of this type by the person responsible for the quiz (See My languages).
By default, a Correct answer is marked in green, Incorrect answer is marked in red and Incomplete answer is marked in yellow. However, you can provide different messages when creating the item by clicking on Modify these values for this item only.
In order to add an image, a video or an audio file to a message, you can use a file that is already saved in your library (see how) or you can import a new file from another source (see how).
Note: The content of this field is not visible in the published quiz. This is used to write notes to help you manage the content or for collaboration with a colleague. It can help identify an item that you wish to note (such as something to check, complete, check copyrights for, etc.).
Classification type item
A Classification item asks the respondent to place elements into the appropriate file folder.
This item type can offer anywhere from 2 to 6 file folders. You can choose either text or image formats for the elements to file and their respective folders.
At the top and bottom of the page, you can see the Save button, to save the information you have entered, Cancel if you choose not to save the new information, and Preview to see how the item will appear when published. This last command allows you to see the item exactly as it will appear to the respondent.
Note that when you add an item to the library of a given project for which you have invited people to collaborate with you, this item will also be available for them to consult or modify as needed. What's more, if one of the people collaborating modifies an item, the modified version of the item will appear in all of the quizzes that use this item.
DEMO text and video for this item type
Three tabs are used to define the item: Content, Add-ons and Parameters.
CONTENT OF A CLASSIFICATION TYPE ITEM
The Content tab is used to define what makes up the item. By default, a Classification item offers two file folders.
Item title: Enter a meaningful name that will help you to find the item in your library. The item's title will appear in the Title column in the list of items. However, it will not appear when the item is shown to the respondent, nor when we look at a preview of an item that we are preparing.
Item type: The item type is Classification.
Text: Write the text for your question as it will be shown to the respondent. Use the editing tools as needed.
Step 1 DEFINE THE FILE FOLDERS (at least 2 pairs of folders, and not more than 6)
Types of file folders: Choose one of the following combinations:
Image/Image
Image/Text
Text/Image
Text/Text
The first word of the pair describes the sort of label used for the file folders (image or text), whereas the second determines whether the elements to be filed will be images or texts.
If you want your file label to be in Text format, write the title in the input field.
If you want your file label to be in Image format, you can use an image file already saved in your library (see how) or or import a new file from another source (see how).
Feedback: Enter the text for the corresponding feedback.
Step 2 ADD ELEMENTS TO THE FILE FOLDERS: A file-folder image is shown with a label showing either text or an image, depending on what was chosen. Place in each of the file folders the elements that the respondent should put in those folders.
To add an element, click on Add an element. This will display a new element in the file, entitled Element without text. Click on this text to display the information concerning the element. Enter the text for the element, and then enter the corresponding feedback.
Feedback: Enter the text for the corresponding feedback.
This feedback will be more specific than that associated with the file folder, because the feedback will be specific to the element itself.
To remove elements, choose the corresponding buttons and click on Delete the selected items or click on Delete this element above the editing zone for this element.
ADD-ONS FOR CLASSIFICATION ITEMS
The Add-ons tab allows you to add complementary information to the item.
Add-ons 1 and 2: Enter the complementary information related to the question. Use the editing tools as needed. For example, you could give clues to help the respondent understand.
Media in the header: The header of an item can contain a descriptive text, a second line with descriptive text or one or more media files. Use the editing tools as needed.
Use the commands Add image file, Add audio file or Add video file, to choose the media file or files for the header. You can use a file that is already saved in your library (see how) or you can import a new file from another source (see how).
PARAMETERS OF A CLASSIFICATION TYPE ITEM
The Parameters tab allows you to define the specific attributes for this item type.
- Category: An item can belong, or not, to a category. To learn more about categories, see the page.
To associate an item with an existing category, select the category from the drop-down menu.
To associate an item with a new category, enter the name for the category in the input field Add a new category as needed. The new category will be created at the same time as the new item and will be added to the library under My categories.
- Setting parameters for the item
- Weighting: Indicate the number of points given to the question.
- Automatically start media: Choose the appropriate option whether or not you want the selected media to start automatically in the Media in the header section, under the Add-ons tab.
Your options are:
- Do not start the media: In this case, the respondent must start the media.
- Start the audio file and Start the video: The media file will start automatically as soon as the item appears to the respondent.
- Display correct answer: Choose whether or not to show the correct answer to the respondent. It might be pedagogically desirable to show the respondent the correct answer. Viewing the correct answer does not require the respondant to put in an answer.
- Orientation of the elements to be filed: Choose the orientation of the elements displayed.
- Horizontal: In the published quiz, the elements to file will be displayed one beside the other above the file folders.
- Vertical: In the published quiz, the elements to file will be displayed one above the other.
- General messages in the preview language: The General messages appear when the respondent chooses to Submit the answer for correction (See). These messages are defined for all of the items of this type by the person responsible for the quiz (See My languages).
By default, a Correct answer is marked in green, Incorrect answer is marked in red and Incomplete answer is marked in yellow. However, you can provide different messages when creating the item by clicking on Modify these values for this item only.
In order to add an image, a video or an audio file to a message, you can use a file that is already saved in your library (see how) or you can import a new file from another source (see how).
Note: The content of this field is not visible in the published quiz. This is used to write notes to help you manage the content or for collaboration with a colleague. It can help identify an item that you wish to note (such as something to check, complete, check copyrights for, etc.).
Dictation type item
A Dictation item asks the respondent to transcribe a text that she or he hears from an audio or a video file.
The respondent has a text input field to enter the response.
At the top and bottom of the page, you can see the Save button, to save the information you have entered, Cancel if you choose not to save the new information, and Preview to see how the item will appear when published. This last command allows you to see the item exactly as it will appear to the respondent.
Note that when you add an item to the library of a given project for which you have invited people to collaborate with you, this item will also be available for them to consult or modify as needed. What's more, if one of the people collaborating modifies an item, the modified version of the item will appear in all of the quizzes that use this item.
DEMO text and video for this item type
CONTENT OF THE DICTATION ITEM
The Content tab is used to define what makes up the item.
Item title: Enter a meaningful name that will help you to find the item in your library. The item's title will appear in the Title column in the list of items. However, it will not appear when the item is shown to the respondent, nor when we look at a preview of an item that we are preparing.
Item type: The item type is Dictation.
Text: Enter the instructions for the respondent (See Working with text input fields).
Answer for the dictation: Enter the text to be used to correct the dictation. Use texts that are fairly short in order to avoid anomalies that could prevent the correction algorithm from functioning properly. You can subdivide a long text into shorter sections and create a separate dictation item for each section. The respondent's answer must be identical to the one expected to be correct.
General feedback: Enter the text for the corresponding feedback.
ADD-ONS FOR DICTATION ITEMS
The Add-ons tab allows you to add complementary information to the item.
Add-ons 1 and 2: Enter the complementary information related to the question. Use the editing tools as needed. For example, you could give clues to help the respondent understand.
Media in the header: Enter a descriptive text. Use the editing tools as needed.
Use the commands Add image file, Add audio file or Add video file, in order to select the media file or files that the respondent will hear for the dictation exercise. You can use a file that is already saved in your library (see how) or you can import a new file from another source (see how).
PARAMETERS OF A DICTATION TYPE ITEM
The Parameters tab allows you to define the specific attributes for this item type.
- Category: An item can belong, or not, to a category. To learn more about categories, see the page.To associate an item with an existing category, choose a category from the drop-down menu.
To associate an item with a new category, write a name for the category in the input field Add a new category as needed. The new category will be created at the same time as the new item and will be added to the library under My categories. - Setting parameters for the item
- Weighting: Indicate the number of points given to the question.
- Automatically start media: Choose the appropriate option whether or not you want the selected media to start automatically in the Media in the header section, under the Add-ons tab. Your options are:
- Do not start the media: In this case, the respondent must start the media.
- Start the audio file and Start the video: The media file will start automatically as soon as the item appears to the respondent.
- Display correct answer: Choose whether or not to show the correct answer to the respondent. It might be pedagogically desirable to show the respondent the correct answer. Viewing the correct answer does not require the respondant to put in an answer.
- Points lost for misspelled words: Enter the percentage of a point to be lost for each spelling error.
You can choose the value that you want but try to adjust the weighting in relation to the length of the text so that the respondent will not have an unfairly low mark for just one error or a very high mark for a short sentence with several errors.
- When correcting, you can take into account:
- Upper case and lower case letters, and
- Punctuation
Netquiz Web detects the following errors:
Words with spelling mistakes
Missing words
Extra words
- General messages in the preview language: The General messages appear when the respondent chooses to Submit the answer for correction (See). These messages are defined for all of the items of this type by the person responsible for the quiz (See My languages). By default, a Correct answer is marked in green, Incorrect answer is marked in red and Incomplete answer is marked in yellow. However, you can provide different messages when creating the item by clicking on Modify these values for this item only. In order to add an image, a video or an audio file to a message, you can use a file that is already saved in your library (see how) or you can import a new file from another source (see how).
Note: The content of this field is not visible in the published quiz. This is used to write notes to help you manage the content or for collaboration with a colleague. It can help identify an item that you wish to note (such as something to check, complete, check copyrights for, etc.).
Essay type item
An essay-type item asks the respondent to answer freely or express an opinion about the given subject.
The respondent has a text input field to enter the response.
At the top and bottom of the page, you can see the Save button, to save the information you have entered, Cancel if you choose not to save the new information, and Preview to see how the item will appear when published. This last command allows you to see the item exactly as it will appear to the respondent.
Note that when you add an item to the library of a given project for which you have invited people to collaborate with you, this item will also be available for them to consult or modify as needed. What's more, if one of the people collaborating modifies an item, the modified version of the item will appear in all of the quizzes that use this item.
DEMO text and video for this item type
Three tabs are used to define the item: Content, Add-ons and Parameters.
CONTENT OF AN ESSAY ITEM
The Content tab is used to define what makes up the item.
Item title: Enter a meaningful name that will help you to find the item in your library. The item's title will appear in the Title column in the list of items. However, it will not appear when the item is shown to the respondent, nor when we look at a preview of an item that we are preparing.
Item type: The item type is Essay.
Text: Write the text for your question as it will be shown to the respondent. Use the editing tools as needed.
Suggested answer: Enter an answer or a comment that will be shown when the respondent Submit the answer for correction. The respondent's answer must be identical to the expected one to be correct.
ADD-ONS FOR THE ESSAY ITEM
The Add-ons tab allows you to add complementary information to the item.
Add-ons 1 and 2: Enter the complementary information related to the question. Use the editing tools as needed. For example, you could give clues to help the respondent understand.
Media in the header: The header of an item can contain a descriptive text, a second line with descriptive text or one or more media files.
Add a descriptive text and a second line of descriptive text. Use the editing tools as needed.
Use the commands Add an image, Add an audio file or Add a video, to choose the media file or files for the header. You can use a file that is already saved in your library (see how) or you can import a new file from another source (see how).
PARAMETERS FOR AN ESSAY ITEM
The Parameters tab allows you to define the specific attributes for this item type.
- Category: An item can belong, or not, to a category. To learn more about categories, see the page.
To associate an item with an existing category, choose a category from the drop-down menu.
To associate an item with a new category, write a name for the category in the input field Add a new category as needed. The new category will be created at the same time as the new item and will be added to the library under My categories.
- Setting parameters for the item
- Weighting: Indicate the number of points given to the question.
- Automatically start media: Choose the appropriate option whether or not you want the selected media to start automatically in the Media in the header section, under the Add-ons tab. Your options are:
- Do not start the media: In this case, the respondent must start the media.
- Start the audio file and Start the video: The media file will start automatically as soon as the item appears to the respondent.
- Display correct answer: Choose whether or not to show the correct answer to the respondent. It might be pedagogically desirable to show the respondent the correct answer. Viewing the correct answer does not require the respondant to put in an answer.
Note: The content of this field is not visible in the published quiz. This is used to write notes to help you manage the content or for collaboration with a colleague. It can help identify an item that you wish to note (such as something to check, complete, check copyrights for, etc.).
Fill in the blanks type item
A Fill in the blanks item asks the respondent to complete a text by filling in missing words or expressions.
At the top and bottom of the page, you can see the Save button, to save the information you have entered, Cancel if you choose not to save the new information, and Preview to see how the item will appear when published. This last command allows you to see the item exactly as it will appear to the respondent.
Note that when you add an item to the library of a given project for which you have invited people to collaborate with you, this item will also be available for them to consult or modify as needed. What's more, if one of the people collaborating modifies an item, the modified version of the item will appear in all of the quizzes that use this item.
DEMO text and video for this item type
Three tabs are used to define the item: Content, Add-ons and Parameters.
CONTENT OF A FILL IN THE BLANKS ITEM
The Content tab is used to define what makes up the item.
Item title: Enter a meaningful name that will help you to find the item in your library. The item's title will appear in the Title column in the list of items. However, it will not appear when the item is shown to the respondent, nor when we look at a preview of an item that we are preparing.
Item type: This is a Fill in the blanks type item.
Text: Write the text for your question as it will be shown to the respondent. Use the editing tools as needed.
Step 1 - DEFINE THE TYPE OF BLANKS: Your options are:
Drag and Drop: The respondent uses his or her cursor to select and slide the words or expressions displayed over the text into the appropriate space;
drop-down menu: For each space, the respondent selects a word or expression for a drop-down menu;
Short answer: The respondent writes the answer into the empty input field.
STEP 2 – WRITE THE TEXT AND ADD THE BLANKS
- Enter the entire text into the text input field.
- Select a portion on the text that you want the respondent to complete. Be careful not to select the spaces or punctuation before or after the text to remove.
- Click on Add a blank.
- For each of the blanks, click on the radio button to indicate the correct answer.
- The respondent must enter the missing text in its correct form; otherwise the answer will be incorrect.
- Enter at least two possible answers and the appropriate feedback.
Drag and Drop: all the possible answers are displayed above the text that is shown to the respondent;
Drop-down menu: the correct answer and the incorrect answers are displayed in the drop-down menu;
Short answer: you must provide a feedback message for all unforeseen answers.
The arrows situated above the editing zone of a blank allow you to move from one blank to another without having to click on each blank in the text. This can be very helpful when revising feedback messages.
To delete a blank:
in the text input field, select the blank and click on Delete the selected blanks
OR
in the editing zone, select the blanked text and click on Delete this blank.
ADD-ONS FOR A FILL IN THE BLANKS ITEM
The Add-ons tab allows you to add complementary information to the item.
Add-ons 1 and 2: Enter the complementary information related to the question. Use the editing tools as needed. For example, you could give clues to help the respondent understand.
Media in the header: The header of an item can contain a descriptive text, a second line with descriptive text or one or more media files. Use the editing tools as needed.
Use the commands Add image file, Add audio file or Add video file to choose the media file or files for the header. You can use a file that is already saved in your library (see how) or you can import a new file from another source (see how).
PARAMETERS OF A FILL IN THE BLANKS ITEM
The Parameters tab allows you to define the specific attributes for this item type.
- Category: An item can belong, or not, to a category. To learn more about categories, see the page.
To associate an item with an existing category, select the category from the drop-down menu.
To associate an item with a new category, enter the name for the category in the input field Add a new category as needed. The new category will be created at the same time as the new item and will be added to the library under My categories.
- Setting parameters for the item
- Weighting: Indicate the number of points given to the question.
- Automatically start media: Choose the appropriate option whether or not you want the selected media to start automatically in the Media in the header section, under the Add-ons tab. Your options are:
- Do not start the media: In this case, the respondent must start the media.
- Start the audio file and Start the video: The media file will start automatically as soon as the item appears to the respondent.
- Display correct answer: Choose whether or not to show the correct answer to the respondent. It might be pedagogically desirable to show the respondent the correct answer. Viewing the correct answer does not require the respondant to put in an answer.
For the correction of Short answer items, take into consideration:
- Upper case and lower case letters, and
- Punctuation.
- General messages in the preview language: The General messages appear when the respondent chooses to Submit the answer for correction (See). These messages are defined for all of the items of this type by the person responsible for the quiz (See My languages).
By default, a Correct answer is marked in green, Incorrect answer is marked in red and Incomplete answer is marked in yellow. However, you can provide different messages when creating the item by clicking on Modify these values for this item only.
In order to add an image, a video or an audio file to a message, you can use a file that is already saved in your library (see how) or you can import a new file from another source (see how).
Note: The content of this field is not visible in the published quiz. This is used to write notes to help you manage the content or for collaboration with a colleague. It can help identify an item that you wish to note (such as something to check, complete, check copyrights for, etc.).
Highlight type item
A Highlight item asks the respondent to find elements in a text and highlight them with different colours.
Netquiz Web offers a choice of nine different colours.
At the top and bottom of the page, you can see the Save button, to save the information you have entered, Cancel if you choose not to save the new information, and Preview to see how the item will appear when published. This last command allows you to see the item exactly as it will appear to the respondent.
Note: When you add an item to the library of a given project for which you have invited people to collaborate with you, this item will also be available for them to consult or modify as needed. What's more, if one of the people collaborating modifies an item, the modified version of the item will appear in all of the quizzes that use this item.
DEMO text and video for this item type
Three tabs are used to define the item: Content, Add-ons and Parameters.
CONTENT OF THE HIGHLIGHT ITEM
The Content tab is used to define what makes up the item.
Item title: Enter a meaningful name that will help you to find the item in your library. The item's title will appear in the Title column in the list of items. However, it will not appear when the item is shown to the respondent, nor when we look at a preview of an item that we are preparing.
Item type: The item type is Highlight.
Text: Enter the instructions for the respondent (See Working with text input fields).
STEP 1 DEFINE HIGHLIGHTER COLOURS
Choose a colour and indicate the meaning of this highlight.
Feedback: Enter texts for appropriate feedback.
STEP 2 – WRITE THE TEXT AND ADD HIGHLIGHTER
- Enter the entire text into the text input field.
- Select a portion on the text that you want to highlight. Be careful not to select the spaces or punctuation before or after the text to highlight.
- Click on Add a highlight.
- Move the cursor over the square to the right of Highlight colour and select the appropriate colour.
- Enter appropriate feedback.
- Repeat the steps for each of the terms you wish to highlight.
The arrows situated over the highlight-editing zone allow you to pass from one highlight to another without having to click on each highlight in the text. This can be very useful when revising feedback messages.
To delete a highlight:
in the text input field, select the highlighted text and click on Delete highlighted sections
OR
in the highlight editing zone, click on Delete this highlight.
Feedback for each highlight colour: Enter texts for appropriate feedback.
ADD-ONS FOR HIGHLIGHT ITEMS
The Add-ons tab allows you to add complementary information to the item.
Add-ons 1 and 2: Enter the complementary information related to the question. Use the editing tools as needed. For example, you could give clues to help the respondent understand.
Media in the header: The header of an item can contain a descriptive text, a second line with descriptive text or one or more media files.
Add a descriptive text and a second line of descriptive text. Use the editing tools as needed.
Use the commands Add image file, Add audio file or Add video file to choose the media file or files for the header. You can use a file that is already saved in your library (see how) or you can import a new file from another source (see how).
PARAMETERS OF A HIGHLIGHT TYPE ITEM
The Parameters tab allows you to define the specific attributes for this item type.
- Category: An item can belong, or not, to a category. To learn more about categories, see the page.
To associate an item with an existing category, select the category from the drop-down menu. To associate an item with a new category, enter the name for the category in the input field Add a new category as needed. The new category will be created at the same time as the new item and will be added to the library under My categories.
- Setting parameters for the item
- Weighting: Indicate the number of points given to the question.
- Automatically start media: Choose the appropriate option whether or not you want the selected media to start automatically in the Media in the header section, under the Add-ons tab. Your options are:
- Do not start the media: In this case, the respondent must start the media.
- Start the audio file and Start the video: The media file will start automatically as soon as the item appears to the respondent.
- Display correct answer: Choose whether or not to show the correct answer to the respondent. It might be pedagogically desirable to show the respondent the correct answer. Viewing the correct answer does not require the respondant to put in an answer.
- Points lost for an incorrect answer: You can choose the value that you want but try to adjust the weighting in relation to the number of possible incorrect answers in the text so that the respondent will not have an unfairly low mark for just one error or a very high mark for a short sentence with several errors.
- General messages in the preview language: The General messages appear when the respondent chooses to Submit the answer for correction (See). These messages are defined for all of the items of this type by the person responsible for the quiz (See My languages).
By default, a Correct answer is marked in green, Incorrect answer is marked in red and Incomplete answer is marked in yellow. However, you can provide different messages when creating the item by clicking on Modify these values for this item only.
In order to add an image, a video or an audio file to a message, you can use a file that is already saved in your library (see how) or you can import a new file from another source (see how).
Note: The content of this field is not visible in the published quiz. This is used to write notes to help you manage the content or for collaboration with a colleague. It can help identify an item that you wish to note (such as something to check, complete, check copyrights for, etc.).
Identify parts of an image type item
An Identify-parts-of-an-image type item asks the respondent to identify different sections of an image.
At the top and bottom of the page, you can see the Save button, to save the information you have entered, Cancel if you choose not to save the new information, and Preview to see how the item will appear when published. This last command allows you to see the item exactly as it will appear to the respondent (see Web preview).
Note: When you add an item to the library of a given project for which you have invited people to collaborate with you, this item will also be available for them to consult or modify as needed. What's more, if one of the people collaborating modifies an item, the modified version of the item will appear in all of the quizzes that use this item.
DEMO text and video for this item type
Three tabs are used to define the item: Content, Add-ons and Parameters.
CONTENT AS AN IDENTIFY PARTS OF AN IMAGE ITEM
The Content tab is used to define what makes up the item.
Item title: Enter a meaningful name that will help you to find the item in your library. The item's title will appear in the Title column in the list of items. However, it will not appear when the item is shown to the respondent, nor when we look at a preview of an item that we are preparing.
Item type: The item type is Identify parts of an image.
Text: Write the text for your question as it will be shown to the respondent. Use the editing tools as needed.
Colour for the contours of the sections within the image: Choose a colour from the Box-outline-colour drop-down menu. It is important to select a colour that contrasts with the image you have chosen so that the labels that identify the image parts will be easy to see.
Image: Click on Add image file. You can use an image file from your library (see how) or import a new file from another source (see how).
You will find as many labels as there are zones to identify, as defined at the bottom of the page. These labels are piled one on top of the other in the upper left corner of the image. Slide each label to the corresponding part of the image; this will automatically insert the X and Y coordinates for each of the zones. You can modify these coordinates, but they could be useful if you want to use the same the same positions for the parts of another image of the same format.
NOTE: Netquiz Web uses the image and labels as the model for the respondent to reproduce. The order in which the respondent see the parts of the image to be identified is determined under the Parameters tab.
Zones to identify: An Identify parts of an image item has at least two zones to identify. To add a new choice, click on the + (plus) button to the right of the last choice. Click on the – (minus) to remove a choice that had been added.
Select the file format for the answers.
For Text, write your text in the input field for each element. Use the editing tools as needed.
For Image elements, you can use an image file from your library (see how) or import a new file from another source (see how).
Feedback: Enter the text for the corresponding feedback.
NOTE: The feedback should be used to give a meaningful explanation or feedback other than Correct answer or Incorrect answer, because this general feedback is given automatically when the respondent submits the answer, whether or not you have written feedback for each possible response. You are not obliged to write feedback for every possible answer, but it is worth the effort because it adds to the teaching potential of the questions.
ADD-ONS FOR AN IDENTIFY PARTS OF AN IMAGE ITEM
The Add-ons tab allows you to add complementary information to the item.
Add-ons 1 and 2: Enter the complementary information related to the question. Use the editing tools as needed [lien vers fichier ContenuPartagéEditeurTexte]. For example, you could give clues to help the respondent understand.
Media in the header: The header of an item can contain a descriptive text, a second line with descriptive text or one or more media files.
Add a descriptive text and a second line of descriptive text. Use the editing tools as needed.
Use the commands Add image file, Add audio file or Add video fileto choose the media file or files for the header. You can use a file that is already saved in your library (see how) or you can import a new file from another source (see how).
PARAMETERS OF AN IDENTIFY PARTS OF AN IMAGE ITEM
The Parameters tab allows you to define the specific attributes for this item type.
- Category: An item can belong, or not, to a category. To learn more about categories, see the page.
To associate an item with an existing category, choose a category from the drop-down menu.
To associate an item with a new category, write a name for the category in the input field Add a new category as needed. The new category will be created at the same time as the new item and will be added to the library under My categories.
- Parameters for the item
- Weighting: Indicate the number of points given to the question.
- Automatically start media: Choose the appropriate option whether or not you want the selected media to start automatically in the Media in the header section, under the Add-ons tab. Your options are:
- Do not start the media: In this case, the respondent must start the media.
- Start the audio file and Start the video: The media file will start automatically as soon as the item appears to the respondent.
- Display correct answer: Choose whether or not to show the correct answer to the respondent. It might be pedagogically desirable to show the respondent the correct answer. Viewing the correct answer does not require the respondant to put in an answer.
- Order in which the elements are shown to the respondent: You can choose to show the elements in an order that is
- Predetermined, whether in the order in which they were entered under the Content tab, or in
- Random order, an order determined by chance by Netquiz Web.
- Labels for the elements: Choose the label type that that the respondent will see on the left of each element in the published quiz. Your options are:
- Numbers: For example, 1), 2), 3), etc.
- Letters: For example, a), b), c), etc.
- None
- General messages in the preview language: The General messages appear when the respondent chooses to Submit the answer for correction (See). These messages are defined for all of the items of this type by the person responsible for the quiz (See My languages).
By default, a Correct answer is marked in green, Incorrect answer is marked in red and Incomplete answer is marked in yellow. However, you can provide different messages when creating the item by clicking on Modify these values for this item only. In order to add an image, a video or an audio file to a message, you can use a file that is already saved in your library (see how) or you can import a new file from another source (see how).
Note: The content of this field is not visible in the published quiz. This is used to write notes to help you manage the content or for collaboration with a colleague. It can help identify an item that you wish to note (such as something to check, complete, check copyrights for, etc.).
Matching board type item
A Matching board item asks the respondent to find matching pairs of elements, which can be either text or images, in a sort of checkerboard.
Like Matching items, this item type requires the respondents to find pairs of elements, but this time from a group of cards spread over a checkerboard. You can use anywhere from 2 to 10 pairs of elements on the checkerboard.
At the top and bottom of the page, you can see the Save button, to save the information you have entered, Cancel if you choose not to save the new information, and Preview to see how the item will appear when published. This last command allows you to see the item exactly as it will appear to the respondent.
Note that when you add an item to the library of a given project for which you have invited people to collaborate with you, this item will also be available for them to consult or modify as needed. What's more, if one of the people collaborating modifies an item, the modified version of the item will appear in all of the quizzes that use this item.
DEMO text and video for this item type
Three tabs are used to define the item: Content, Add-ons and Parameters.
Editing this type of item is very similar to editing Matching type items, since in both cases you must add pairs of matching elements, one in the Element column and the other to the Associated element column. These elements can either be in image or text format. You choose the format from the drop-down menu above the columns.
CONTENT OF THE MATCHING BOARD ITEM
The Content tab is used to define what makes up the item. By default, the Matching board contains two pairs of elements.
Item title: Enter a meaningful name that will help you to find the item in your library. The item's title will appear in the Title column in the list of items. However, it will not appear when the item is shown to the respondent, nor when we look at a preview of an item that we are preparing.
Item type: The item type is Matching board.
Text: Write the text for your question as it will be shown to the respondent. Use the editing tools as needed.
Element and Associated element: A Matching board item must have at least two pairs of elements. To add a new pair, click on the + (plus) button to the right of the last element. Click on the – (minus) button to remove a pair of elements.
Choose a file format for the elements and for their associated elements.
For Text, write your text in the input field for each element. Use the editing tools as needed.
For Image elements, you can use an image file from your library (see how) or import a new file from another source (see how).
Positive feedback and Negative feedback: Write the text that the respondent will see depending on whether the answer given is correct or incorrect. Use the editing tools as needed.
NOTE: The feedback should be used to give a meaningful explanation or feedback other than Correct answer or Incorrect answer, because this general feedback is given automatically when the respondent submits the answer, whether or not you have written feedback for each match. You are not obliged to write feedback for each of the matches, but it is worth the effort because it adds to the teaching potential of the questions.
ADD-ONS FOR THE MATCHING BOARD ITEMS
The Add-ons tab allows you to add complementary information to the item.
Add-ons 1 and 2: Enter the complementary information related to the question. Use the editing tools as needed. For example, you could give clues to help the respondent understand.
Media in the header: The header of an item can contain a descriptive text, a second line with descriptive text or one or more media files.
Add a descriptive text and a second line of descriptive text. Use the editing tools as needed.
Use the commands Add an image, Add audio file or Add video file, to choose the media file or files for the header. You can use a file that is already saved in your library (see how) or you can import a new file from another source (see how).
PARAMETERS OF A MATCHING BOARD TYPE ITEM
The Parameters tab allows you to define the specific attributes for this item type.
-
Category: An item can belong, or not, to a category. To learn more about categories, see the page.
To associate an item with an existing category, choose a category from the drop-down menu.
To associate an item with a new category, write a name for the category in the input field Add a new category as needed. The new category will be created at the same time as the new item and will be added to the library under My categories.
-
Setting parameters for the item
- Weighting: Indicate the number of points given to the question.
- Automatically start media: Choose the appropriate option whether or not you want the selected media to start automatically in the Media in the header section, under the Add-ons tab. Your options are:
- Do not start the media: In this case, the respondent must start the media.
- Start the audio file and Start the video: The media file will start automatically as soon as the item appears to the respondent.
- Display correct answer: Choose whether or not to show the correct answer to the respondent. It might be pedagogically desirable to show the respondent the correct answer. Viewing the correct answer does not require the respondant to put in an answer.
- Background colour of the element: Move your cursor over the colour pallet to choose a distinctive colour for the elements.
- Background colour for the associated elements: Move your cursor over the colour pallet to choose a distinctive colour for the associated elements.
- Type of display for the elements:
- Hidden from the beginning: The squares of the checkerboard are hidden from the beginning, and the respondent must reveal them by successively clicking to find the elements that make up a pair. This exercise is like a memory game.
- Not hidden from the beginning: the checker board squares are not hidden at the start, and the respondent hides them by successively finding the elements that make up the pairs. This exercise is more like matching type items.
-
General messages in the preview language: The General messages appear when the respondent chooses to Submit the answer for correction (See). These messages are defined for all of the items of this type by the person responsible for the quiz (See My languages).
By default, a Correct answer is marked in green, Incorrect answer is marked in red and Incomplete answer is marked in yellow. However, you can provide different messages when creating the item by clicking on Modify these values for this item only.
In order to add an image, a video or an audio file to a message, you can use a file that is already saved in your library (see how) or you can import a new file from another source (see how).
Note: The content of this field is not visible in the published quiz. This is used to write notes to help you manage the content or for collaboration with a colleague. It can help identify an item that you wish to note (such as something to check, complete, check copyrights for, etc.).
Matching type item
A matching type item asks the respondent to match elements from the first column with corresponding elements in the second column.
This item type can include anywhere from 2 to 30 pairs to match, however if there are too many pairs to match, the exercise might become difficult for some respondents. The pair of elements to match can be in text or image formats, or a combination of the two. For example, you can offer images in one column to be matched with a text in the second column.
At the top and bottom of the page, you can see the Save button, to save the information you have entered, Cancel if you choose not to save the new information, and Preview to see how the item will appear when published. This last command allows you to see the item exactly as it will appear to the respondent.
Note that when you add an item to the library of a given project for which you have invited people to collaborate with you, this item will also be available for them to consult or modify as needed. What's more, if one of the people collaborating modifies an item, the modified version of the item will appear in all of the quizzes that use this item.
DEMO text and video for this item type
Three tabs are used to define the item: Content, Add-ons and Parameters.
CONTENT OF A MATCHING TYPE ITEM
The Content tab is used to define what makes up the item. By default, Matching items contain two pairs of elements.
Item title: Enter a meaningful name that will help you to find the item in your library. The item's title will appear in the Title column in the list of items. However, it will not appear when the item is shown to the respondent, nor when we look at a preview of an item that we are preparing.
Item type: The item type is Matching
Text: Write the text for your question, as it will be shown to the respondent. Use the editing tools as needed.
Element and Associated element: A Matching item must have at least two pairs of elements. To add a new pair, click on the + (plus) button to the right of the last element. Click on the – (minus) button to remove a pair of elements.
Choose a file format for the elements and for their associated elements.
For Text, write your text in the text box for each element. Use the editing tools as needed.
For Image elements, you can use an image file from your library (see how) or import a new file from another source (see how).
Positive feedback and Negative feedback: Write the text that the respondent will see depending on whether the answer is correct or incorrect. Use the editing tools as needed.
NOTE: The feedback should be used to give a meaningful explanation or feedback other than Correct answer or Incorrect answer, because this general feedback is given automatically when the respondent submits the answer, whether or not you have written feedback for each match. You are not obliged to write feedback for each of the matches, but it is worth the effort because it adds to the teaching potential of the questions.
ADD-ONS FOR MATCHING ITEMS
The Add-ons tab allows you to add complementary information to the item.
Add-ons 1 and 2: Enter the complementary information related to the question. Use the editing tools as needed. For example, you could give clues to help the respondent understand.
Media in the header: The header of an item can contain a descriptive text, a second line with descriptive text or one or more media files. Use the editing tools as needed.
Use the commands Add image file, Add audio file or Add video file, to choose the media file or files for the header. You can use a file that is already saved in your library (see how) or you can import a new file from another source (see how).
THE PARAMETERS OF A MATCHING TYPE ITEM
The Parameters tab allows you to define the specific attributes for this item type.
-
Category: An item can belong, or not, to a category. To learn more about categories, see the page.
To associate an item with an existing category, choose a category from the drop-down menu.
To associate an item with a new category, write a name for the category in the input field Add a new category as needed. The new category will be created at the same time as the new item and will be added to the library under My categories.
-
Setting parameters for the item
- Weighting: Indicate the number of points given to the question.
- Automatically start media: Choose the appropriate option whether or not you want the selected media to start automatically in the Media in the header section, under the Add-ons tab. Your options are:
- Do not start the media: In this case, the respondent must start the media.
- Start the audio file and Start the video: The media file will start automatically as soon as the item appears to the respondent.
- Display correct answer: Choose whether or not to show the correct answer to the respondent. It might be pedagogically desirable to show the respondent the correct answer. Viewing the correct answer does not require the respondant to put in an answer.
- Labels for the elements: Choose the label type that that the respondent will see on the left of each matching pair in the published quiz. Your options are:
- Numbers: For example, 1), 2), 3), etc.
- Letters: For example, a), b), c), etc.
- None -
General messages in the preview language: The General messages appear when the respondent chooses to Submit the answer for correction (See). These messages are defined for all of the items of this type by the person responsible for the quiz (See My languages).
By default, a Correct answer is marked in green, Incorrect answer is marked in red and Incomplete answer is marked in yellow. However, you can provide different messages when creating the item by clicking on Modify these values for this item only.
In order to add an image, a video or an audio file to a message, you can use a file that is already saved in your library (see how) or you can import a new file from another source (see how).
Note: The content of this field is not visible in the published quiz. This is used to write notes to help you manage the content or for collaboration with a colleague. It can help identify an item that you wish to note (such as something to check, complete, check copyrights for, etc.).
Page type item
Page items allow the users to add pages other than question pages to their quizzes. You can add a page as an introduction or an end page to a quiz, to separate sections or for any other useful function in presenting your quiz.
This type of item can be used to give a lesson, an explanation or instructions. You can follow a page like this with a series of exercises based on various item types.
At the top and bottom of the page, you can see the Save button, to save the information you have entered, Cancel if you choose not to save the new information, and Preview to see how the item will appear when published. This last command allows you to see the item exactly as it will appear to the respondent.
Note that when you add an item to the library of a given project for which you have invited people to collaborate with you, this item will also be available for them to consult or modify as needed. What's more, if one of the people collaborating modifies an item, the modified version of the item will appear in all of the quizzes that use this item.
DEMO text and video for this item type
Three tabs are used to define the item: Content, Add-ons and Parameters.
CONTENT OF THE PAGE ITEM
The Content tab is used to define what makes up the item.
Item title: Enter a meaningful name that will help you to find the item in your library. The item's title will appear in the Title column in the list of items. However, it will not appear when the item is shown to the respondent, nor when we look at a preview of an item that we are preparing.
Item type: The item type is Page.
Text: Write the text for your question as it will be shown to the respondent. Use the editing tools as needed.
ADD-ONS FOR PAGE ITEMS
The Add-ons tab allows you to add complementary information to the item.
Media in the header: The header of an item can contain a descriptive text, a second line with descriptive text or one or more media files. Use the editing tools as needed.
Use the commands Add image file, Add audio file or Add video file, to choose the media file or files for the header. You can use a file that is already saved in your library (see how) or you can import a new file from another source (see how).
PARAMETERS OF A PAGE ITEM
The Parameters tab allows you to define the specific attributes for this item type.
- Category: An item can belong, or not, to a category. To learn more about categories, see the page.
To associate an item with an existing category, choose a category from the drop-down menu.
To associate an item with a new category, write a name for the category in the input field Add a new category as needed. The new category will be created at the same time as the new item and will be added to the library under My categories.
- Setting parameters for the item
- Automatically start media: Choose the appropriate option whether or not you want the selected media to start automatically in the Media in the header section, under the Add-ons tab. Your options are:
- Do not start the media: In this case, the respondent must start the media.
- Start the audio file and Start the video: The media file will start automatically as soon as the item appears to the respondent.
Note: The content of this field is not visible in the published quiz. This is used to write notes to help you manage the content or for collaboration with a colleague. It can help identify an item that you wish to note, such as something to check, complete, check copyrights for, etc.).
Sequencing type item
A Sequencing item asks the respondent to put a list of elements, which can be either texts or images, in order.
A Sequencing item can include from 2 to 30 elements to be placed in order. Please note that too many elements can become difficult to manipulate in the Web version of this item.
At the top and bottom of the page, you can see the Save button, to save the information you have entered, Cancel if you choose not to save the new information, and Preview to see how the item will appear when published. This last command allows you to see the item exactly as it will appear to the respondent.
Note that when you add an item to the library of a given project for which you have invited people to collaborate with you, this item will also be available for them to consult or modify as needed. What's more, if one of the people collaborating modifies an item, the modified version of the item will appear in all of the quizzes that use this item.
DEMO text and video for this item type
CONTENT OF A SEQUENCING ITEM
The Content tab is used to define what makes up the item. By default, a Sequencing item contains two elements.
Item title: Enter a meaningful name that will help you to find the item in your library. The item's title will appear in the Title column in the list of items. However, it will not appear when the item is shown to the respondent, nor when we look at a preview of an item that we are preparing.
Item type: The item type is Sequencing.
Text: Write the text for your question as it will be shown to the respondent. Use the editing tools as needed.
Element: A Sequencing item must have at least two elements. Enter the elements in the correct order; this will be the reference for correction. To add a new element, click on the + (plus) button to the right of the last element. Click on the – (minus) button to remove an element.
Select the file format for the answers.
For Text, write your text in the input field for each element. Use the editing tools as needed.
For Image elements, you can use an image file from your library (see how) or import a new file from another source (see how).
Positive feedback and Negative feedback: Write the text that the respondent will see depending on whether the answer given is correct or incorrect. Use the editing tools as needed.
NOTE: The feedback should be used to give a meaningful explanation or feedback other than Correct answer or Incorrect answer, because this general feedback is given automatically when the respondent submits the answer, whether or not you have written feedback for each match. You are not obliged to write feedback for each of the matches, but it is worth the effort because it adds to the teaching potential of the questions.
ADD-ONS FOR SEQUENCING ITEMS
The Add-ons tab allows you to add complementary information to the item.
Add-ons 1 and 2: Enter the complementary information related to the question. Use the editing tools as needed. For example, you could give clues to help the respondent understand.
Media in the header: The header of an item can contain a descriptive text, a second line with descriptive text or one or more media files.
The header of an item can contain a descriptive text, a second line with descriptive text or one or more media files. Use the editing tools as needed.
Use the commands Add image file, Add audio file or Add video file, to choose the media file or files for the header. You can use a file that is already saved in your library (see how) or you can import a new file from another source (see how).
PARAMETERS OF A SEQUENCING ITEM
The Parameters tab allows you to define the specific attributes for this item type.
- Category: An item can belong, or not, to a category. To learn more about categories, see the page.
To associate an item with an existing category, choose a category from the drop-down menu.
To associate an item with a new category, write a name for the category in the input field Add a new category as needed. The new category will be created at the same time as the new item and will be added to the library under My categories.
- Setting parameters for the item
- Weighting: Indicate the number of points given to the question.
- Automatically start media: Choose the appropriate option whether or not you want the selected media to start automatically in the Media in the header section, under the Add-ons tab. Your options are:
- Do not start the media: In this case, the respondent must start the media.
- Start the audio file and Start the video: The media file will start automatically as soon as the item appears to the respondent.
- Display correct answer: Choose whether or not to show the correct answer to the respondent. It might be pedagogically desirable to show the respondent the correct answer. Viewing the correct answer does not require the respondant to put in an answer.
- Labels for the elements: Choose the label type that that the respondent will see on the left of each element in the published quiz. Your options are:
- Numbers: For example, 1), 2), 3), etc.
- Letters: For example, a), b), c), etc.
- None
- General messages in the preview language: The General messages appear when the respondent chooses to Submit the answer for correction (See). These messages are defined for all of the items of this type by the person responsible for the quiz (See My languages).
By default, a Correct answer is marked in green, Incorrect answer is marked in red and Incomplete answer is marked in yellow. However, you can provide different messages when creating the item by clicking on Modify these values for this item only. In order to add an image, a video or an audio file to a message, you can use a file that is already saved in your library (see how) or you can import a new file from another source (see how).
Note: The content of this field is not visible in the published quiz. This is used to write notes to help you manage the content or for collaboration with a colleague. It can help identify an item that you wish to note (such as something to check, complete, check copyrights for, etc.).
Short answer type item
A Short answer item asks the respondent to write a short answer to a given question.
At the top and bottom of the page, you can see the Save button, to save the information you have entered, Cancel if you choose not to save the new information, and Preview to see how the item will appear when published. This last command allows you to see the item exactly as it will appear to the respondent (See).
Note that when you add an item to the library of a given project for which you have invited people to collaborate with you, this item will also be available for them to consult or modify as needed. What's more, if one of the people collaborating modifies an item, the modified version of the item will appear in all of the quizzes that use this item.
DEMO text and video for this item type
Three tabs are used to define the item: Content, Add-ons and Parameters.
CONTENT OF A SHORT ANSWER ITEM
The Content tab is used to define what makes up the item. By default, a Short answer item offers two potential answers.
Item title: Enter a meaningful name that will help you to find the item in your library. The item's title will appear in the Title column in the list of items. However, it will not appear when the item is shown to the respondent, nor when we look at a preview of an item that we are preparing.
Item type: The item type is Short answer.
Text: Write the question text that the respondent will see. Use the editing tools as needed.
Answer: Under the question statement, give correct and incorrect of answers that you anticipate the respondents giving for this question. To add a new potential answer, click on the + (plus) button to the right of the last answer. Click on the – (minus) to remove an answer that you have indicated.
Correct answer: Click on the radio button to indicate which is the correct answer. Viewing the correct answer does not require the respondant to put in an answer.
Feedback: Enter the text for the corresponding feedback.
NOTE: The feedback should be used to give a meaningful explanation or feedback other than Correct answer or Incorrect answer, because this general feedback is given automatically when the respondent submits the answer, whether or not you have written feedback for each possible response. You are not obliged to write feedback for every possible answer, but it is worth the effort because it adds to the teaching potential of the questions.
ADD-ONS FOR THE SHORT ANSWER ITEM
The Add-ons tab allows you to add complementary information to the item.
Add-ons 1 and 2: Enter the complementary information related to the question. Use the editing tools as needed. For example, you could give clues to help the respondent understand.
Media in the header: The header of an item can contain a descriptive text, a second line with descriptive text or one or more media files
Add a descriptive text and a second line of descriptive text. Use the editing tools as needed. Use the commands Add an image, Add an audio file or Add a video, to choose the media file or files for the header. You can use a file that is already saved in your library (see how) or you can import a new file from another source (see how).
PARAMETERS OF A SHORT ANSWER ITEM
The Parameters tab allows you to define the specific attributes for this item type.
- Category: An item can belong, or not, to a category. To learn more about categories, see the page.
To associate an item with an existing category, select the category from the drop-down menu.
To associate an item with a new category, enter the name for the category in the input field Add a new category as needed. The new category will be created at the same time as the new item and will be added to the library under My categories.
- Setting parameters for the item
- Weighting: Indicate the number of points given to the question.
- Automatically start media: Choose the appropriate option whether or not you want the selected media to start automatically in the Media in the header section, under the Add-ons tab. Your options are:
- Do not start the media: In this case, the respondent must start the media.
- Start the audio file and Start the video: The media file will start automatically as soon as the item appears to the respondent.
- Display correct answer: Choose whether or not to show the correct answer to the respondent. It might be pedagogically desirable to show the respondent the correct answer.
- When correcting, take into account...
- Upper case and lower case letters
- Punctuation
- General messages in the preview language: The General messages appear when the respondent chooses to Submit the answer for correction (See). These messages are defined for all of the items of this type by the person responsible for the quiz (See My languages).
By default, a Correct answer is marked in green, Incorrect answer is marked in red and Incomplete answer is marked in yellow. However, you can provide different messages when creating the item by clicking on Modify these values for this item only.
In order to add an image, a video or an audio file to a message, you can use a file that is already saved in your library (see how) or you can import a new file from another source (see how).
Note: The content of this field is not visible in the published quiz. This is used to write notes to help you manage the content or for collaboration with a colleague. It can help identify an item that you wish to note (such as something to check, complete, check copyrights for, etc.).
True or False type item
A true or false item asks the respondent to select one of two possible answers.
At the top and bottom of the page, you can see the Save button, to save the information you have entered, Cancel if you choose not to save the new information, and Preview to see how the item will appear when published. This last command allows you to see the item exactly as it will appear to the respondent.
Note that when you add an item to the library of a given project for which you have invited people to collaborate with you, this item will also be available for them to consult or modify as needed. What's more, if one of the people collaborating modifies an item, the modified version of the item will appear in all of the quizzes that use this item.
DEMO text and video for this item type
Three tabs are used to define the item: Content, Add-ons and Parameters.
CONTENT OF A TRUE OR FALSE ITEM
The Content tab is used to define what makes up the item.
Item title: Enter a meaningful name that will help you to find the item in your library. The item's title will appear in the Title column in the list of items. However, it will not appear when the item is shown to the respondent, nor when we look at a preview of an item that we are preparing.
Item type: The item type is True or False.
Text: Write the text for your question as it will be shown to the respondent. Use the editing tools as needed.
Correct answer: Click on the radio button to indicate which is the correct answer. Viewing the correct answer does not require the respondant to put in an answer.
Answer: A true or false item asks the respondent to select one of two possible answers
Feedback: Enter the text for the corresponding feedback.
NOTE: The feedback should be used to give a meaningful explanation or feedback other than Correct answer or Incorrect answer, because this general feedback is given automatically when the respondent submits the answer, whether or not you have written feedback for each possible response. You are not obliged to write feedback for every possible answer, but it is worth the effort because it adds to the teaching potential of the questions.
ADD-ONS FOR A TRUE OR FALSE ITEM
The Add-ons tab allows you to add complementary information to the item.
Add-ons 1 and 2: Enter the complementary information related to the question. Use the editing tools as needed. For example, you could give clues to help the respondent understand.
Media in the header: The header of an item can contain a descriptive text, a second line with descriptive text or one or more media files. Use the editing tools as needed.
Use the commands Add image file, Add audio file or Add video file to choose the media file or files for the header. You can use a file that is already saved in your library (see how) or you can import a new file from another source (see how).
PARAMETERS OF A TRUE OR FALSE ITEM
The Parameters tab allows you to define the specific attributes for this item type.
- Category: An item can belong, or not, to a category. To learn more about categories, see the page.
To associate an item with an existing category, choose a category from the drop-down menu. To associate an item with a new category, write a name for the category in the input field Add a new category as needed. The new category will be created at the same time as the new item and will be added to the library under My categories.
- Setting parameters for the item
- Weighting: Indicate the number of points given to the question.
- Automatically start media: Choose the appropriate option whether or not you want the selected media to start automatically in the Media in the header section, under the Add-ons tab. Your options are:
- Do not start the media: In this case, the respondent must start the media.
- Start the audio file and Start the video: The media file will start automatically as soon as the item appears to the respondent.
- Display correct answer: Choose whether or not to show the correct answer to the respondent. It might be pedagogically desirable to show the respondent the correct answer.
- Labels for the elements: Choose the label type that that the respondent will see on the left of each element in the published quiz. Your options are:
- Numbers: For example, 1), 2), 3), etc.
- Letters: For example, a), b), c), etc.
- None
- General messages in the preview language: The General messages appear when the respondent chooses to Submit the answer for correction (See). These messages are defined for all of the items of this type by the person responsible for the quiz (See My languages). By default, a Correct answer is marked in green, Incorrect answer is marked in red and Incomplete answer is marked in yellow. However, you can provide different messages when creating the item by clicking on Modify these values for this item only. In order to add an image, a video or an audio file to a message, you can use a file that is already saved in your library (see how) or you can import a new file from another source (see how).
Note: The content of this field is not visible in the published quiz. This is used to write notes to help you manage the content or for collaboration with a colleague. It can help identify an item that you wish to note (such as something to check, complete, check copyrights for, etc.).
Modify an item
- Display the list of items by clicking on Library at the top of the Netquiz Web page
OR
in the menu on the left, under the title Library, and click on My items. - Select the item that you wish to modify by clicking on the corresponding button.
- Move the cursor over the gear icon to display the list of commands. Click on Modify.
- Modify the content of the input fields.
- Click on the Save button to save changes or click on Cancel if you do not wish to save the changes.
NOTE : The Preview button allows you to see an item as it will appear to the respondent in the published quiz. To close the preview, click on the upper right corner of the window. See See a Web preview for more information.
Duplicate items
- Display the list of items by clicking on Library at the top of the Netquiz Web page
OR
in the menu on the left, under the title Library, by clicking on My items. - Select the item or items that you want to duplicate by clicking on the corresponding buttons.
- Move the cursor over the gear icon to display the list of commands. Click on Duplicate.
The item or items that have been duplicated will be added to the list.
NOTE : When an item's form is displayed, you can move the cursor over the gear icon in the top right of the form and click on Duplicate. When you are creating a quiz, it is also possible to duplicate an item (see).
Flag items
- Display the list of items by clicking on Library at the top of the Netquiz Web page
OR
in the menu on the left, under the title Library, and click on My items. - Select the item or items that you want to flag by clicking on the corresponding buttons.
- Move the cursor over the gear icon to display the list of commands. Click on Flag.
In the list of items in the library, the flagged items now have an orange star in the second-last column from the right. The orange star is used to flag an item or items to which you wish to draw a special attention, whether they are favourite items or items to complete or check.
From the list of items, you can click on the star next to an item to flag or unflag the item.
NOTE : When an item's form is displayed, you can move the cursor over the gear icon in the top right of the form and click on Flag. When you are creating a quiz, it is also possible to flag an item (see).
Add items to or remove items from a quiz
To add one or more items to a quiz:
- Display the list of items by clicking on Library at the top of the Netquiz Web page.
- Select the quiz that you wish to modify by clicking on the corresponding button.
- Move the cursor over the gear icon to display the list of commands and click on Add to a quiz. This will display a list that allows you to select the quiz.
In the list of items in the library, the selected items now have a hyperlink icon in the last column. This icon identifies an item that appears in one or more quizzes. Move the cursor over this icon to display the list of quizzes that contain this item.
NOTE : When the form for an item is displayed, click on the command Add to a quiz by moving the cursor over the gear icon at the top right of the form.
To delete one or more items from a quiz:
- Display the list of quizzes by clicking on Quizzes at the top of the Netquiz Web page.
- Click on the quiz that you want to modify; this will display the selected quiz on the left side of the page, with all the items it contains.
- Select the item or items in the list that you want to delete.
- Move the cursor over the gear icon in the top right of the page and click on Remove this item from quiz item from the quiz.
The item now removed from the quiz, but it can still be found in the library. If, however, you click on Move to recycle bin, the item will be removed from the library and from every quiz in which it has been used.
It is possible to retrieve an item from the recycle bin by clicking on Recycle bin in the Library menu, at the left of the page. The recycle bin contains all items that have not yet been permanently deleted.
NOTE : When you are creating a quiz, it is also possible to remove an item (see).
Import and export items
To import one or more items into the library of a project:
You must first compress any items that you wish to import from your computer into a .zip file. This is the only compression format that is compatible with Netquiz Web.
- Click on Library at the top of the Netquiz Web page. This will display the list of all items in the library on the left of the page.
- Within this list, move your cursor over My items. This will display the gear icon.
- Move your cursor over this icon. This displays the menu related to items.
- From this menu, click on Import elements. This opens a window in which you can select the items that you want to import from your computer.
- Click on the button Import.
The items will be saved to the library of this project. You will now be able to add them to quizzes for this project.
To export one or more items:
- Display the list of items by clicking on Library at the top of the Netquiz Web page
OR
in the menu on the left, under the title Library, by clicking on My items. - Select the item or items that you want to export by clicking on the corresponding buttons.
- Move the cursor over the gear icon to display the list of commands and click on Export XML.
The contents of the selected items is converted into files in XML format and transferred to your computer. You can now retrieve them in the usual manner.
NOTE : When an item's form is displayed, you can move the cursor over the gear icon in the top right of the form and click on Export XML. When you are creating a quiz, it is also possible to export an item (see).
See a Web preview of an item
- Display the list of items by clicking on Library at the top of the Netquiz Web page
OR
in the menu on the left, under the title Library, by clicking on My items. - Select the item that you wish to see in a Web preview by clicking on the corresponding button.
- Move the cursor over the gear icon and click on Web preview.
NOTE : When an item's form is displayed, you can move the cursor over the gear icon in the top right of the form and click on Web preview.
The Web preview will be displayed in a new browser window and Netquiz Web produces a simulation of the question that the respondent will see in the published quiz.
Print item's forms
- Display the list of items by clicking on Library at the top of the Netquiz Web page
OR
in the menu on the left, under the title Library, by clicking on My items. - Select the item or items that you want to print by clicking on the corresponding buttons.
- Move the cursor over the gear icon to display the list of commands. Click on Print.
NOTE : When an item's form is displayed, you can move the cursor over the gear icon in the top right of the form and click on Print. When you are creating a quiz, it is also possible to print an item.
Delete items
- Display the list of items by clicking on Library at the top of the Netquiz Web page
OR
in the menu on the left, under the title Library, by clicking on My items. - Select the item or items that you want to delete by clicking on the corresponding buttons.
- Move the cursor over the gear icon to display the list of commands. Click on Move to recycle bin.
Items in the recycle bin are not permanently deleted, but simply placed in the project's recycle bin. By using the Recycle bin menu, you can either retrieve items or delete them permanently.
NOTE : When an item's form is displayed, you can move the cursor over the gear icon in the top right of the form and click on Move to recycle bin. When you are creating a quiz, it is also possible to move an item to the recycle bin (see).
Organize my items using categories
Although is not essential for items to belong to a category, categories can help you organize your items.
Information about the categories is saved in the project's Library and can be used to organize all the items of the project.
Commands that apply to categories, such as Duplicate or Print, function in the same way as they do for other aspects of Netquiz Web.
List of categories
At the top of the Netquiz Web page, click on Library, then, in the menu on the left beneath the title Library, click on My categories.
The columns in the list:
- Code: A unique number given by Netquiz Web when the category was recorded.
- Title: Name of the category.
- Note: The content of this field is not visible in the published quiz. This is used to write notes to help you manage the content or for collaboration with a colleague. It can help identify an item that you wish to note, such as something to check, complete, check copyrights, etc.).
- Modification date: Date and time that the category was last saved.
See Using lists
Associate an item with a category
There are two ways to associate an item with a category:
- First create categories for your items (see)
OR - Assign a category when adding or modifying an item (under the Parameters tab. If the category has not yet been saved in the library, write a name for the new category in the field Create a new category.
Manage categories
At the top of the Netquiz Web page, click on Library, then, in the menu on the left beneath the title Library, click on My categories. This displays the list of categories.
From this page, you can add a new category, modify, duplicate, export, print or delete forms for categories.
See the gear icon above and to the left of the list of categories. When you move the cursor over this icon, a menu appears showing the functions available for managing categories.
Add a new category:
- Click on Add a new category, to the right of the title My categories.
- Enter the required information in the input fields:
Name of the category
Note : The content of this field is not visible in the published quiz. This is used to write notes to help you manage the content or for collaboration with a colleague. It can help identify categories that you wish to note, such as something to check, complete, check copyrights, etc.). - Click on the Save button to save the information or click on Cancel if you do not wish to save the form.
Modify a category:
- Select the category you wish to modify from the list of categories by clicking on the corresponding button.
- Move the cursor over the gear icon, above and to the left of the list of categories, and select Modify in the drop-down menu.
- Enter the changes in the appropriate input fields.
- Click on Save to save the changes or on Cancel if you do not want to save the changes.
Duplicate one or more categories:
- Select the category you wish to duplicate from the list of categories by clicking on the corresponding buttons.
- Move your cursor over the gear icon, above and to the left of the Categories list. Select Duplicate from the drop-down menu.
The duplicated categories will be added to the list, preceded by asterisks.
Export one or more categories:
- Select the category or categories you wish to print from the list of categories by clicking on the corresponding buttons.
- Move your cursor over the gear icon, above and to the left of the Categories list. Select Export XML from the drop-down menu.
Information concerning the selected category or categories will be saved in XML format. - You can retrieve the file using the usual method for your computer.
Print one or more categories:
- Select the category that you wish to print from the list of categories by clicking on the corresponding buttons.
- Move the cursor over the gear icon, above and to the left of the list of categories, and select Print in the drop-down menu.
- Print the document as you normally do with your computer.
Delete one or more categories:
- Select the category or categories that you wish to delete from the list of categories by clicking on the corresponding buttons.
- Move the cursor over the gear icon, above and to the left of the list of categories, and select Move to recycle bin in the drop-down menu.
The information concerning the selected category or categories has not been permanently deleted, but simply moved to the recycle bin. By using the Recycle bin menu, you can either retrieve or delete them permanently.
My terms for glossaries
In a project's library, in the section My terms, you can find the list of terms and expressions that you can use to create glossaries. This list of terms will be available to use in all the quizzes in a given project. You choose terms from this list when you want to prepare a glossary for any specific quiz (see).
When the quiz is published, a tab will be added to bar at the top of the page giving access to the Glossary at the end of the quiz. What's more, in every text input box, the glossary's terms and expressions are highlighted; when respondents move their cursor over a highlighted term, they will be able to see its definition in a window containing either text or a media file.
At the top of the Netquiz Web page, click on Library, then, in the menu on the left beneath the title Library, click on My terms.
The columns in the list are as follows:
Code: A unique code number assigned by Netquiz Web when the term is saved.
Term: A word or expression that you wish to highlight within the text of a quiz.
Variations: Other forms associated with the term. This can include synonyms or other grammatical forms (spelling variations, number, etc.). Unlike the glossary terms, the variations are not highlighted in the text.
Definition: This is the content the respondent will see that explains the term. Click on the appropriate radio button to enter the content.
Add text: Enter the text for the definition.
Add an image: Insert an image file saved in your library or imported from another location.
Add an audio file: Insert an audio file saved in your library or imported from another location.
Add a video: Insert a video file saved in your library or imported from another location.
Note: Comment related to a term when it was created or modified. The content of this field is not visible in the published quiz. This is used to write notes to help you manage the content or for collaboration with a colleague. It can help identify an item that you wish to note (such as something to check, complete, check copyrights for, etc.).
Modification date: Date and time that the term was last saved.
From this page, you can add a new term, modify, duplicate, export or delete a term's form.
Add a new term:
- Click on Add a new term
- Fill in the text input fields.
- Click on the Save button to save the information or click on Cancel if you do not wish to save the term.
Modify a term:
- From the list of terms, select the term you wish to modify category by clicking on the corresponding button.
- Move the cursor over the gear icon, above and to the left of the list of terms, and select Modify in the drop-down menu.
- Enter the changes in the appropriate input fields.
- Click on Save to save the changes or on Cancel if you do not want to save the changes.
Duplicate terms:
- Select the terms you wish to duplicate from the list of terms by clicking on the corresponding button.
- Move the cursor over the gear icon, above and to the left of the list of terms, and select Duplicate in the drop-down menu.
- The duplicated terms will be added to the list, preceded by an asterisk.
Export terms:
- From the list of terms, select the term you wish to export by clicking on the corresponding box.
- Move the cursor over the gear icon, above and to the left of the list of terms, and select Exporter XML in the drop-down menu.
- The forms for the selected terms will be converted into XML format.
- You can retrieve the XML file using the usual method for your computer.
Delete a term:
- From the list of terms, select the term you wish to delete by clicking on the corresponding box.
- Move the cursor over the gear icon, above and to the left of the list of terms, and select Move to recycle bin in the drop-down menu.
NOTE: Terms cannot be recovered from the recycle bin; they are permanently deleted.
Import terms:
It is possible to import terms by using the command Import elements. You will find this in the menu My items and in the menu for My quizzes.
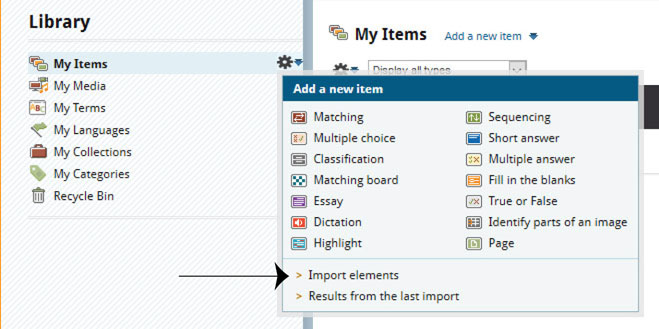
My media files
Media files include image, audio and video files that are saved in a project's library. You can use them to give a multimedia aspect to your Netquiz Web quizzes.
The following file formats are compatible with Netquiz Web:
GIF, PNG and JPEG for images
MP3 and MP4 for audio files
MOV for video files
To display the list of media files:
At the top of the Netquiz Web page, click on Library, then, in the menu on the left beneath the title Library, click on My media.
From this page, you can use all of the functions related to media files: Add new media, Modify, Flag, Print or Move to recycle bin.
The columns in the list are as follows:
Code: A unique code number assigned by Netquiz Web when the media file is saved.
-
Title: Name assigned by the user.
-
Type: Type of media file: Image, Audio or Video.
-
Description: Description of media file.
-
Note: Comment related to a media file when it was created or modified. The content of this field is not visible in the published quiz. This is used to write notes to help you manage the content or for collaboration with a colleague. It can help identify an item that you wish to note, such as something to check, complete, check copyrights for, etc.).
-
Modification date: Date and time that the media file was last saved.
-
Star icon: An orange star is used to flag a media file or files to which you want to draw a special attention. It could be files to check or modify. You can flag or unflag a media file by clicking on the star next to the item in the list or by using the command Flag for one or more items in the list.
Hyperlink icon: This icon indicates that this media file is linked to one or more other quizzes. When you move the cursor over the icon, a list appears showing the code of these quizzes.
See Using lists
Add new media
- Display the list of media files by clicking on Library at the top of the Netquiz Web page
OR
in the menu on the left, under the title Library, and click on My media. - Click on Add new media, to the right of the title My media.
- Fill in the text input fields.
- Click on the Save button to save the information or click on Cancel if you do not wish to save the changes to the form.
Modify the form of a media file
- Display the list of media files by clicking on Library at the top of the Netquiz Web page
OR
in the menu on the left, under the title Library, click on My media. - Select the media file that you wish to modify by clicking on the corresponding button.
- Move the cursor over the gear icon to display the list of commands. Click on Modify.
- Modify the content of the input fields.
- Click on the Save button to save changes or click on Cancel if you do not wish to save the changes.
Flag media files
- Display the list of media files by clicking on Library at the top of the Netquiz Web page
OR
in the menu on the left, under the title Library, and click on My media. - Select the media files that you want to flag by clicking on the corresponding buttons.
- Move the cursor over the gear icon to display the list of commands. Click on Flag.
In the list of media files in the library, the flagged media now have an orange star in the second-last column from the right. The orange star is used to flag a media file or files to which you wish to draw a special attention, whether they are a favourite media file or files to modify or check. From the list of media files, you can click on the corresponding star to either flag or unflag the file.
NOTE: When a media's form is displayed, you can move the cursor over the gear icon in the top right of the form and click on Flag.
Print the information concerning a media file
- Display the list of media files by clicking on Library at the top of the Netquiz Web page
OR
in the menu on the left, under the title Library, and click on My media. - Select the media file or files for which you want to print the information by clicking on the corresponding buttons.
- Move the cursor over the gear icon to display the list of commands. Click on Print.
For an image file, the file that will be printed will contain the image or images included in the file.
For an audio file or a video file, the file to be printed will show the file name and its ULR address.
NOTE: When a media files's form is displayed, you can move the cursor over the gear icon in the top right of the form and click on Print.
Delete media files from the library
- Display the list of media files by clicking on Library at the top of the Netquiz Web page
OR
in the menu on the left, under the title Library, and click on My media. - Select the media file or files that you want to delete by clicking on the corresponding buttons.
- Move the cursor over the gear icon to display the list of commands. Click on Move to recycle bin.
Files in the recycle bin are not permanently deleted, but simply placed in the project's recycle bin. By using the Recycle bin menu, you can either retrieve media files or delete them permanently.
NOTE: When a media file's form is displayed, you can move the cursor over the gear icon in the top right of the form and click on Move to recycle bin.
Use media files in a quiz
Media files can be inserted in various places in a quiz:
Within the text of an item;
As part of the content of some types of questions;
In the choice of answers for some types of questions;
In the feedback for all types of questions.
A media file can be chosen from among those already saved in the library (see how) or downloaded from another source, such as the Internet or a network (see how).
Add a media file to a text input field
Netquiz Web allows you to insert media files from your library into any text input field that offers an editing toolbar.
When you activate the full-screen mode by clicking on the full-screen icon, all of the editing tools will appear.
Figure Editing toolbar for the text input field, full-screen mode
There are three ways to add media files:
Add a media file
Add/edit an image
Add/edit other media files
The Add a mediaicon allows you to add a media file saved in your library to a text input field (see how). Once you have selected an image from the window showing the list of media files in your library, only the identifier (such as "M53") will appear in the text. The media file itself will only be visible when the quiz is published.
Other icons allow you to insert media files from another site into a text input field, by indicating the file's URL (see how):
-
Add/edit an image for media files.
-
Add/edit other media files for video, audio, flash, QuickTime, shockwave, Windows media, RealMedia and iFrame.
Note: Adding media files to a text input field can create problems with your page layout. Use the Web preview function for the item or quiz to check that the media files you have added give the result that you want.
My languages for My quizzes
The Netquiz Web user can work with the application's interface in either French or English. By default, quizzes can also be created in French or English. It is, however, possible to modify the texts comprising the framework of a quiz so that the quiz will appear in other language. If you wish the texts forming the framework of a quiz to be in another language, simply enter the translation of the messages into the text input fields on the language form.
When preparing a quiz, one of the parameters allows you to choose the language that you want from among those saved in the library (see).
NOTE: The current version of Netquiz Web only allows languages that are written from left to right.
To display the list of languages:
At the top of the Netquiz Web page, click on Library, then, in the menu on the left beneath the title Library, click on My languages.
The columns in the list are as follows:
Code: A unique number given by Netquiz Web when the language was saved.
Title: Name of language.
Note: Comment related to the language when it was added or modified. The content of this field is not visible in the published quiz. This is used to write notes to help you manage the content or for collaboration with a colleague. It can help identify an item that you wish to note (such as something to check, complete, check copyrights for, etc.).
Modification date: Date and time that the language was last saved.
See Using lists
Using the list of languages, you can add a new language or modify, duplicate, export, print or delete language forms.
To add a new language:
-
Click on Add a new language.
-
Fill in the text input fields.
-
Click on the Save button to save the information or click on Cancel if you do not wish to save the language.
Messages that you enter into the General messages section will appear by default in the published quiz as feedback for a correct answer, incorrect answer or an incomplete answer, when the respondent clicks of the Submit button. If you want to personalize the default feedback for an item, use the command Modify these values for this item only under the Parameters tab for the item, in the section Language for preview or publication of this quiz.
NOTE: Another way to add a new language is to duplicate an existing language, and then enter the translation into each of the text input fields. This approach can be simpler because you can see the content of all of the input fields and you only need to replace the content with the content in the new language.
To modify a language form:
-
From the list of languages, select the language you wish to modify by clicking on the corresponding button.
-
Move the cursor over the gear icon, above and to the left of the list of languages, and select Modify in the drop-down menu.
-
Enter the changes in the appropriate input fields.
-
Click on Save to save the changes or on Cancel if you do not want to save the changes.
Duplicate language forms:
-
Select the language you want to duplicate from the list of languages by clicking on the corresponding button.
-
Move the cursor over the gear icon, above and to the left of the list of languages, and select Duplicate in the drop-down menu.
The duplicated language will be added to the list, preceded asterisk.
NOTE: When a language's form is displayed, you can move the cursor over the gear icon in the top right of the form and click on Duplicate.
To export a language’s form:
-
Select the language you wish to export from the list of languages by clicking on the corresponding button.
-
Move the cursor over the gear icon, above and to the left of the list of languages, and select Export XML in the drop-down menu.
The language form that you select will be converted into XML format. -
You can retrieve the XML file using the usual method for your computer.
NOTE: When a language's form is displayed, you can move the cursor over the gear icon in the top right of the form and click on Export XML.
Print a language form:
-
Select the language that you wish to print from the list of languages by clicking on the corresponding button.
-
Move the cursor over the gear icon, above and to the left of the list of languages, and select Print in the drop-down menu.
NOTE: When a language form is displayed, you can move the cursor over the gear icon in the top right of the form and click on Print.
Move a language form to the recycle bin:
-
Select the language form that you wish to delete from the list of languages by clicking on the corresponding button.
-
Move the cursor over the gear icon, above and to the left of the list of languages, and select Move to recycle bin in the drop-down menu.
NOTE: Language forms in the recycle bin are not permanently deleted, but simply placed in the project's recycle bin. By using the Recycle bin menu, you can either retrieve or delete them permanently.
Version
The date of the Netquiz Web application software version is always indicated on the home page. When you click on this date, you will be automatically directed to help topic that describes the changes that were made with this updated.
Demonstration videos
Demonstration: Classification item type
A Classification-type item asks the respondent to categorize the elements, which can be words or images, into what looks like file folders. The tab on the folders is labelled with either text or an image.
Here is a quiz entitled Cinéquiz-français that contains a Classification item, and whose subject is Quebec actors, TV series and films. I will choose this item and edit its content.
Under the Content tab, I wrote a title for the item, and then stated the question in which I ask the respondent to file the names of TV series and films in which two well-known Quebec actors, Raymond Bouchard and Rémi Girard, had acted.
First, I click on STEP 1 – DEFINE THE FOLDERS. That is here, and as the name suggests, I define my folders. We can choose between four types of folders: Image/Image, Image/Text, Text/Image or Text/Text. The first term of the word pair determines the type of labelling on the tabs of my folders (whether I choose text or an image). The second term determines the nature of the elements to be put in the folders (text or image). For this example, I have chosen Image/Text, for I want my folders to be identified using a photo of the actor. The elements to file will be the names of TV series and films.
A Classification item can include from 2 to 6 folders. For this example, I have only two folders. For each of the folders, I can write a positive feedback that will be shown when the respondent has correctly placed all of the elements, and only the elements intended for this folder; negative feedback in case the folder contains at least one wrong element; and feedback for if the folder has no wrong elements, but is incomplete.
If I want to add another folder, I just have to click on the + button on the right side. Now I must choose an image from my library or from my computer to be used as the label for this file folder. Then I will write the feedback.
Now, I click on STEP 2 - EDITING FILE CONTENT. This is where we add elements that the respondent must place in each of the folders. In this example, the first folder already contains four elements. To add an element, we just need to click on the button Add an element. A new element entitled Element without text will be added to the list. By clicking on this text, a zone appears under the folder that allows me to modify the title of this element. Then I write the respective feedback depending on whether the respondent places the element in one folder or the other. These feedback messages are more precise than the ones associated with the folders because they are specific to the element itself.
I can move from one element to another, either by clicking on the elements within the folder, or by using the arrows placed above this zone.
To delete elements, you can check their boxes and then click on the Delete selected elements button, or click on Delete this element above in the element-editing zone.
As in the case of the other types of items, the Add-ons tab allows me to include additional information. For this question, I have not added any additional media or text.
This type of question includes, under the Parameters tab, in addition to Weighting, Automatically start media and Display correct answer, that are common to all the question types, a parameter that allows you to choose the orientation, either horizontal or vertical, of the elements to be filed. I kept the default value, Horizontal. This means that when the quiz is published, the elements to be filed will be one beside the other, above the files, and not one above the other.
To get a preview of how this item will appear and function after it is published, you just have to click on the Preview button on the top or bottom of this screen. So, this is what my Classification item will look like to the respondents, in the published quiz.
The respondent must slide each of the names of TV series and films into the appropriate file folder. When the respondent clicks on the Submit button, the elements that are in the correct folder will be shown in green. Otherwise, they will be red. The feedback specific to each element or each of the folders will be displayed if, of course, you wrote feedback.
And that was Classification-type items!
Demonstration: Create a new quiz
This tutorial explains how to create a new quiz with Netquiz Web.
In the Quizzes, section there are two ways to create a new quiz: I can either click on the tab Add a new quiz, above the menu that lists my quizzes, or use the tab Add a new quiz in the pop-up menu that appears when I move the mouse over My quizzes in the left-hand column.
As soon as I add a new quiz, its components will be shown in the left column. By default, the new quiz will be entitled Untitled Quiz and will have a title page and an end page. Right away, I can give my quiz a more meaningful title. For example, Quiz about Netquiz Web. You must not forget to click on the Save tab so that the changes will be recorded. On the editing page for the quiz, we can see that several parameters can be modified. For now, let’s keep the default values. Other help sections will help you understand what these values do. The Theme tab offers you several different styles. I will use the default theme.
I will now add a first question to my quiz. When I move my mouse over the title of the quiz in the left column, a pop-up menu appears and offers me 14 different types of question: Matching, Multiple choice, Classification, etc. Other help sections will give you more information about each type of question. For now, I will choose a question type that everyone is familiar with: True or False.
When the question that I have just added is highlighted in the left column, I will be able to edit the question in the right part of the screen. Under the first tab, Content, I write the name of my question, the text of the question, the choice of answers and the respective feedback. You must not forget to indicate which of the answers is the correct answer. The Add-ons and Parameters tabs allow me to fine tune and personalize my question. The other help sections explain in greater detail how to add questions.
As soon as a question is finished, I save it and I click on the Preview tab to see how the question will appear to my respondents when the quiz is published online.
Once I have finished preparing my quiz, I can publish it. First however, I must complete its title page by clicking here in the left column. This is the first page that the respondents will see when they go to the URL address of my quiz. The end page, however, is optional, so I will leave it empty.
And there we go! My first quiz is ready!
Demonstration: Dictation item type
A Dictation item asks the respondent to transcribe the content of a sound track or a video.
I have several items in my Cinéquiz-français quiz, including a dictation that can easily be recognised by its icon that represents a loudspeaker. I click on this item entitled Court Métrage “Nelligan. Profils et regards.” Émile Nelligan was a 19th century Québec poet.
Under the Content tab, I wrote the title of the item, and then the text in which I ask the respondents to listen to the short film and to write down the poem that they hear, in the answer field.
Under the text, in the Correct Answer input field, I put my transcription of the poem, which serves as the basis for the correction of the dictation. In order to avoid problems with the correction algorithm, it is best to use short dictations. A long text can be divided into shorter sections, which can be placed into separate dictation items.
Farther down, I can write feedback messages. The Positive feedback and Negative feedback fields should be used to give more meaningful feedback than just Correct answer or Incorrect answer, since this information will be given automatically when the respondent submits the item for correction, whether or not you have written feedback. By clicking in these text boxes, icons appear that will allow you to format your text.
Let’s now see what is under this Add-ons tab. In the top part of the window, there are two fields where I can insert additional information. They can be used for clues, extra help or additional information about the subject of this item. In this case, I used one the fields to indicate the source of the video that I used for the dictation. I even added a hyperlink to the CCDMD product page that contains this video.
A dictation always requires the presence of an audio file in order to hear the text. And so, I must insert either an audio or a video file in the section Media in the header. When I move the mouse over Add a video, a pop-up menu offers me two choices: choose either a file that is already in the library or import a new file from my computer.
Now I click on the Parameters tab. I leave the weighting default setting at one point. Farther down, I choose not to start the media automatically. In this way, the respondent can start it when he or she is ready. I also choose to allow the solution to be displayed.
One parameter lets me indicate how many points will be deducted for each word wrongly spelled; I wrote 0.05. You can use the value of your choice, but note that it is important to adjust the weighting in relation to the number of words in your dictation, in order to avoid cases where the respondent receives a note of 0 after having a single error in a long dictation, or 9/10 for a short sentence full of mistakes!
A final parameter lets me indicate whether I want the correction to take into consideration upper and lower case letters, as well as punctuation. Check one or the other of these options if you want these types of errors to be counted in the correction of the dictation.
Now I check the Web preview of my Dictation item.
The Solution button appears because, if you recall, I chose this option in the Parameters. If I click on the Solution button, the text of the dictation will appear in the lower part of the screen, under the heading, Solution.
The Submit button gives feedback that corresponds with the transcription that the respondent wrote in the field under the media:
- if the respondent did not write anything, the message Incomplete answer will appear in yellow in the lower part of the screen;
- if there are no errors in the dictation, the message Correct answer will appear in green, followed by positive feedback, if I had written feedback for this item;
- if there are errors in the dictation, the message Incorrect answer will appear in red, followed by negative feedback, if I wrote negative feedback. And finally, the text of the dictation appears with the spelling mistakes in red and underlined, red underlining indicates missing words, and words in red between square brackets to show extra words.
There you go! You are now ready to create your own Dictation item!
Demonstration: Essay item type
An Essay-type item asks the respondent to respond freely or express an opinion about the given subject.
The quiz that we now have on screen is about Quebec and international cinema. It includes one essay question.
In the field Item title, I wrote Your opinion matters. I could have just as well written Essay question, or anything else, since this title will not appear anywhere in the published quiz. However, it is very useful to me to have a meaningful title because it helps me find this question among all the others that make up this quiz.
In the Question text field, I invite the respondent to give his or her opinion on Quebec cinema.
In the Suggested answer field, I can either write a comment or an answer that will appear in the published quiz when the respondent clicks on the Solution or Submit buttons.
The fields that we just completed can be found under the Content tab. But like the other item types, the Add-ons tab allows me to add information such as clues or a short helpful text, an image or a video that will show above the text in the published quiz. For this item, I have added an image.
This type of question includes, under the Parameters tab, only the parameters that are common to all of the question types (Weighting, Automatically start or not the media and Display or not of the Solution button) in the published quiz.
Now, I will click on the Preview button to see how this item will appear in my published quiz. The image that I added under the Add-ons tab can be seen over the text and the field where the respondent must write his or her answer. When the respondent clicks on the Submit or the Solution button over the text, the suggested response will appear in the lower part of the screen, under the title Suggested answer.
Because there is not an automatic correction for this sort of question, unlike other types of items, your suggested answer will allow respondents to correct themselves by comparing this answer with theirs.
And that was the Essay item !
Demonstration: Export content from Netquiz Pro 4 into Netquiz Web
This tutorial will show you how to export the questions and quizzes from Netquiz Pro 4 into Netquiz Web.
First, I open the bank of questions and quizzes that were prepared using Netquiz Pro 4 (having the file format .npro). Next, in the File menu, I select Export in XML format. Then, I save the exported file to the desktop of my computer, so that I can find it easily. This can take a few seconds or more, depending on the quantity of material you have to export and the size of the media files that it contains. When this operation is finished, a window will appear that indicates the name of the exported file and the path showing where to find it. Then, I click on OK.
In order to import the file that I just exported from Netquiz Pro 4 into Netquiz Web, I must compress it into ZIP. format. To do this, I open the exported file. Then I select the two elements that it contains: the XML files and the media file — while pressing on the Shift key. Then I right-click with the mouse and select the function that lets me compress the selected files in ZIP. format.
Now, I open the Netquiz Web application. In the left column next to the sub-menu My quizzes, I select the option Import elements. I click on Choose file in order to find the compressed file on my computer. Then I click on Import.
And there you are! All of the files that were in the older .npro format are now imported into My quizzes, My items and My media.
In order to confirm that everything is in place, I click on My quizzes: the quiz entitled Thema is there. And when I check in the library, I can find all the freshly imported items, either by searching in the column Modification date, or in the column Category, because all the elements imported by Netquiz Pro 4 are automatically categorized by the name of the compressed file. When I click on My media, I can also find all the newly imported media in the My media list.
Demonstration: Fill in the blanks item type
A Fill-in-the-blanks item asks the respondent to complete a text by adding the missing words or expressions.
In my quiz entitled Multidiscipline, I have one Fill-in-the-blanks item that I named Past Continuous and Simple Past in a scientific report. I will click on this item so that I can modify it.
Under the Content tab, I wrote the title of this item, and then the text in which I ask the respondents to choose the appropriate past form of the verb from each of the drop-down menus that appear in the text.
Below, in STEP 1 - DEFINE THE TYPE OF BLANKS, I define the way in which the respondents will fill in the spaces:
- With the option Drag and drop, the respondents must choose the words or expressions that are shown above the text and slide them into the empty spaces in the text:
- With the option Drop-down menu (which I chose for this item), the respondents must choose, for each blank in the text, one answer from among those proposed in the drop-down menu;
- With the option Short answer the respondents must write their answer, without having clues, in the blanks that appear in the text.
Now we go to STEP 2 – ADD TEXT AND BLANKS. First I must add a text, and then create the blanks one at a time by choosing the expressions that I want to hide from the respondents, by clicking on the button Add a blank. A box appears under the text that allows me to edit this blank; I can add several good answers and several wrong answers. If the blank is of the Drop-down menu type, these good and bad answers will be among the potential answers in the menu. If the blanks are of the type Drag and drop, all of the options will be seen on top of the text. If this is a Short answer type of blank, the potential answers will be used in correcting the answers given by the respondent. In all of these situations, it is possible to create a feedback message for all of the good and bad answers. The wrong answers anticipated should reflect the types of errors the respondents are most likely to make. Give them feedback that will explain why they made this mistake. For each of the blanks in a Short Answer item, a general feedback message for all the unforeseen answers is required.
The arrows situated above the editing zone of a blank allow me to move from one blank to another without having to click on each blank in the text. This can be very helpful when I am revising my feedback messages, for example.
In order to delete blanks, I can either select a portion of the text that includes the blanks to be removed, then click on the Delete selected blanks button, or I can click on the button Delete this blank, placed over the blank-editing zone.
And like all the other types of items, the Add-ons button allows me to insert additional information. In the first field for additional information, I added some clues. In the second field, I added the source of the text. For this item, I did not add anything for Media in the header, but I could have added a text, an image or a video.
This type of item includes, under the Parameters tab, in addition to the parameters that are common to all of the question types (Weighting, Automatically start media and Display correct answer), a parameter that only applies to Fill-in-the-blanks items. This allows us to specify whether we want the correction of the respondent’s answer to take into consideration upper and lower case, or punctuation. For this item, I did not check either option.
Now, let’s look at the Preview to see how this item will appear in my published quiz. The additional information that I provided appears when the respondent clicks on the words Clues and Sources on the top part of quiz. Under the text of the question, we see the text with the blank spaces. There is a drop-down menu for each of the blanks.
I try out a few quick answers. And when I click on the Submit button, the feedback messages are displayed as they are in the other item types: Correct answer in green for a good reply and Incorrect answer in red otherwise, followed by either a green circle or a red square depending on whether the answer is valid or not. And finally, a feedback message that I wrote specifically for this answer.
And there you have the Fill-in-the-blanks item!
Demonstration: Highlights item type
A Highlight item asks the respondent to find certain elements in a text and highlight them with markers of different colours.
Here is the quiz, Recognising tenses of verbs, which contains an item entitled Highlight verbs in imperative and present tenses.
Under the Content tab, I wrote the title of this item, and then the text in which I ask the respondents to highlight verbs in the present tense in yellow, and verbs in the imperative tense in blue. In stating my question, I tell the respondent not to include either the spaces or the punctuation adjacent to the verbs they are highlighting, because the automatic correction will see this as an error. I also gave an example.
In Step 1, entitled DEFINE THE HIGHLIGHTER COLOURS, I define the two colours that I need for this item: a yellow highlighter for verbs in the present tense, and the blue highlighter for verbs in the imperative tense. Under each of the highlighters, I can write positive feedback that will be shown when the respondent has used the correct colour to highlight all of verbs and only the verbs from the requested categories, or negative feedback if the respondent has highlighted at least one expression that does not correspond to the verb of the required category, and the feedback Incomplete answer if he or she has neglected to highlight certain verbs of the given category. It is possible to define up to 9 different highlighter colours for a Highlight item.
Now I click on Step 2 - ADD TEXT AND HIGHLIGHTING. This step includes writing my text and then highlighting the present indicative verbs in yellow, and those in the present imperative in blue. To highlight a verb, I just have to choose the verb, being careful not to select spaces or punctuation that are adjacent to the verb. Then I click on Add highlighting. A field appears under the text that allows me to choose the appropriate highlighter colour. When I move the mouse over the little square, the two colours that I defined in Step 1 are available. I choose yellow, if a verb is in fact a present tense, or blue if the verb is imperative. However, a third colour, red, is automatically added to my list, with the comment Incorrect answer. It is thus possible to anticipate the errors that the respondents are likely to make, and to explain to them why they made these mistakes. In fact, for every highlighting, red or otherwise, it is possible to write a feedback message specific to highlighter colour that the respondent can use: positive feedback if the respondent highlighted the verb with the correct colour, or a negative feedback if not.
The arrows situated over the highlight-editing zone allow me to pass from one highlight to another without having to click on each one. This can be very useful when I am revising my feedback messages, for example.
To delete a highlight, I can either choose a part of the text that includes the highlighting to be deleted and then click on the Delete the highlighted sections button, or click on the Delete this highlight button, over the highlighter editing the zone.
And like all the other types of items, the Add-ons button allows me to insert additional information. In the first information field, I gave a clue about the forms of verbs. In the second box, I added a link to a language reference site. I did not add any media for this item.
This type of item includes, under the Parameters tab, in addition to the parameters that are common to all of the question types (Weighting, Automatically start media and Display correct answer), a parameter that allows me to indicate the number of points to be deducted for each incorrect answer. I wrote one tenth of a point. You can use the value of your choice, but note that it is important to adjust the weighting in relation to the number of potential wrong answers, in order to avoid cases where the respondent receives a note of 0 for a single error, or 9/10 despite having numerous mistakes!
Now I click on the Preview button to see how this item will appear once it is published. The Add-ons that I provided are accessible by clicking on the links on top of the screen, Verb forms and Language reference.
When the respondent clicks on the Submit button, each of the highlights that he or she made on the text (all of the sections that the respondent highlighted) will appear in a text box that corresponds with a highlighter colour. If the highlighting is of the correct colour, there will be a green circle before the section. Otherwise, there will be a red square. Feedback messages specific to each highlight or to each colour will appear if, of course, you wrote them!
Highlight items a great for language learning, but can be used for many other subjects as well. Your imagination is the limit!
Demonstration: Identify parts of an image item type
An Identify-parts-of-an-image type item asks the respondent to identify different sections of an image.
My quiz entitled Cinéquiz-français contains an Identify-parts-of-an-image item on the subject of Quebec film producers.
Under the Content tab, I wrote the title of this item, and in the question text I ask the respondents to identify the producers of the films represented in the images.
An option over the image allows me to choose a colour for the contours of the sections within the image. It is important to select a colour that contrasts with the image we have chosen. I chose black for the contours. Farther down, I have already inserted an image and indicated the sections. I will delete it by clicking on the "x" situated in the upper right corner of the image, in order to demonstrate how I proceeded. When we move the mouse over Add an image, we are given the option of taking an image from our Library or importing a new image from our computer. I will retrieve an image from my library; it’s called film_poster. It is an image made up of six movie posters that I put together using a graphic editing software.
Under the image, I identified each section that the respondent must identify within the image. My question asks the respondent to associate the name of the producers with the films represented by the posters that make up my image. I also could have defined the sections by using images (photos of the producers, for example), by choosing the option Image in the small drop-down menu. Each time that I define another section to identify, a small label is added to the top-left corner of the image. I must move this label to the appropriate part of the image. For each section that has been defined in this way, I can write two feedback messages: positive feedback if the respondent places the label in the right place, and negative feedback if not.
An Identify-parts-of-an-image item can include from 2 to 30 sections to identify.
Under the Add-ons tab, I did not write any extra information in the fields available, nor did I put anything in Media in the header.
This type of item includes, under the Parameters tab, in addition to the parameters that are common to all of the question types (Weighting, Automatically start media and Display correct answer), two special parameters. The first parameter gives you two options for how the sections to identify are displayed. You can choose Random order, which means that each respondent will see the list of film producers in a random order. If you choose Predetermined order, the respondents will see the list in the order in which you prepared it. I chose the second option. The second parameter allows you to choose the type of label (letters or numbers) that the respondent must place on the images. I chose Alphabetic.
Now I will look at a preview of how the respondents will see this item in the published quiz. Under my question statement appears the image with the black contour to separate the sections into which the respondents must put the labels that are below the image. The letter on each label corresponds with a film producer, and must be placed in the right section of the image. I quickly place the labels on the image, and then click on Submit. The sections that have been correctly identified have a green dot before them. Otherwise, they have a red square. Each section to be identified shows an appropriate feedback message, if I wrote one, of course.
And there you have the item, Identify parts of an image!
Demonstration: Matching board type item
A Matching-board item asks the respondent to find pairs of elements that go together within a sort of checkerboard. The elements can be texts or images.
Here is a quiz entitled Cinéquiz-français that contains a Matching-board item, and whose subject is characters from Quebec films. I will choose this item and edit its content.
Under the Content tab, I wrote a title for the item, and then stated the question in which I ask the respondent to match the photos of actresses and actors with the names of films in which they acted.
The way to edit a Matching-board item is quite similar to that of Matching items, since we are using pairs of elements. We put one element in the Element column and the other in the Associated Element column. The elements can be either texts or images, depending on what I choose in the drop-down menu above the columns. I have inserted photos of actresses and actors in the Element column, and the names of films in which they played in the Associated element column. And like Matching items, the last column allows us to write feedback for each pair of elements, as needed.
Matching-board items have two main differences in comparison with Matching items. First, Matching-board items have a Mask image column, which includes a small image for each pair of matching elements and will be used to hide the element and its matching element in the checkerboard. The column already contains a default image that works perfectly, but you can change it as needed. Second, the checkerboard must include 2, 4, 6, 8 or 10 pairs of matching elements in order to function. The small icons, x and +, at the end of each line allow you to either delete or add a pair of elements.
Under the Add-ons tab, I did not add anything for this item. I could have written the source of my photos in an information field, for example.
This type of question includes, under the Parameters tab, in addition to the parameters that are common to all of the question types (Weighting, Automatically start media and Display correct answer), some parameters that are special to Matching-board items:
- The parameter Background colour of the element and Background colour of the associated element allow you to add a background colour to the squares of the checkerboard. I chose white for the background of my photos and grey for the background of the film titles.
- The parameter Type of display for the elements offers two display options. If we choose the option Masked from the beginning, the squares of the checkerboard are hidden to start with, and the respondent must expose them by successively finding the elements that make up the pairs. In this way, the exercise is a sort of memory game. If we choose the option Not masked from the beginning, the squares of the checkerboard will not be hidden. This way, the respondent will cover them as he or she connects the matching pairs of elements. And so, the exercise resembles a Matching question.
I chose the second option for my item. Let’s click on the Preview button to see what the quiz will look like once it is published. My squares are all uncovered. The objective is to hide them by finding all the matching pairs. If I click on two squares that are not associated, nothing will happen. But if I click successively on two elements that are correctly associated, they become hidden. And so it goes until all the squares of the checkerboard are hidden.
And that explains Matching-board items!
Demonstration: Matching type item
A Matching item asks the respondent to match elements from one column with those in a second column.
In my quiz that deals with Quebec and international cinema, I have an item that asks the respondents to match actresses with the films in which they performed.
Under the Content tab, in the Item Title field, I wrote Hollywood Stars. This meaningful title helps me to identify this item from among the other questions in my quiz. I then state my question.
Now I must choose the type of elements that I want to be matched: texts in the left column with texts in the right column, or as in this case, images in the left column (photos of famous actresses) with the names of films in the right column.
When I have made my choice, I can add my pairs of items to match, one pair at a time, along with their respective feedback. Positive feedback will be displayed when the respondent correctly matches the actress with the film she played in, and negative feedback to be shown if the answer is wrong. A Matching item can include between two and 30 pairs of answers. Take note however, that it can become difficult for the respondents if there are too many pairs to match.
To add another pair to match, I just have to click on the [+] button to the right of each line of items. To add an element to the left column, I click on Add an image and then, in the pop-up menu that appears, I choose an image that I already have in my library, or I can import a new image.
In the same way as with other types of items, the Add-ons tab allows me to give additional information. For this question, I used two Add-ons fields: one for clues and the other for the source of my photos.
This type of question includes, under the Parameters tab, as well as Weighting, Automatically start media and Display correct answer, that are common to all the question types, a parameter that allows us to choose the type of label that will be shown on the left of each matching pair in the published quiz.
I now click on the Preview button in order to see what this item will look like in the published quiz, depending on the theme that I chose for my quiz. At the top of the page, the respondent can click on the Clue and Source fields to discover what I have written in these add-ons. Under the text of the question, there are two columns: the photos of famous actresses on the left are in the same order that I had given them when I edited the question. On the other hand, the film titles on the right are in random order. To answer, I drag the items in the right column to the appropriate spot and leave them. Once I have finished matching the items, I click on the Submit button in order to see the feedback at the bottom of the page.
See you next time!
Demonstration: Multiple answer type item
The Multiple-answer item allows the respondent to choose more than one of the several potential answers offered.
This quiz entitled Cinéquiz-français contains a Multiple-answer item about Denys Arcand.
The Content tab allows me to write the title of this item and then state the question, in which I ask the respondent to mark in which of the listed films Denys Arcand performed.
Then I added the choice of answers below. These answers can be in either Text or Image format. I chose to use text, because the answers are film titles. A Multiple-answer item can include from 2 to 30 choices. In this this item, I present 10 film titles, out of which four are marked as Correct answer. In the right column, I wrote pertinent feedback messages that explain why the answer is correct or incorrect.
Now let’s see the Add-ons tab. In the Media in the header section, I inserted a photo of Denys Arcand. In the Add-on 1 field, I wrote the source of this photo, which happens to be Wikipedia.
This type of item includes, under the Parameters tab, in addition to the parameters that are common to all of the question types (Weighting, Automatically start media and Display correct answer), three special parameters. The first allows me to choose whether the order of the potential answers will be random or predetermined. The second offers a choice of labels that will appear to the left of the each potential answer in the published quiz. And finally, the last offers two options: ask the respondent to give either all of the correct answers, or give at least one of the correct answers from among the choices offered. I left the default option requiring all of the correct answers.
Now let’s click on the Preview button to see how the respondents will see this item in the published quiz. The photo of Denys Arcand occupies a good part of the top of the page. The source of this photo is seen directly underneath. And below, as the question asks, I checked all of the films in which I believe Denys Arcand acted. Then I click on the Submit button to see the correction of my answer. There is a green circle before each of my correct answers, and a red square before my wrong answers. For each answer, I receive an appropriate feedback message.
And that was the Multiple-Answer item!
Demonstration: Multiple choice type item
A Multiple-choice item asks the respondent to choose one correct answer from among several possibilities.
Here is a quiz on the subject of cinema. It already contains one multiple-choice item.
Under the Content tab, first I give a meaningful title to an item about film music. Then I state the question. Below, I can add from 2 to 30 potential answers, and match the answers with appropriate feedback. The Feedback fields are used to write an explanation or give meaningful feedback, rather than simply say Correct answer or Incorrect answer, because this general feedback is automatically given when the test is submitted, whether or not you have written feedback for each choice. You are not obliged to write feedback for each choice, but it is worth the effort for this enhances the teaching aspect of our quizzes. For this item, the answers are in text format but the small drop-down menu situated over the Answer column also offers you the possibility of using Image format. In the column Correct answer?, you must indicate which is the correct answer from among the choices by clicking on the appropriate button.
As in the case of the other types of items, the Add-ons tab allows me to include additional information. For this question, I have not written anything in the add-ons fields, but I have included a photo of Clint Eastwood. He was the main actor in a film directed by Sergio Leone. Our musical excerpt is, of course, from the soundtrack of this film, and is the subject of this question. To add a media file, we can either choose one that is already in our Netquiz Web library or import a new file from our computer.
This type of item includes, under the Parameters tab, in addition to the parameters that are common to all of the question types (Weighting, Automatically start media and Display correct answer), two special parameters. One allows us to choose the order in which the answers will be shown (Random or Predetermined). The other lets you choose the type of label that will be shown on the left of each matching pair in the published quiz.
I have now finished creating my item, and I will look at a preview of it in order to see how it will appear to my respondents when I publish the quiz online. The question asks which film the musical excerpt comes from. First I play the excerpt. Do you recognize it? It’s the music from the film For a Few Dollars More. I choose this answer, then I click on Submit. At the bottom of the screen, I have the confirmation that I chose the right answer. And the feedback tells me more about this film, which is part of the famous trilogy directed by Sergio Leone.
And that was the Multiple-choice item!
Demonstration: Page type item
Here is my Cinéquiz-français quiz. As we can see in the left column, this quiz is made up of 19 items divided into two sections. The first section is entitled International cinema, and the second is called Quebec cinema. When a quiz is divided into sections, the title of the section will always appear in the top part of the published quiz, above the content.
At the beginning of each of the sections, I have inserted a page, which will introduce the content of the section. A Page item does not include any questions or possible answers. It is simply a text page into which we can add media. Page-type items can serve different purposes. For example, they can be used to write lessons, give explanations or instructions. After this, we add a series of exercises prepared using the other item types.
As we can see under the Content tab, first I wrote the title of this item and, farther down the page, I added the text for the page.
Under the Add-ons tab, in the section Media in the header, I added a decorative image that will appear above the text of this page in the published quiz.
Under the Parameters tab, I can associate this item with a category. There is only one parameter that I can modify, Automatically start media. In this case, I will leave the default setting.
Now I check the preview of my page. The decorative image can be seen, with the text on the page just below.
And that was the Page item!
Demonstration: Sequencing type item
A Sequencing item asks the respondent to place a group of elements in order. The elements can be either texts or images.
In my quiz entitled Multidiscipline, I have a Sequencing item on the subject of geography. I will click on this item in order to modify it.
Under the Content tab, I wrote the title of this item, and then the text in which I ask the respondents to place six countries in descending order in terms of their Human Development Index.
Then I add one of the elements to put in order, after having chosen, in a drop-down menu, whether I will use texts or images. For this item, I chose to use text elements. I added six elements for which I wrote the names of six countries in descending order according to their Human Development Index. For each of the elements, I can write positive feedback, which will show when the respondent places the element in the right order, or negative feedback in the opposite case. It is pointless just to write Correct answer or Incorrect answer, since this message will show automatically when the quiz is corrected, whether or not you have written a message. For this item, I wrote, as positive feedback for this item, the Human Development Index of the country along with its ranking.
A Sequencing item can include from 2 to 30 elements to be placed in order. Please note that too many elements can become difficult to manipulate in the Web version of this question.
As with all the other types of items, the Add-ons tab allows you to supply additional information. For this item, I have added links to two online encyclopaedias that offer information on this subject. Farther down, in the Media in the header section, I inserted a short text and an image that will appear over the text of the question in the published item.
Under the Parameters tab, I have the option of associating this item with a category. I placed it in the Multidiscipline category, which I had created previously. It is useful to categorize items in this way, to make it easier to find them in our library. And farther down, in addition to the parameters that are common to all of the question types (Weighting, Automatically start media and Display correct answer), this type of item offers a parameter offering you to choose the type of label that will appear on the left of each element in the published quiz. I chose to use numbers, which is an appropriate for Sequencing questions.
Let’s see a preview of how my quiz will appear when it is published. The two information sources I inserted in the Add-ons are on top of the screen. The text and image that I’d also added can be seen on top. Then we have the question statement, followed by the elements that the respondent must put in order. I answer the question by dragging and dropping the countries in the correct order. When I have finished, I click on Submit. Depending on my answer, either the message Correct answer will appear in green or Incorrect answer will appear in red after each of the elements, followed by either a green circle or a red square indicating whether the order is valid or not. Under each element, a positive or negative feedback message will appear that has been composed specifically for each element.
And there you are, the Sequencing item!
Demonstration: Short answer type item
A Short-answer item asks the respondent to write a short answer to a given question.
Here is a quiz entitled Multidiscipline containing a Short-answer item entitled Past participle agreement.
Under the Content tab, you find a field for writing the title of the item and another for stating the question. In this item, I ask the respondents to conjugate the past participle of a verb.
Under the question statement, we can give any answers, good or bad, that we imagine the respondents might give for this question. For this item, I have anticipated three answers: agreement of the past participle with a feminine singular subject, the word elle (which is the correct answer); agreement with the masculine singular, with the word air (which is the most frequent error); and the infinitive (not conjugated) form of the verb, for those who don’t understand the concept of past participle agreement. For each of these potential answers, I have written a pertinent message. A text box at the bottom of the screen also allows me to compose a general message for all of the responses that I had not anticipated.
Now I go to the Add-on tab. In the first field for additional information, on top, I indicated the source of the sentence, which I took from a quiz about past participles created by the CCDMD. Farther down, in the zone Media in the header, I added a purely decorative image.
This type of item includes, under the Parameters tab, in addition to the parameters that are common to all of the question types, a parameter that is specific to this type of item, which asks if you wish the corrector to take upper and lower case letters, and punctuation into consideration. For this item, did not click either option.
This type of item includes, under the Parameters tab, in addition to the parameters that are common to all of the question types (Weighting, Automatically start media and Display correct answer), a parameter that is specific to this type of item, which asks if you wish the corrector to take upper and lower case letters, and punctuation into consideration. For this item, did not click either option.
Let’s now take a look at a Preview of how this item will appear in the published quiz. At the top, the word Source is clickable. It shows the information that I wrote in the More Information field under the Add-ons tab. The decorative image, which I put in the section Media in the header, appears above the question statement. The respondent must write his or her answer in the text box under the question statement. I wrote the word choquée in the feminine singular form, because the past participle agrees with the word elle.
And what does the correction say? I get the message, Correct answer, written in green. My answer is preceded by a green circle. If I had given a wrong answer, I would have received the message Incorrect answer, in red and it would have come after a red square. The feedback message that I wrote for this answer is shown below.
And that was the Short-answer item!
Demonstration: True or False type item
A True-or-False item provides only two options in response to a question.
My quiz, Cinéquiz-français, contains a True-or-False item entitled Cet obscur objet du désir. I click on this item in order to modify it.
Under the Content tab, I wrote the title of this item, and then the question text in which I ask the respondents whether it is true or false that Luis Buñuel gave the role of Conchita to two different actresses who alternately assumed the role throughout the film Cet obscur objet du désir.
The two choices, True and False, are already written by default. You can modify the options (Yes or No, for example). I indicated the correct answer by clicking on the appropriate radio button. In the right-hand column, I wrote feedback messages and added, for respondents who want to learn more, a link to Wikipedia.
Now let’s move to the Add-ons tab. I did not use the two Add-on fields for this item, but I could have given clues, help, the source, etc.
In the section, Media in the header, I inserted a photo of the producer Luis Buñuel next to a poster for the film Cet obscur objet du désir.
Now, let’s see the Parameters tab. In addition to the parameters that are common to all of the question types (Weighting, Automatically start media and Display correct answer), this item type offers a parameter that lets you choose the type of label that will appear to the left of each element in the published quiz. For this item, I chose letters of the alphabet.
I will now preview how this item will appear and function in the published quiz. Under the image that I added as complementary information, and the question statement, are the options, True and False. I click on True, then on Submit. The message Correct answer appears in green, followed by a green circle to the left of the answer I chose. The positive feedback message that I wrote under the Content tab appears below.
And there you have the True-or-False item!
Netquiz Web Installation
If you need help, send this page to your web hosting provider, so that the provider can prepare the server and transmit instructions to you regarding the steps required for installation.
1. Use decompression software to unzip the file contents from the file netquizweb_installation.zip, which you have downloaded from the site http://www.ccdmd.qc.ca/catalogue/netquiz-web. The unzipped folder contains the file Lisez-moi_NetquizWeb.html and a directory entitled nqw.
2. If you work with a Web hosting service and you need help, send them a copy of the file Lisez-moi_NetquizWeb.html, so that they can prepare the server and then send you the information that you will need in order to proceed to the next steps.
If you install Netquiz Web on your own Web server or a server that you are familiar with, you should create a MySQL database dedicated to the Netquiz Web application software.
NOTE: The Netquiz Web database must not be shared with the database of other applications.
The MySQL user for this database must have permission to perform all the following operations: Select, Insert, Update, Delete, Index, Create temporary tables, Execute, Create, Alter, Drop, Lock tables, References and Create routine.
3. Find the file config.inc.php in the nqw directory. Open it using text- or code-editing software. For each of the variables, write the values that you were given by your Web hosting service (or the values that you have defined when you created the database). WRITE THESE VALUES BETWEEN THE APOSTROPHES (' ') that you find at the end of the lines:
Network address of the database Web server
define('DB_HOST', ' ') ;
Web server database port
define('DB_PORT, ' ') ;
Name of the Netquiz Web database
define('DB_NAME', ' ') ;
Netquiz Web database username
define('DB_USER', ' ') ;
Netquiz Web database password
define('DB_PASSWORD', ' ');
Email address that will be displayed to identify the sender of emails sent automatically by Netquiz Web to the users
define('EMAIL_FROM', ' '); (Note: Ideally this address should not be your personal email address, but rather an address reserved for Netquiz Web.)
Return email address in case of non-delivery of email
define('RETURN_PATH', 'support@ccdmd.qc.ca');
4. Using File Transfer Protocol (FTP) software and the access information that you were given, upload the nqw directory (which you took from netquizweb_installation.zip) from your computer to the Web server. The fileLisez-moi_NetquizWeb.html does not need to be transferred to the Web server, unless you wish to save it in this location.
5. Make sure that the Web host has permission to write in the following nqw subdirectories:
- /ressources/journaux
- /ressources/medias
- /web
In Windows, make sure that all of the “IIS_IUSRS” and “USERS” users have permission to modify any of the directories. You can modify these permissions by clicking on the directory (while you are connected to the Web server), right clicking on the directory, then on Properties, and then on Security. At this point you can manage permissions for the directories.
On Linux, you can modify these permissions by using your FTP software. Make sure that the Apache Web server is configured to accept .htaccess files. You can ask your Web host to make these modifications for you, if necessary.
6. Write the directory ULR address of your installation of Netquiz Web in the address bar of your browser, followed by /app/install.php. Then follow the installation instructions that are displayed on your screen.
If you have questions or experience technical problems, contact technical support at soutien@ccdmd.qc.ca.